Ok, so lets rock this out wiki style. Once we get some info compiled, we can paste it all in one good thread and I'm sure Inda would fix us up with a sticky. Post up with any tips, tricks, or E bike trivia.
The e series KDX200 introduced in 1989 was the first water cooled kdx200 to hit the floors. The bike was completely redesigned from the previous years C-3 model. It continued on with the KIPS technology, however the design differs from the earlier models, as well as the later models (H-series) bikes. It is said by many that the E series engine is one of the best trail motors ever built. The power delivery is very smooth, with a surprising amount of torque. The engines are very very reliable, running uncounted hours on a single top end.
The breakdown of 200 E bikes goes like this; (fine print disclaimer: borrowed information, origin unknown)
1989: KDX200-E1, heavily redesigned with liquid cooled engine, rear disc brake, different frame, improved suspension, etc.
1990: KDX200-E2, available with lime green frame and plastic or sky blue frame and white plastic
1991: KDX200-E3, last year for KDX200 available with lime green frame and plastic or sky blue frame and white plastic
1992: KDX200-E4, last year for full sized KDX with damping rod forks
1993: KDX200-E5, KDX200 receives upside down (USD) forks, 41mm inner tubes
1994: KDX200-E6
Some subjects for discussion....
Kips valves
suspension
parts availability
jetting
modding
and whatever else you guys can think of.
more to come
1989 - 1994 KDX200 (E Series) general information
-
Julien D

- KDXRider.net

- Posts: 5858
- Joined: 07:53 pm Nov 07 2008
- Country: USA
- Contact:
-
blimpman

- Supporting Member II

- Posts: 221
- Joined: 07:05 pm Oct 23 2007
- Country:
- Location: Central Florida
-
92kdxRider
- Supporting Member
- Posts: 84
- Joined: 04:38 pm May 04 2010
- Country:
- Location: High Bridge, NJ
Don't remember if this applies just the E-series bikes or both E and H series, but any year KX500 front end is a complete bolt on (as per Inda  ) and if I'm not mistaken you can re-use your kdx calipers and brake lines too. Obviously you'd want a newer set of forks, shoot for 01 and up if memory serves. I've got a KX500 front suspension search set on my Ebay account just for this purpose
-
BobbyZ
- Supporting Member
- Posts: 89
- Joined: 06:13 am Nov 30 2009
- Country:
one myth I've seen around here is that the e series can't run a over bore piston.One of these days when I get my bike me and a garage all on the same continent I'll mic all the cylinders I have.But The biggest issue is cylinder wall clearance between the center power valve where it rides inside of the cylinder.IIRC its pretty simple to go up too 2 mm over with with just a bore and replate as I did with the first motor FRP did for me years ago.While I cant vouch for his work these days I am hanging onto this cylinder as the port job really woke the beast up.At the time I was on a quest for the most power in the 200 class. So I also had another motor that had some more serious reworking done with the center valve and some welding and since joining the site I have meant to dig it out of my parents garage but I just have yet to have the chance.I do recall that it ran a piston that was available at the time(15 years ago or so)and was in the 220 ish cc range.Unfortunately I had a seizure just after break in and shelved the project due to funding at the time.I never fully looked into what the cause was,or if it was a design flaw because I currently cant find anyone running much if any over bore on a e series.
Hopefully by the spring I'll be settled in enough in one place to get back to tinkering with the old girl and at that point I'll mic and document everything along with further testing on big bores for the e series if anyone wants to tag along
Hopefully by the spring I'll be settled in enough in one place to get back to tinkering with the old girl and at that point I'll mic and document everything along with further testing on big bores for the e series if anyone wants to tag along
-
SS109

- KDXRider.net
- Posts: 5799
- Joined: 05:11 am Aug 23 2009
- Country: USA
- Location: Tucson, AZ, USA
- Contact:
Yes, full sized. There was also 50, 80, and 125cc versions which were not full sized bikes.moto_psycho wrote:"1992: KDX200-E4, last year for full sized KDX with damping rod forks "
full sized?
Youtube Channel: WildAzzRacing
AZ State Parks & Trails OHV Ambassador - Trail Riders of Southern AZ
Current KDX: '98 KDX220
Old KDX: '90 KDX200 -White/Blue
'11 GasGas EC250R
AZ State Parks & Trails OHV Ambassador - Trail Riders of Southern AZ
Current KDX: '98 KDX220
Old KDX: '90 KDX200 -White/Blue
'11 GasGas EC250R
-
BobbyZ
- Supporting Member
- Posts: 89
- Joined: 06:13 am Nov 30 2009
- Country:
http://kdxrider.net/forums/viewtopic.php?t=8972
a link to juliend's thread on aftermarket/yz pegs for the e series
a link to juliend's thread on aftermarket/yz pegs for the e series
-
92kdxRider
- Supporting Member
- Posts: 84
- Joined: 04:38 pm May 04 2010
- Country:
- Location: High Bridge, NJ
-
Julien D
- KDXRider.net
- Posts: 5858
- Joined: 07:53 pm Nov 07 2008
- Country: USA
- Contact:
-
bholmes
- Member
- Posts: 3
- Joined: 02:11 pm Jan 16 2012
- Country:
- Location: Parkersburg, WV
Pipe Mod
SORRY, I CAN"T FIGURE OUT HOW TO EMBED PICS
Spose I could chip in. I'm new, but I have fooled with bikes alot and had a pristine '90 KDX200 White edition back when I was a teen and I just recently bought another KDX200 and am In the process of rebuilding it. Anyhow, the thing about the stock KDX expansion chamber is that it was designed with quietness in mind. Why? Duno, my best guess is because it was a dualsport bike over seas and had to comply with dB limits. Regardless, the expansion chamber itself has a sort of silencer in it. It has a perforated baffler material and is packed with fiber glass. If you cut the pipe apart and remove this baffle and packing you can have a pipe that performs nearly as well as an FMF pipe but for $250 less. Now here's you're WARNING- it's not an easy mod. I'm pretty intense and capable but it was not a fun job. obviously be familiar with a welder before you start cutting. So here we go!
Tools: Hack saw, Hammer, long slender punch or flat tipped screwdriver you don't mind killing, welder (mig preferably), pliers
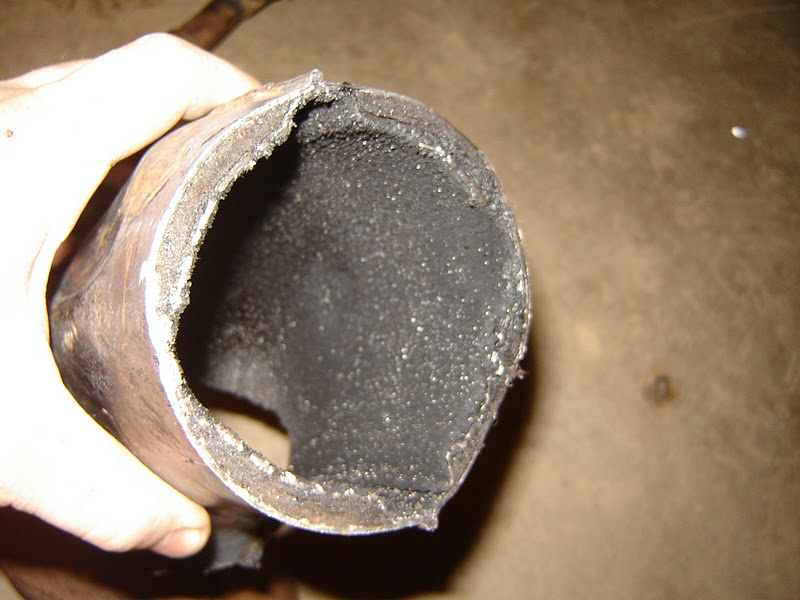
First you need to find the spot welds around the pipe. There are two rings of spot welds around the expansion chamber and you will want to saw through the center of these tack welds to make them easier to break when pulling your baffle out. Also it is good placement for being able to access all the baffle material.

Once you find the tack welds make a line running through these welds to help guide your sawing. After that's laid out make a mark with a nail or your screwdriver in the paint (See the shiney verticle line on my pipe?). This will be used to help line up your pipe later to weld it up.
Now go ahead and saw away! This is what you should end up with

See that nasty baffle junk in there?!
Now begin using your screw driver and pliers to loosen the baffles and pull them out. It will be hard work and MESSY! I highly advise you do this on some cardboard you can throw away later otherwise you'll make a huge mess like I did that's really hard to clean up.

Again, it takes a while but you can do it! This is what should come out leaving you with a nice clean spanny chamber when you pull the fiberglass out (kinda comes out in the process).
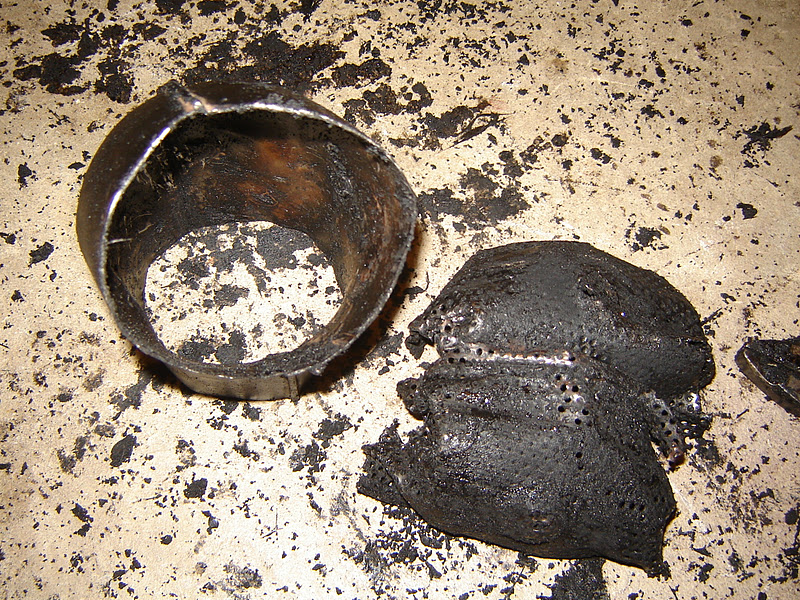
You will have to do this with all three parts of the pipe, but for me, the middle was the hardest part.
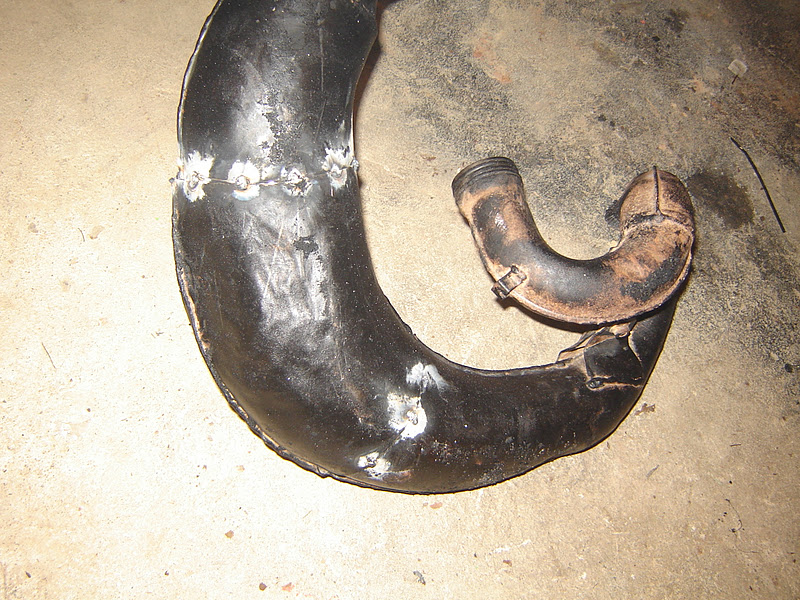
Now once you get all that crap out, it's a good time to take a hammer and a large piece of tubing and hammer some dents out if your pipe is dented like mine.
That being done it's time to line up your previous scribe mark and the former weld lines and tack weld it.
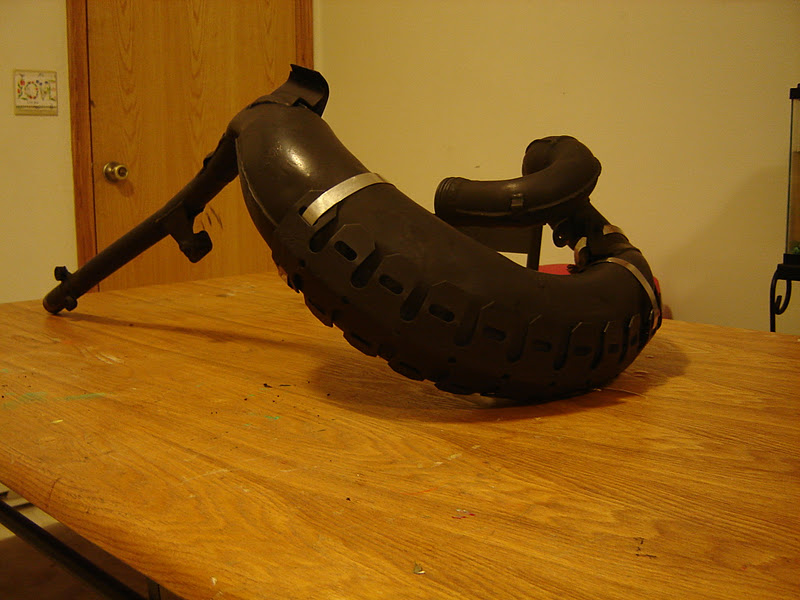
Next you'll need to clean and degrease your pipe and probably yourself. Now it's time to weld it completely up. If you're like me you'll also want to grind your embarassing welds a little. Then I used VHT black paint for 1000 some degrees from advance auto and then cured it in the oven when the wife is asleep and here's the final product
Now remember you might have just affected your jetting! This should be a pretty big improvement. Now, this is not my original idea, the idea is taken from justkdx.dirtrider.net, but the pictures and write up are my own original work. Enjoy!
Spose I could chip in. I'm new, but I have fooled with bikes alot and had a pristine '90 KDX200 White edition back when I was a teen and I just recently bought another KDX200 and am In the process of rebuilding it. Anyhow, the thing about the stock KDX expansion chamber is that it was designed with quietness in mind. Why? Duno, my best guess is because it was a dualsport bike over seas and had to comply with dB limits. Regardless, the expansion chamber itself has a sort of silencer in it. It has a perforated baffler material and is packed with fiber glass. If you cut the pipe apart and remove this baffle and packing you can have a pipe that performs nearly as well as an FMF pipe but for $250 less. Now here's you're WARNING- it's not an easy mod. I'm pretty intense and capable but it was not a fun job. obviously be familiar with a welder before you start cutting. So here we go!
Tools: Hack saw, Hammer, long slender punch or flat tipped screwdriver you don't mind killing, welder (mig preferably), pliers
First you need to find the spot welds around the pipe. There are two rings of spot welds around the expansion chamber and you will want to saw through the center of these tack welds to make them easier to break when pulling your baffle out. Also it is good placement for being able to access all the baffle material.
Once you find the tack welds make a line running through these welds to help guide your sawing. After that's laid out make a mark with a nail or your screwdriver in the paint (See the shiney verticle line on my pipe?). This will be used to help line up your pipe later to weld it up.
Now go ahead and saw away! This is what you should end up with
See that nasty baffle junk in there?!
Now begin using your screw driver and pliers to loosen the baffles and pull them out. It will be hard work and MESSY! I highly advise you do this on some cardboard you can throw away later otherwise you'll make a huge mess like I did that's really hard to clean up.
Again, it takes a while but you can do it! This is what should come out leaving you with a nice clean spanny chamber when you pull the fiberglass out (kinda comes out in the process).
You will have to do this with all three parts of the pipe, but for me, the middle was the hardest part.
Now once you get all that crap out, it's a good time to take a hammer and a large piece of tubing and hammer some dents out if your pipe is dented like mine.
That being done it's time to line up your previous scribe mark and the former weld lines and tack weld it.
Next you'll need to clean and degrease your pipe and probably yourself. Now it's time to weld it completely up. If you're like me you'll also want to grind your embarassing welds a little. Then I used VHT black paint for 1000 some degrees from advance auto and then cured it in the oven when the wife is asleep and here's the final product
Now remember you might have just affected your jetting! This should be a pretty big improvement. Now, this is not my original idea, the idea is taken from justkdx.dirtrider.net, but the pictures and write up are my own original work. Enjoy!
-
Julien D
- KDXRider.net
- Posts: 5858
- Joined: 07:53 pm Nov 07 2008
- Country: USA
- Contact:
-
bholmes
- Member
- Posts: 3
- Joined: 02:11 pm Jan 16 2012
- Country:
- Location: Parkersburg, WV
-
bholmes
- Member
- Posts: 3
- Joined: 02:11 pm Jan 16 2012
- Country:
- Location: Parkersburg, WV
Couldn't tell you honestly. Over the stock pipe it just has more all over. I've not got to ride it yet and it's been YEARS (atleast 10) since I have rode another KDX. My old bike had an FMF on it back in the day, but I can't afford a pipe currently so this is my solution. I'm not a fan of DG's stuff in the fourstroke world, but I don't recall how they are in the two stroke world. I won't even be able to compare it to stock since the bike didn't run when I got it. I'm doing the pipe mod, air box mod, reeds and jetting it and it's got a silencer so it should run pretty good when I'm done. Pondering a flywheel weight too because I'm wanting to get back into single trackFrysk wrote:Nice pics, thinking of doeing this myself to but how does a gutted pipe perform in comparison to a DG pipe?
More torque or more at high rpm?
-
1989KDXNH
- Member
- Posts: 4
- Joined: 08:28 am Oct 26 2017
- Country: NH USA
Re: 1989 - 1994 KDX200 (E Series) general information
bholmes,
Excellent write up on the kdx exhaust.
FYI. If you drill all the spot welds, and cut off half the pipe leaving the majority of it intact you don't need alignment marks, and the baffle comes our fairly easy.
Excellent write up on the kdx exhaust.
FYI. If you drill all the spot welds, and cut off half the pipe leaving the majority of it intact you don't need alignment marks, and the baffle comes our fairly easy.