Bottom end frozen
-
Dekon
- Supporting Member II

- Posts: 674
- Joined: 07:54 am Jun 26 2012
- Country:
- Location: Rhode Island
Re: Bottom end frozen
Inside the cases are the crank bearings and transmission bearings. There is also a bushing in there I replaced. The other bearing are in the right side case, but you can to those from clutch cover. I replaced those also because it was easier working on them. A trick I learned on the blind bearings(I didn't have a small enough puller) was to use some wet paper and jam it through the bearing using a punch. Just kept hammering the wet paper in there and the blind bearings will pop off. Someone on here had mentioned it, I was amazed how good it worked.
-
Tedh98

- Supporting Member II
- Posts: 1576
- Joined: 01:08 pm Mar 20 2009
- Country:
- Location: Atlanta, Georgia
- Contact:
Re: Bottom end frozen
I was able to use a couple of different materials to get the bearings out: blind bearing removalDekon wrote: A trick I learned on the blind bearings(I didn't have a small enough puller) was to use some wet paper and jam it through the bearing using a punch. Just kept hammering the wet paper in there and the blind bearings will pop off. Someone on here had mentioned it, I was amazed how good it worked.
-
Friedom
- Supporting Member I

- Posts: 803
- Joined: 08:46 pm Nov 22 2015
- Country:
Re: Bottom end frozen
I love this site.
I didn't see that challenge coming at all, but what a set of solutions!
So what's the secret to diy clutch basket, conrod, etc holders when tightening this down? I used an impact drill to loosen clutch nuts and whatnot, but don't want to go that route on reassembly. Cloth between gears?
I didn't see that challenge coming at all, but what a set of solutions!
So what's the secret to diy clutch basket, conrod, etc holders when tightening this down? I used an impact drill to loosen clutch nuts and whatnot, but don't want to go that route on reassembly. Cloth between gears?
-
Tioli

- Supporting Member I
- Posts: 267
- Joined: 06:57 am Jul 19 2014
- Country: Tasmania AUS
Bottom end frozen
When I first started to rebuild motors I started with cloth. Then moved on to aluminium as its way softer than metal. Now I take them off with a rattel gun and do up one lower setting.
What that is as far as torquing it down I have no idear, maybe it's wrong.
What that is as far as torquing it down I have no idear, maybe it's wrong.
2001 KX125 with a 1997 KDX Tioli Hp motor
My KDX journey starts at the bottom of this page:
http://www.trials.com.au/forum/viewtopi ... &start=160
Trials.com.au / Forum / All about...me! / My long time friend the prancing horse / page 9
My KDX journey starts at the bottom of this page:
http://www.trials.com.au/forum/viewtopi ... &start=160
Trials.com.au / Forum / All about...me! / My long time friend the prancing horse / page 9
-
Friedom
- Supporting Member I
- Posts: 803
- Joined: 08:46 pm Nov 22 2015
- Country:
Re: Bottom end frozen
I've broken gear teeth trying that in the past, but it was with a hardened screw driver. Cloth has merit, I'll give it a shot.Tioli wrote:When I first started to rebuild motors I started with cloth. Then moved on to aluminium as its way softer than metal. Now I take them off with a rattel gun and do up one lower setting.
What that is as far as torquing it down I have no idear, maybe it's wrong.
-
Tedh98
- Supporting Member II
- Posts: 1576
- Joined: 01:08 pm Mar 20 2009
- Country:
- Location: Atlanta, Georgia
- Contact:
Re: Bottom end frozen
You can put the transmission in 4th or 5th gear, lock the rear tire from moving and you can then tighten or loosen the clutch, crank or flywheel nuts. I've heard that some just use the brake to lock the rear tire, but I've never had that really work for me. I've got an aluminum rod that I snake through the sprocket and spokes and then rest it on the top or bottom (depending if tightening or loosening) of the swingarm to hold the tire in place.
As I'm rebuilding an engine, I will hand tighten all those high torque nuts and get the engine back in the bike. With the chain on, I'll then lock the rear tire and then tighten them all to spec. A lot easier than trying to do it with the engine on the bench.
As I'm rebuilding an engine, I will hand tighten all those high torque nuts and get the engine back in the bike. With the chain on, I'll then lock the rear tire and then tighten them all to spec. A lot easier than trying to do it with the engine on the bench.
-
Friedom
- Supporting Member I
- Posts: 803
- Joined: 08:46 pm Nov 22 2015
- Country:
Re: Bottom end frozen
Thank you sir, I will keep that in mind! Otherwise you've got an engine that wants to roll over, too.
-
Friedom
- Supporting Member I
- Posts: 803
- Joined: 08:46 pm Nov 22 2015
- Country:
Re: Bottom end frozen
For story, read on. For questions - jump to last paragraph.
Ok here's the update - I'm ready to split the cases. Everything in the transmission area looks wonderful. Glorious clean oil, looks like 80 wt gear oil. That's refreshing to find on this engine!
Then I opened the magneto and a combination of white fluffy stuff, rust, mud and fluid came out. I call it engine puke, the colors were all there. It's pretty corroded in there, but a good spray cleaning got the majority of the chunks out.
Magneto puller worked the way it should, stator is off after I stripped one screw then slotted it. (Dremel FTW).
All of the case bolts are out, and I think I'm ready to split(big moment for me, never done). Just need to find 5 and 6mm bolts of correct lengths and start wrenching.
Questions: If there's surface corrosion and gunk on some of the flywheels, should I buy a replacement crank shaft entirely?
Same question for magneto and stator?
I'm planning to clean them both up with soda blasting, but with a crank rebuild I should be fine, right?
Also, what is the recommended gasket maker for reassembling the cases? I have permatex ultimate gasket maker grey and threebond. Either of these suffice? My manual doesn't specify(that I've seen).
-
Tioli
- Supporting Member I
- Posts: 267
- Joined: 06:57 am Jul 19 2014
- Country: Tasmania AUS
Bottom end frozen
Without seeing any pictures this is what i would do as its similar to how I found mine just not quite as bad.
If it make spark then it’s all good but don’t disturb the coils to much
Clean up all the metal parts as you wish. Now that they are all leached clean the surfaces are very susceptible to re corroding. I tend to cover everything with Penatrol which is 4 times thinner than water, creeps in, clear, rust protectant and not a coating that’s thick.
Check your mating surface between flywheel and crank. if it’s good then leave it. If it’s so so give it a few laps with thin valve cutting compound and if it’s all pitted see if you can bring it back?
Where the wires come out of your cases I would cover with glued heat shrink and supporting zip ties to stop water getting in there.
Good coating of grease on gasket if you intend to be in and out of there.
There is a proper case bond that every manufacture has. I have used Yamaha Bond but I think there is Kawasaki Bond also. Problem with yammi bond is it dries within a minute or so, so you have to do it all in one planed go.
While you are at it check if you have weeping from the steel baring supports moulded into the side cases. A small tag can be just under the surface and you may see weeping. If so clean up, rough up, leach and cover with a lump of Devcon or your US epoxy equilivent
Now this is my approach and I'm not qualified to suggest
It’s all covered somewhere in my signature link
2001 KX125 with a 1997 KDX Tioli Hp motor
My KDX journey starts at the bottom of this page:
http://www.trials.com.au/forum/viewtopi ... &start=160
Trials.com.au / Forum / All about...me! / My long time friend the prancing horse / page 9
My KDX journey starts at the bottom of this page:
http://www.trials.com.au/forum/viewtopi ... &start=160
Trials.com.au / Forum / All about...me! / My long time friend the prancing horse / page 9
-
Friedom
- Supporting Member I
- Posts: 803
- Joined: 08:46 pm Nov 22 2015
- Country:
Re: Bottom end frozen
Thanks!
So in supporting the DIY tradition, I'm still ready to split the case halves (puller I borrowed doesn't have long enough arms), I'm going to donate a magneto cover to the cause. Just ordered a new one for $10 shipped, and now I have something that will fit the case perfectly, and can drill a hole in the center to put a push or pull setup to push the crank out or pull it back in. May have to reinforce it a little to hold that kind of pressure, I'm excited to see how this goes!
Update:
I used the engine case bolts, since they're longer, and put a steel plate inside the stator cover to widen the load, then ran a bolt through to a washer and nut and put an open end wrench inside to hold the nut in place while tightening.

After tightening cautiously for awhile, a shape started emerging through the stator cover: the shape of the metal piece underneath reinforcing it.

I've decided to change strategies. I found some 75mm m6 bolts to make the gap larger. I'd love to just use a large steel or aluminum plate with holes drilled matching the stator cover as a template, but I haven't found one yet.
I'm hoping to find a cheap solution, and document it for other people without a welder.
Last edited by Friedom on 10:33 am Dec 03 2015, edited 1 time in total.
-
Friedom
- Supporting Member I
- Posts: 803
- Joined: 08:46 pm Nov 22 2015
- Country:
Re: Bottom end frozen
So what's wrong with using a pipe of suitable size, washer and the flywheel nut to pull the left case together?
-
Tedh98
- Supporting Member II
- Posts: 1576
- Joined: 01:08 pm Mar 20 2009
- Country:
- Location: Atlanta, Georgia
- Contact:
Re: Bottom end frozen
Friedom wrote:I'm hoping to find a cheap solution, and document it for other people without a welder.
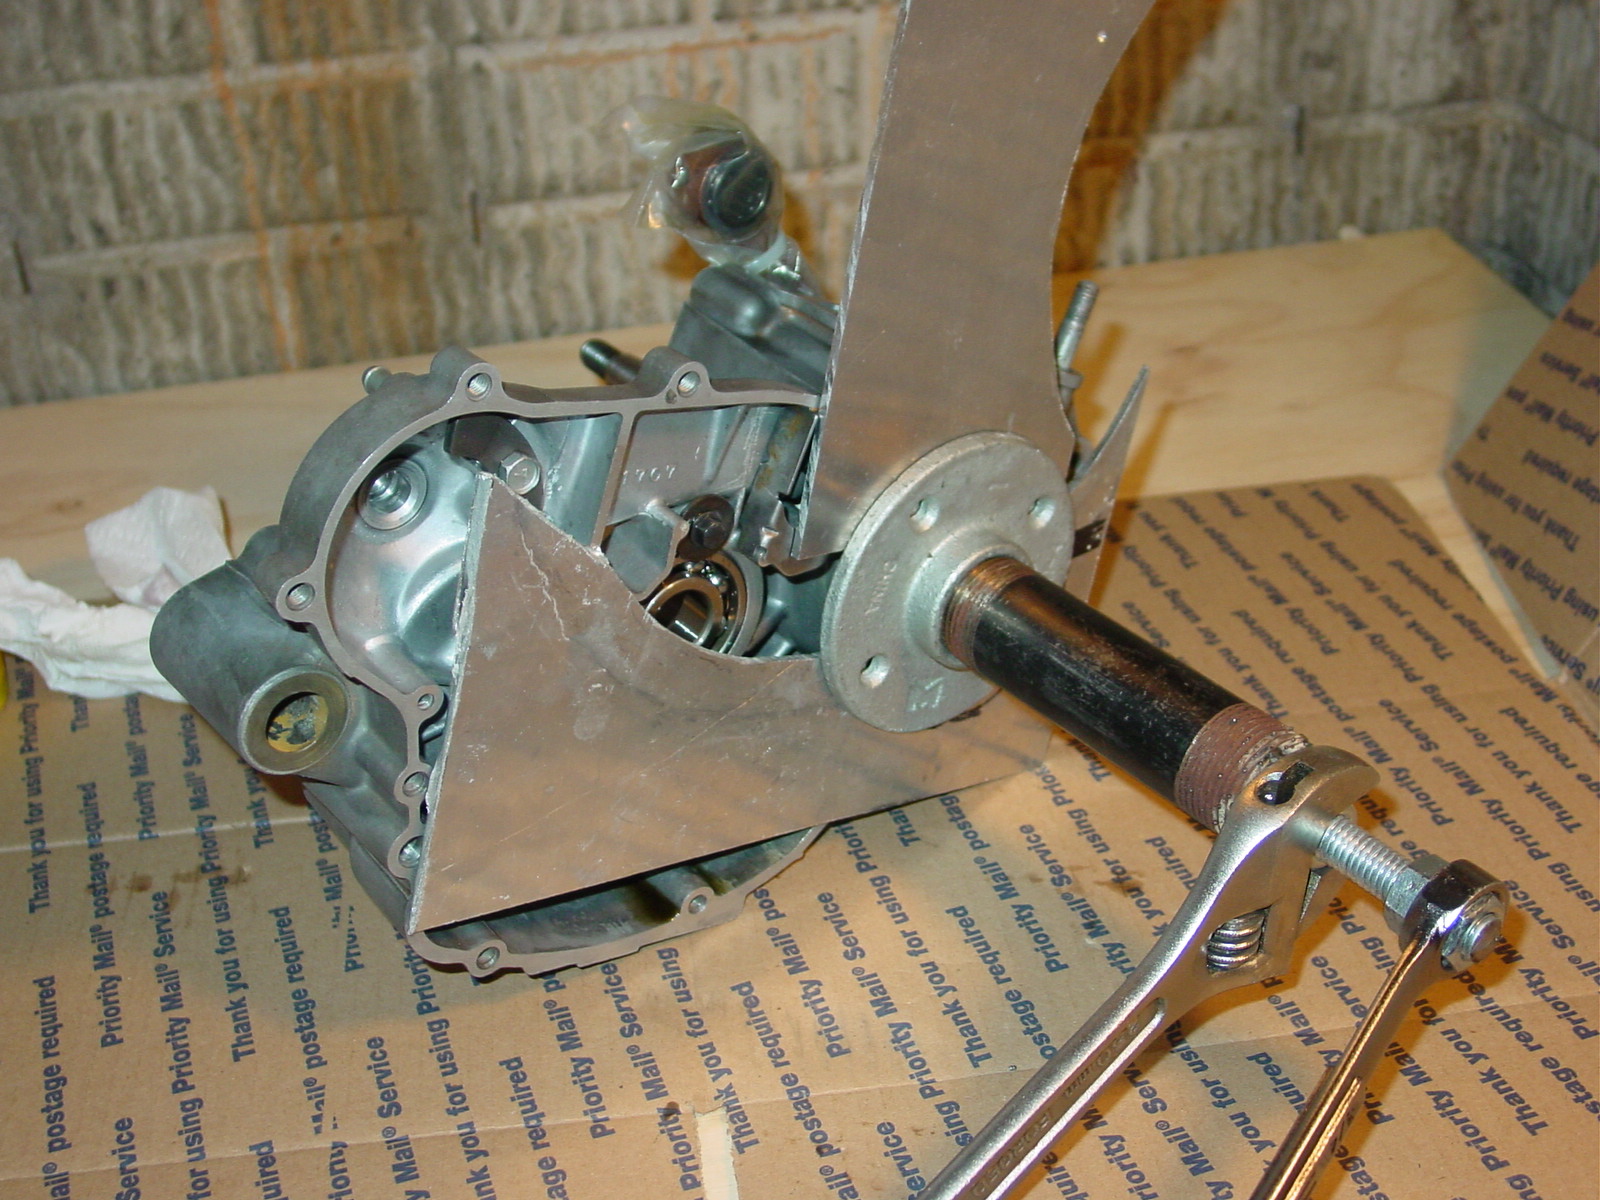
Cheap could wind up costing you more in the end. Just go to one of the chain auto shops and rent the puller. Or I got mine at HF for not much. I've used on for some other things I would have never thought of, so it has become even cheaper over the long run.
The biggest concern I would have with using something cobbled together is that you mess up the threads on the end of the crank. As you can see in this picture, the puller uses a fitting with a point that fits into a dimple on the end of the crank. The threads remain untouched.

-
Tedh98
- Supporting Member II
- Posts: 1576
- Joined: 01:08 pm Mar 20 2009
- Country:
- Location: Atlanta, Georgia
- Contact:
Re: Bottom end frozen
I've used something similar:Friedom wrote:So what's wrong with using a pipe of suitable size, washer and the flywheel nut to pull the left case together?
But I've got to say that the heated "slug" method works way better. You don't need to a 1/2 of a crank like I did. I just had it laying around. I would think that whatever you use, you want it to have some decent mass so it holds the heat well. In some of the Ken O'Connor videos you can see what he uses.
[youtube][/youtube]
-
Tedh98
- Supporting Member II
- Posts: 1576
- Joined: 01:08 pm Mar 20 2009
- Country:
- Location: Atlanta, Georgia
- Contact:
Re: Bottom end frozen
Was there any pitting on the crank where the seals make contact?Friedom wrote:Questions: If there's surface corrosion and gunk on some of the flywheels, should I buy a replacement crank shaft entirely?
Same question for magneto and stator?
I'm planning to clean them both up with soda blasting, but with a crank rebuild I should be fine, right?
Also, what is the recommended gasket maker for reassembling the cases? I have permatex ultimate gasket maker grey and threebond. Either of these suffice? My manual doesn't specify(that I've seen).
I've always used Yamabond 4. I just wish they sold it in a smaller/cheaper size since I never use much and it has a shelf life.
-
Friedom
- Supporting Member I
- Posts: 803
- Joined: 08:46 pm Nov 22 2015
- Country:
Re: Bottom end frozen
Good question. I don't have the cases split yet to find out. I'm sending the crank off to millennium technologies with the cylinder to get it rebuilt. We'll see how it goes.Tedh98 wrote:Was there any pitting on the crank where the seals make contact?Friedom wrote:Questions: If there's surface corrosion and gunk on some of the flywheels, should I buy a replacement crank shaft entirely?
Same question for magneto and stator?
I'm planning to clean them both up with soda blasting, but with a crank rebuild I should be fine, right?
Also, what is the recommended gasket maker for reassembling the cases? I have permatex ultimate gasket maker grey and threebond. Either of these suffice? My manual doesn't specify(that I've seen).
I've always used Yamabond 4. I just wish they sold it in a smaller/cheaper size since I never use much and it has a shelf life.
-
Friedom
- Supporting Member I
- Posts: 803
- Joined: 08:46 pm Nov 22 2015
- Country:
Re: Bottom end frozen
Thanks. I realize it could cost more as I'm exploring options, but I was hoping in that process to narrow down what would work to help out the next guy in a way that the final cost would be low and done with easy materials. While there's likely no substitute for the right tool, I think long enough (75mm) m6 bolts and a 1/4" sheet of steel or aluminum with a 8 or 10mm push bolt going through the center then a nut would do the trick. Might have to grind the bolt to somewhat of a point to keep it centered as you said.Tedh98 wrote:
Cheap could wind up costing you more in the end. Just go to one of the chain auto shops and rent the puller. Or I got mine at HF for not much. I've used on for some other things I would have never thought of, so it has become even cheaper over the long run.
The biggest concern I would have with using something cobbled together is that you mess up the threads on the end of the crank. As you can see in this picture, the puller uses a fitting with a point that fits into a dimple on the end of the crank. The threads remain untouched.
I just haven't found a plate to use yet.
Edit: uh, I just described the puller you pictured, but with a sheet of thick metal instead of the forged puller arms. SMH
It really is easier to buy a tool, and cheaper enough to rent and return. I borrowed my brother's puller, but the arms weren't long enough. Then the DIY monster kicked in.
-
Friedom
- Supporting Member I
- Posts: 803
- Joined: 08:46 pm Nov 22 2015
- Country:
Re: Bottom end frozen
Dude. Why is this video not everywhere?Tedh98 wrote:I've used something similar:Friedom wrote:So what's wrong with using a pipe of suitable size, washer and the flywheel nut to pull the left case together?
But I've got to say that the heated "slug" method works way better. You don't need to a 1/2 of a crank like I did. I just had it laying around. I would think that whatever you use, you want it to have some decent mass so it holds the heat well. In some of the Ken O'Connor videos you can see what he uses.
[youtube][/youtube]
You just blew my mind. I suddenly want to do this myself again. How hot do you get the slug?
-
Tedh98
- Supporting Member II
- Posts: 1576
- Joined: 01:08 pm Mar 20 2009
- Country:
- Location: Atlanta, Georgia
- Contact:
Re: Bottom end frozen
I believe this method was outlined in manuals a long time ago. I got onto it by watching the Ken O'Conner videos.Friedom wrote:Dude. Why is this video not everywhere?
You just blew my mind. I suddenly want to do this myself again. How hot do you get the slug?
I just set the crank half in front of my heat gun for around 10 minutes. I tried measuring the temp with a laser thermometer gun, but I think the surface was too shiny. The reading didn't make sense.
I wouldn't worry too much about how hot to get your "slug", the resistance of the bearing will tell you when the inner race has expanded.
I would suggest practicing on your old bearings and crank before doing it with new/rebuilt parts.
-
Tioli
- Supporting Member I
- Posts: 267
- Joined: 06:57 am Jul 19 2014
- Country: Tasmania AUS
Bottom end frozen
The heated slug is new to me but heating and freezing in general is the only way I find that you get that satisfying clunk as the cranks or bearings drop into place.
My question is
Why did he put a spacer in the right case befor he dropped the crank in? Most cranks are pulled against the right bearing and the left is just where it sits. Now he has gone to all that trouble of expanding the right bearing, dropped the crank in then will have to pull it further when cold whilst doing the right nut up. This will pull on both left and right inner bearing races which will make them bias to one side and be the friction point.
If you want a motor to spin freely then heat it by all means but the end desire is to do that so the crank goes in with out touching anything and lands in its final resting place first time all centered. If you want your motor to give then rest it in a happy spot and not scued (smilie scratching head)
Last edited by Tioli on 10:01 pm Dec 04 2015, edited 1 time in total.
2001 KX125 with a 1997 KDX Tioli Hp motor
My KDX journey starts at the bottom of this page:
http://www.trials.com.au/forum/viewtopi ... &start=160
Trials.com.au / Forum / All about...me! / My long time friend the prancing horse / page 9
My KDX journey starts at the bottom of this page:
http://www.trials.com.au/forum/viewtopi ... &start=160
Trials.com.au / Forum / All about...me! / My long time friend the prancing horse / page 9
-
Tedh98
- Supporting Member II
- Posts: 1576
- Joined: 01:08 pm Mar 20 2009
- Country:
- Location: Atlanta, Georgia
- Contact:
Bottom end frozen
I did that to center the crank in the cases. I have yet to see a factory installed crank centered. Some are close, but most are either all the way to the left or right. There doesn't seem to be any rhyme or reason to where the crank is positioned. Centering it just seemed to be the right thing to do.Tioli wrote:My question is Why did he put a spacer in the right case befor he dropped the crank in?
I never moved the crank after getting the cases together.Tioli wrote:dropped the crank in then will have to pull it further when cold whilst doing the right nut up. This will pull on both left and right inner bearing races which will make them bias to one side and be the friction point.