Page 2 of 8

Re: KDX Restoration X 2

Posted: 03:49 pm Jan 28 2018
by ericr
6 Riders wrote:One more thing.....do you have an impact driver? That is the type you hit with a hammer.....They do wonders for stuck screws, nuts and etc.

Sent from my BLN-L24 using Tapatalk
I do have one - bought it in 1971, back when engine cases were held together with screws.

Re: KDX Restoration X 2

Posted: 05:04 pm Jan 28 2018
by david
ericr wrote:
6 Riders wrote:One more thing.....do you have an impact driver? That is the type you hit with a hammer.....They do wonders for stuck screws, nuts and etc.

Sent from my BLN-L24 using Tapatalk
I do have one - bought it in 1971, back when engine cases were held together with screws.
Hated those damn screws on my old Elsinore.


Sent from my iPhone using Tapatalk

Re: KDX Restoration X 2

Posted: 10:51 pm Jan 28 2018
by ericr
6 Riders wrote:I have one small suggestion..... don't pc the swingarm. I have one bike that I pc'd and one that I polished (or removed the factory pc) down to bare aluminum. The polished swing arm looks way better by far, over the pc'd swingarm......just my 2ยข....

Sent from my BLN-L24 using Tapatalk
I like how polished swingarms look, but It seems like a lot of effort to maintain that polished look. I first thought of powdercoating the swingarms black like new Betas. My neighbor with the Beta said that's a bad idea because as soon as you scratch it, you see aluminum. I'm thinking of powdercoating in an aluminum color. My reasoning is, that way, when it gets scratched, it won't be too noticeable. Does that make sense, or is it still a bad idea to powdercoat swingarms?

Re: KDX Restoration X 2

Posted: 11:19 pm Jan 28 2018
by KDXGarage
Any thoughts on stripping it down, then green Scotch Brite finish, then clear coat paint?

Re: KDX Restoration X 2

Posted: 01:09 am Jan 29 2018
by ericr
Jason wrote:Any thoughts on stripping it down, then green Scotch Brite finish, then clear coat paint?
After that suggestion by 6 Riders, I read up on raw vs. powdercoated swingarms - thanks 6 Riders. You guys are right, I think I'll go with raw rather than powdercoat.

I've known that PC can be a problem with aluminum. All it takes is a scratch, and aluminum will start oxidizing under the coating until it bubbles and lifts off.

So, now I'm trying to figure out how best to keep it raw. I'll have to file or disk sand any major scratches. After that, there seems to be a couple options;

Glass bead blast vs. Soda blast vs. Vapor blasting
And then, I would like a brushed effect on the outer face, so the choices are - Red scotchbrite, then grey scotchbrite, or blocking with wet-dry sandpaper.
And after that, clear coat, or ACF-50, or ProtectaClear, or what?

That's what an hour on the interweb will get you - confusion and more options to consider. Why do I do this to myself?

Re: KDX Restoration X 2

Posted: 11:57 pm Jan 29 2018
by John_S
Check out the way this guy cleans this aluminum frame and swing arm.


Re: KDX Restoration X 2

Posted: 10:27 am Jan 30 2018
by 6 Riders
I used a wire wheel on a drill and went to town. I wasn't worried about the brushing effect. It came out very nice, hasn't oxydized in 3 years, stays shiny and I don't even notice the brush marks

Sent from my BLN-L24 using Tapatalk

Re: KDX Restoration X 2

Posted: 05:26 pm Jan 30 2018
by ericr
John_S wrote:Check out the way this guy cleans this aluminum frame and swing arm.

That's what I'll do - thanks. Just ordered aircraft paint stripper and scotchbrite pads.

KDX Restoration X 2

Posted: 09:35 pm Jan 30 2018
by ericr
I figured out a replacement for Photobucket. I'm using Google's Blogger and just dump images there. Then, right click the image you want and copy the link address. Then, in the post here, click on "Img" in the menu bar and paste the copied link between the image tags. To see photos full size, right click, then select, "Open image in new tab." This will take you to the blog.

Here's a couple photos. The first is just the 2 cylinders and the weisco pistons before shipping to Millennium for plating.

Image

Next is the shipment to RB Designs. I starting packaging the heads and carbs before thinking I should take some photos. I'm also shipping the axle, new bearings and the KDX and KX lower t's and stems. I tried the new aluminum cleaning process and I like it. I used Eagle Mag wheel cleaner and red Scothbrite pads, Then I used a citrus cleaner to make sure they were fully degreased. Finally, I put them in a conversion bath for 1 minute. This is an alodine oxide coating. I kinda like it - it's a bit gold in color and won't require any maintenance. The coating will self-heal scratches. I'll do the upper clamps and bar mounts to match. I might do the same for the swingarm. It is not shiny though. If you want a highly polished finish, don't do this. This is also an excellent prep for paint or powdercoat.

The alodine is PPG DX533 that I bought at an auto paint supply shop. You mix it 1:3, solution to water and submerge the part for up to 3 minutes. Be careful, it is a chromate solution which I handle with heavy gloves and a respirator.

Image

Re: KDX Restoration X 2

Posted: 10:00 pm Jan 30 2018
by KDXGarage
Looks good. Thanks for the info.

Re: KDX Restoration X 2

Posted: 12:39 am Jan 31 2018
by ericr
doakley wrote:So here's a question since we seem to have fused on forks...what years of KX forks are generally regarded as the best choices for the KDX conversion assuming enduro and hare scrambles use?
From my limited experience, it seems that '99-'03 is good. They are 46mm tubes, later years are 48 which can interfere with steering stops and tank clearance. There is information for these years to change the base valve stacks from Motocross to trail and enduro riding - or you can buy a Gold Valve. RB Designs can modify your existing KDX axle to work with these years forks. The stem does not require knurling. And, RB Designs will include a machined bushing for the top clamp that makes it a total plug-and-play solution. That's what I'm doing, and in a few weeks, I plan on diving into fork tuning and sharing my experiences here.

Re: KDX Restoration X 2

Posted: 03:35 am Jan 31 2018
by KDXGarage
48 mm inner tubes started in 2002 on KX's. 1996 - 2001 KX125 / 1996 - 2001 KX250 / 1997 - 2004 KX500 had 46 mm inner tubes.

Be aware that the outer tube diameters are the exact same on all those years. The upper triple clamp dimensions are a good bit larger than stock to accommodate the larger OD of the USD fork upper tubes.

The 1995 - 1997 KDX200 / KDX220R steering stem is a smaller OD than the later one.

http://www.rb-designs.com/rb_designs_llc_027.htm

KDX Restoration X 2

Posted: 05:52 pm Feb 17 2018
by ericr
It's been awhile, so I thought I'd post an update.

I got my parts back from RB Designs. Excellent work with quick turn-around as usual. I won't post any photos until later as you've all seen it before.

I dropped off my 2 sets of forks at LT Racing in Port Orchard, WA for revalve and shortening. I was going to do it myself but the learning curve seemed really steep to figure out how to do it properly. Les is a really nice guy with a reputation of doing excellent work. He'll shorten the forks by 7/8" and is ordering springs shortened by that amount too. They'll be ready in 3 weeks or so.

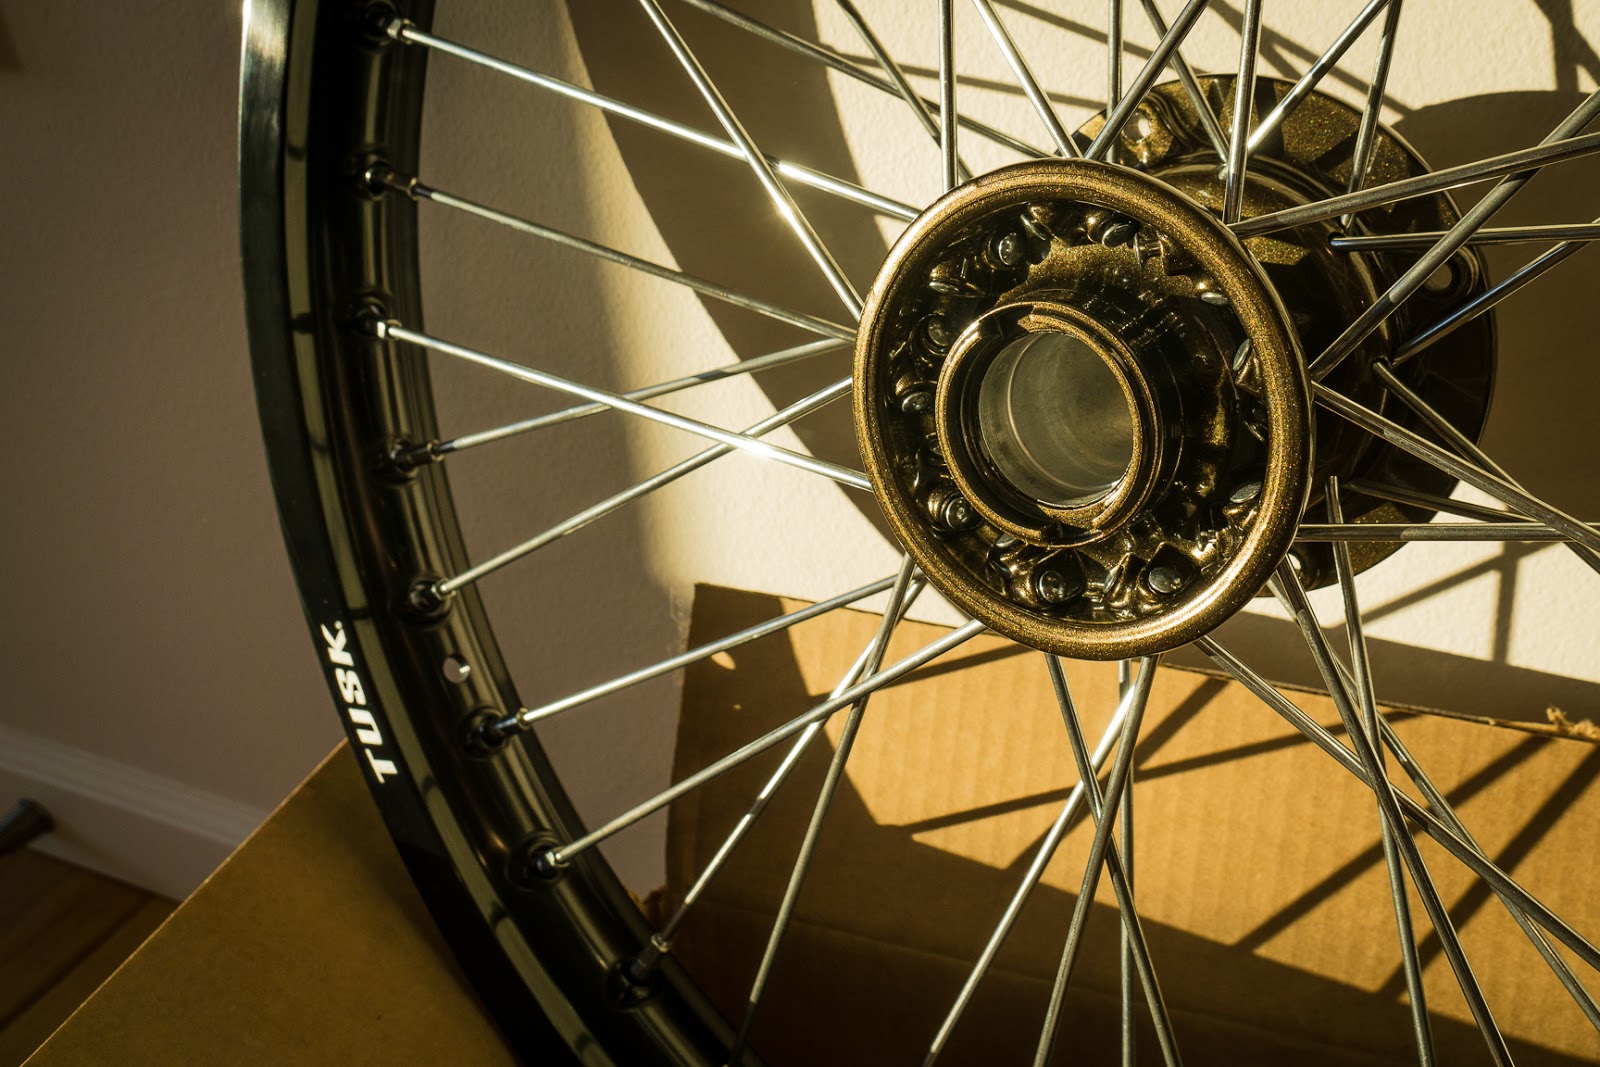
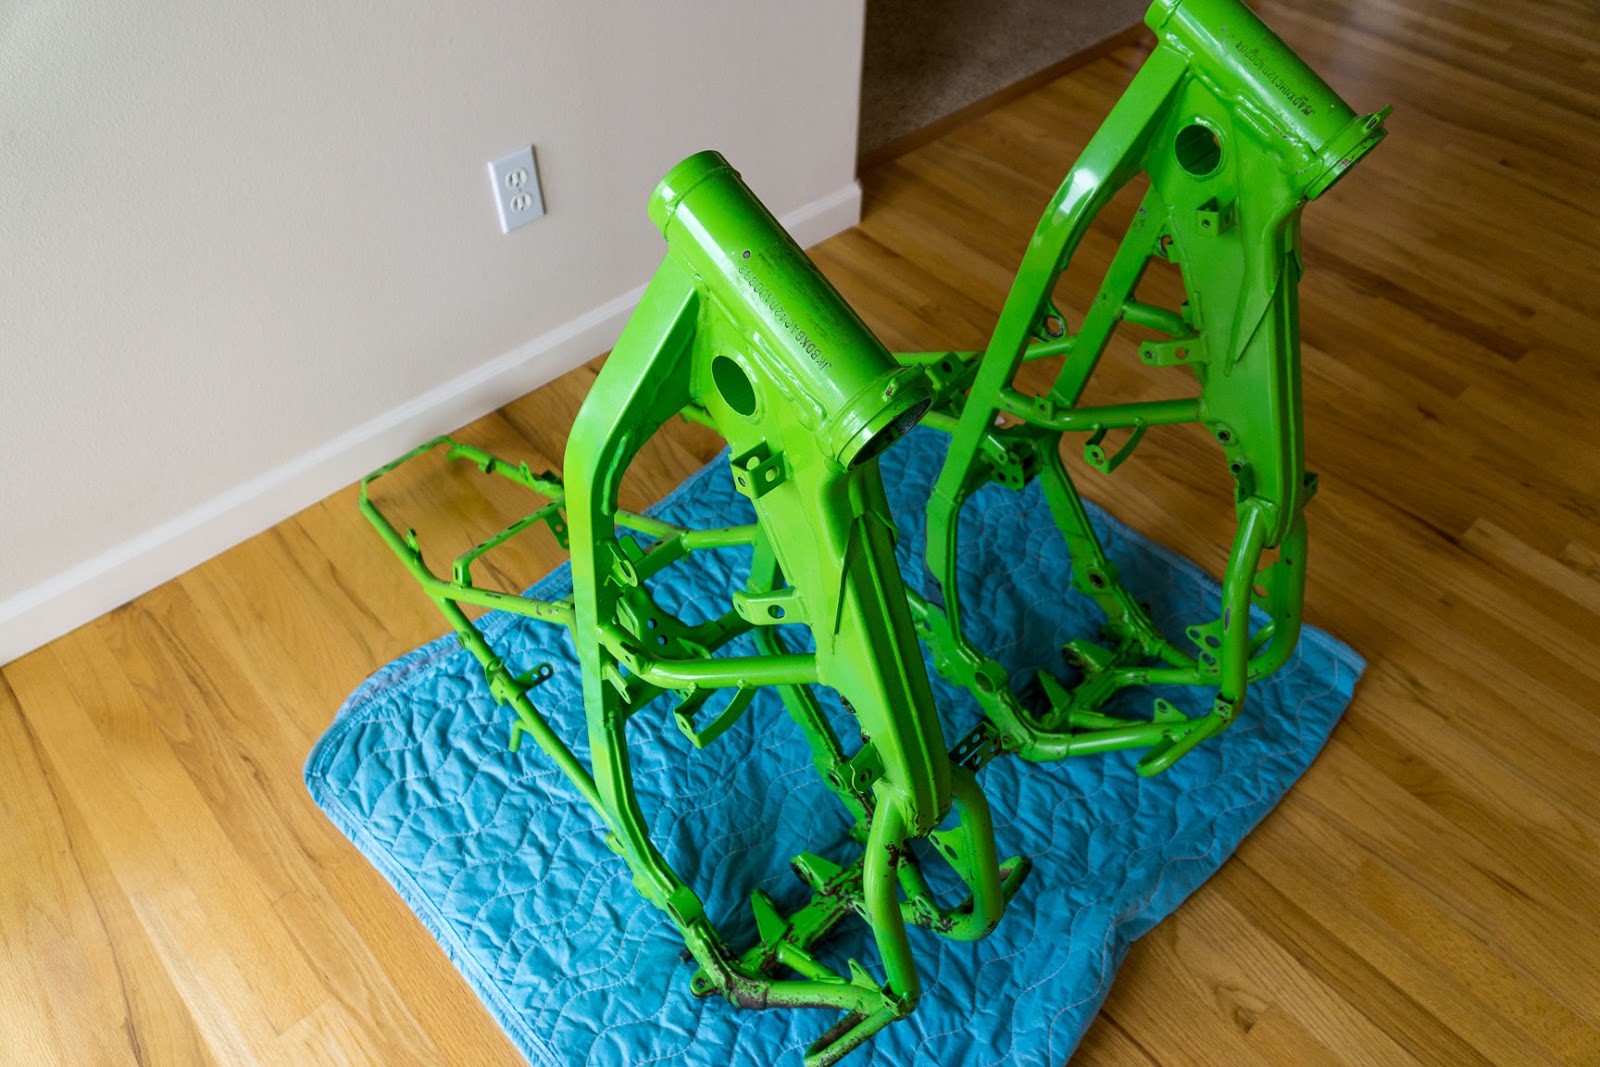
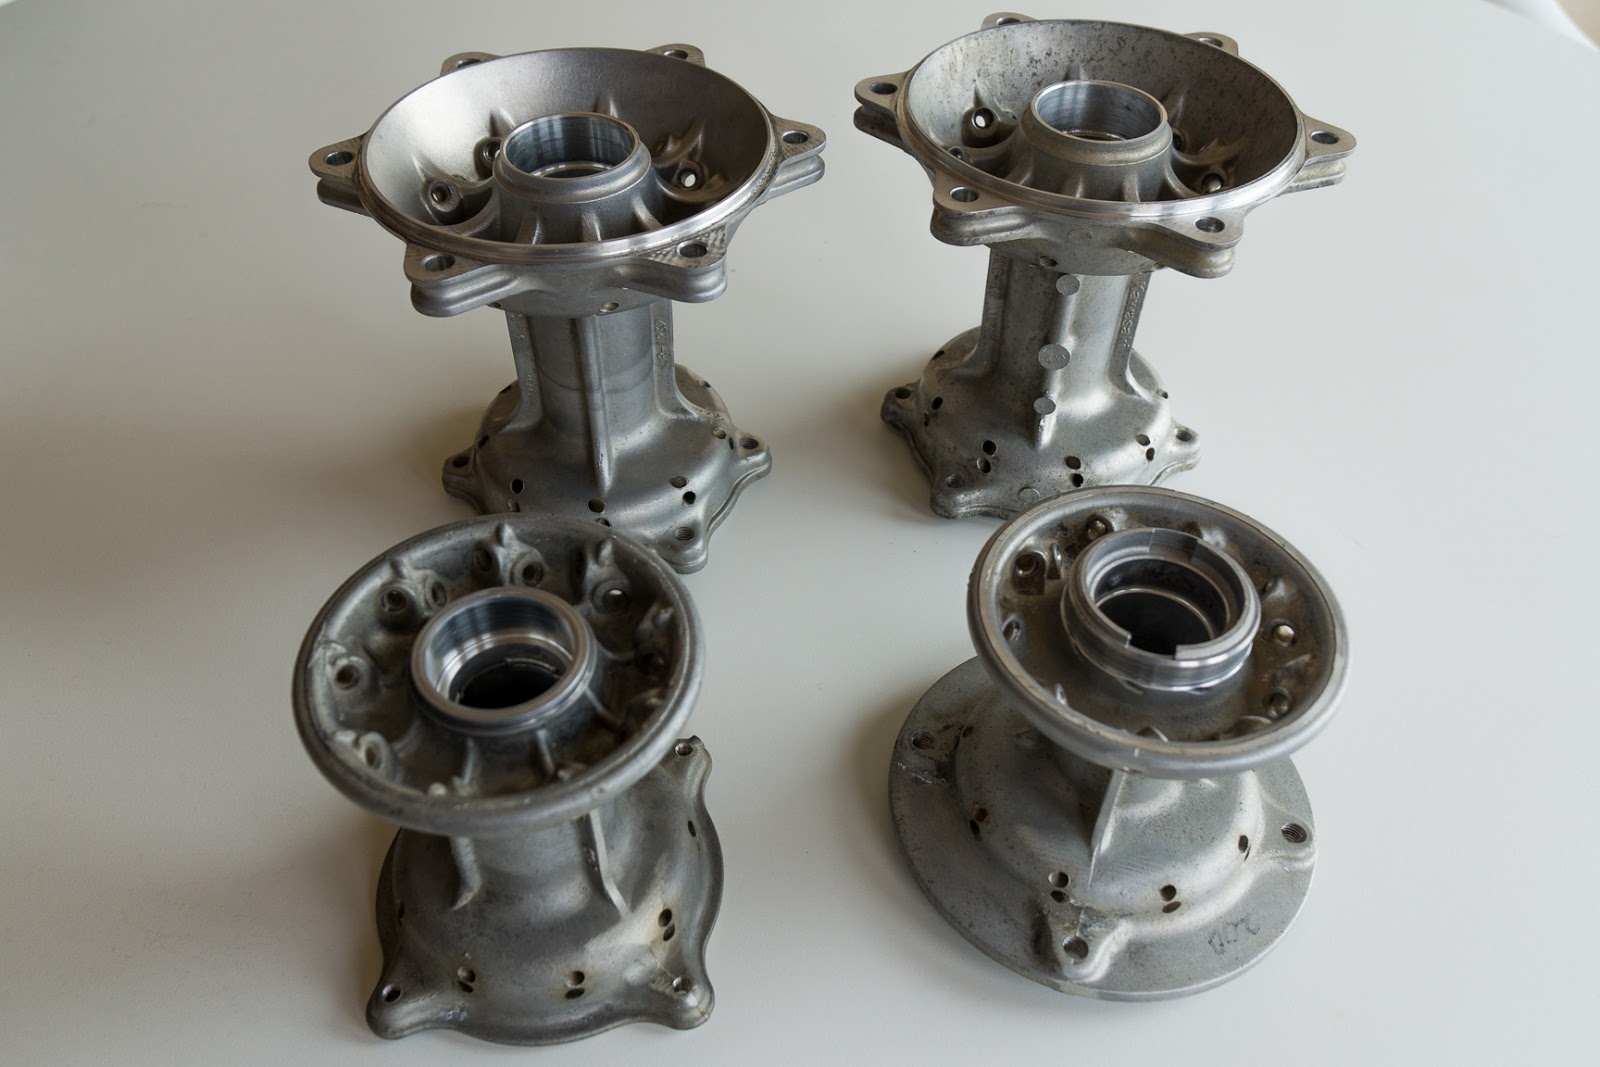
I dropped off my frames and hubs for powdercoating at Powdervision in Issaquah, WA. The frames will be Kawasaki green. I had wanted to have the hubs done in black chrome but found that, since it's a 2 coat finish, it would be quite expensive. I was just going to do black but JR could do it in metallic bronze for the same price. I hope it looks ok. They'll be done in about another week.

Image

The hubs were another PITA. I just could not get the center bushings pushed far enough out of the ways to drift out the bearings. I ended up buying a Tusk blind bearing puller. Even with that, and heat, it took quite a bit of effort to pull the bearings. After 16 years, there was corrosion between the bearings and the aluminum seats. Also, the bushings had corrosion causing them to be frozen in position.

Image

I really need to get the cases split, but I've been putting it off because someone welded the shift lever to the shaft. I have a new shaft and lever already, so I just need to destroy this one in the easiest manner. Maybe a sawzall? Edit: Looking at the photo, I realized it was just a small spot weld. I filed it flush in about 10 minutes and got it freed. Both the shaft and shifter splines were fine. It appears that someone probably lost the pinch bolt and did a quick fix.

Image

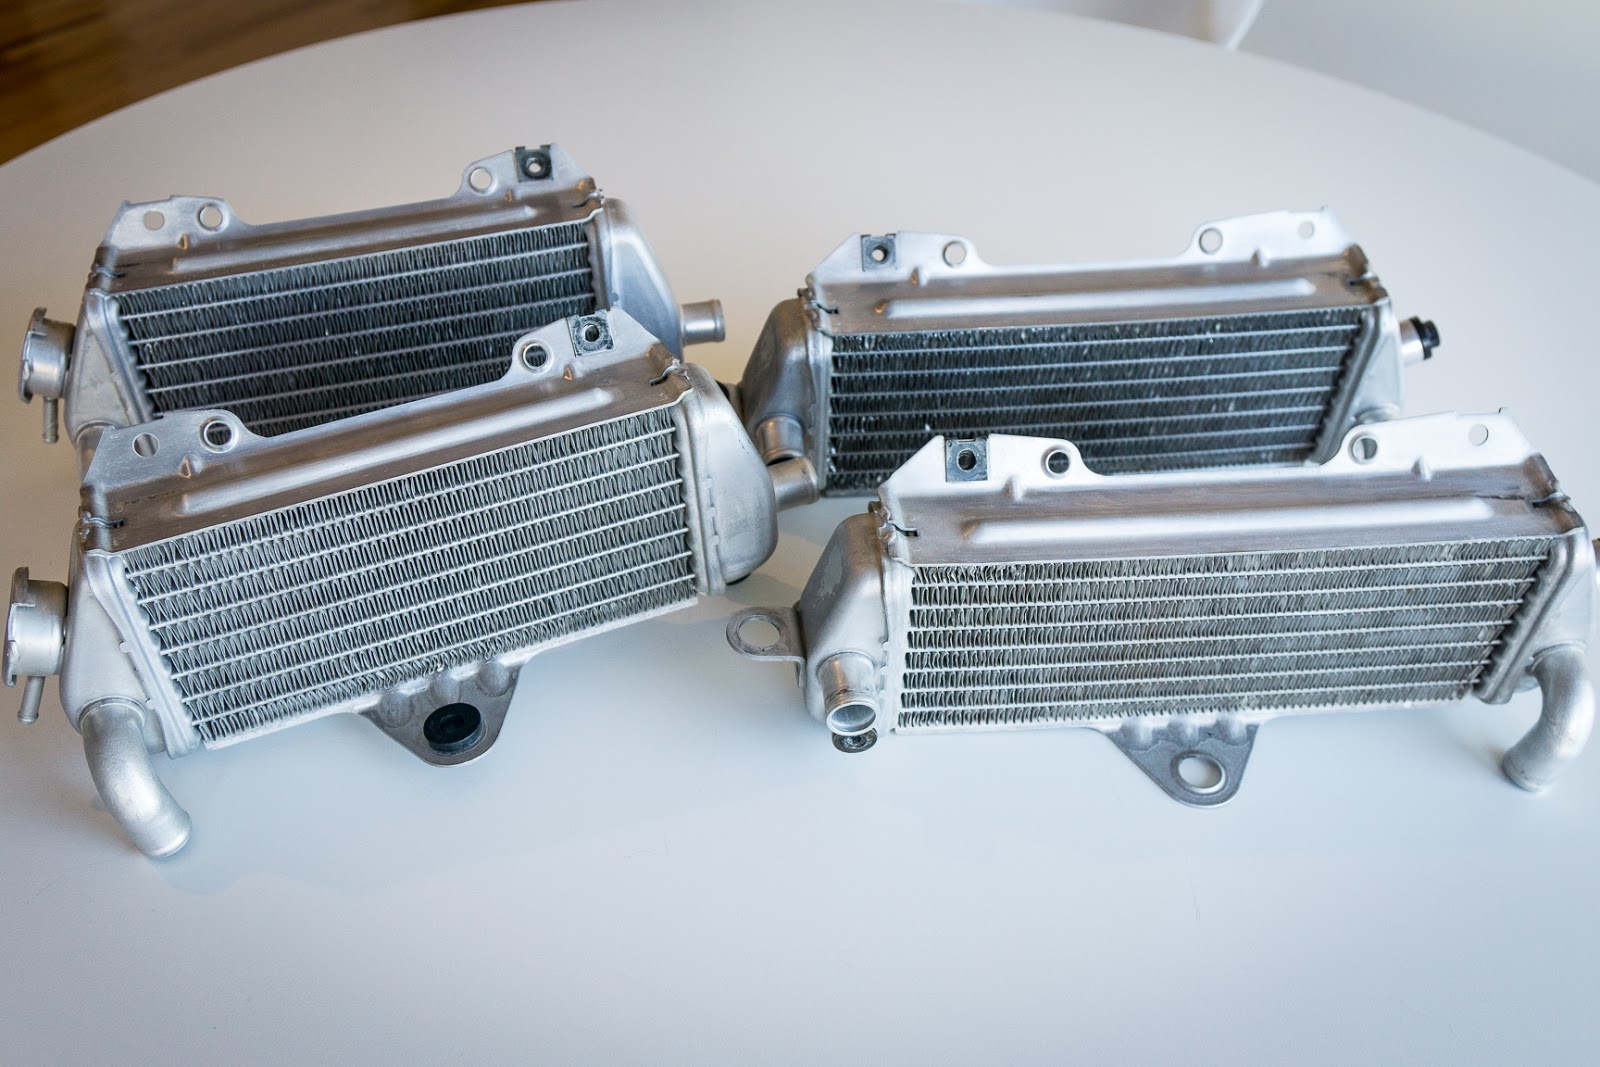
I have been working on cleaning up parts. I cleaned the radiators with the Mag wheel cleaner. I also had to straighten 3 of them with a drift along the long edges with a hammer. Tapping lightly, I took a full 1" bend and twist out of a couple of them. I then used tweezers to straighten out lots of fins. Someone must of hit them hard with a pressure washer.

Image

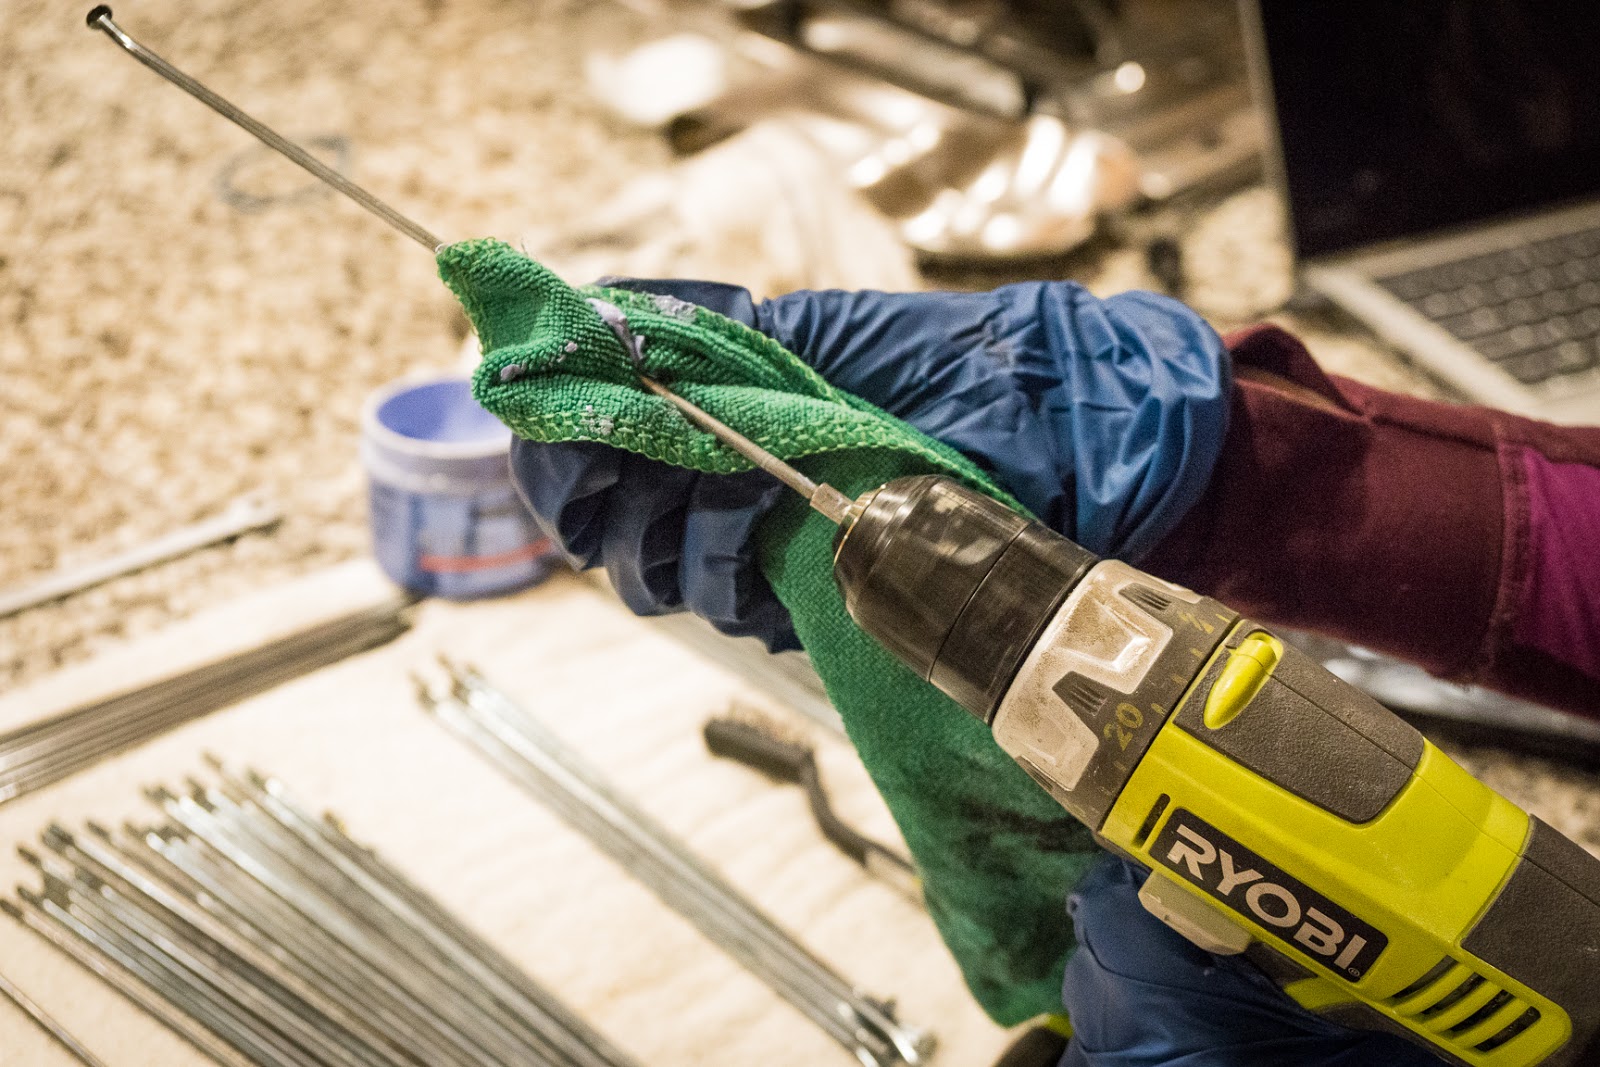
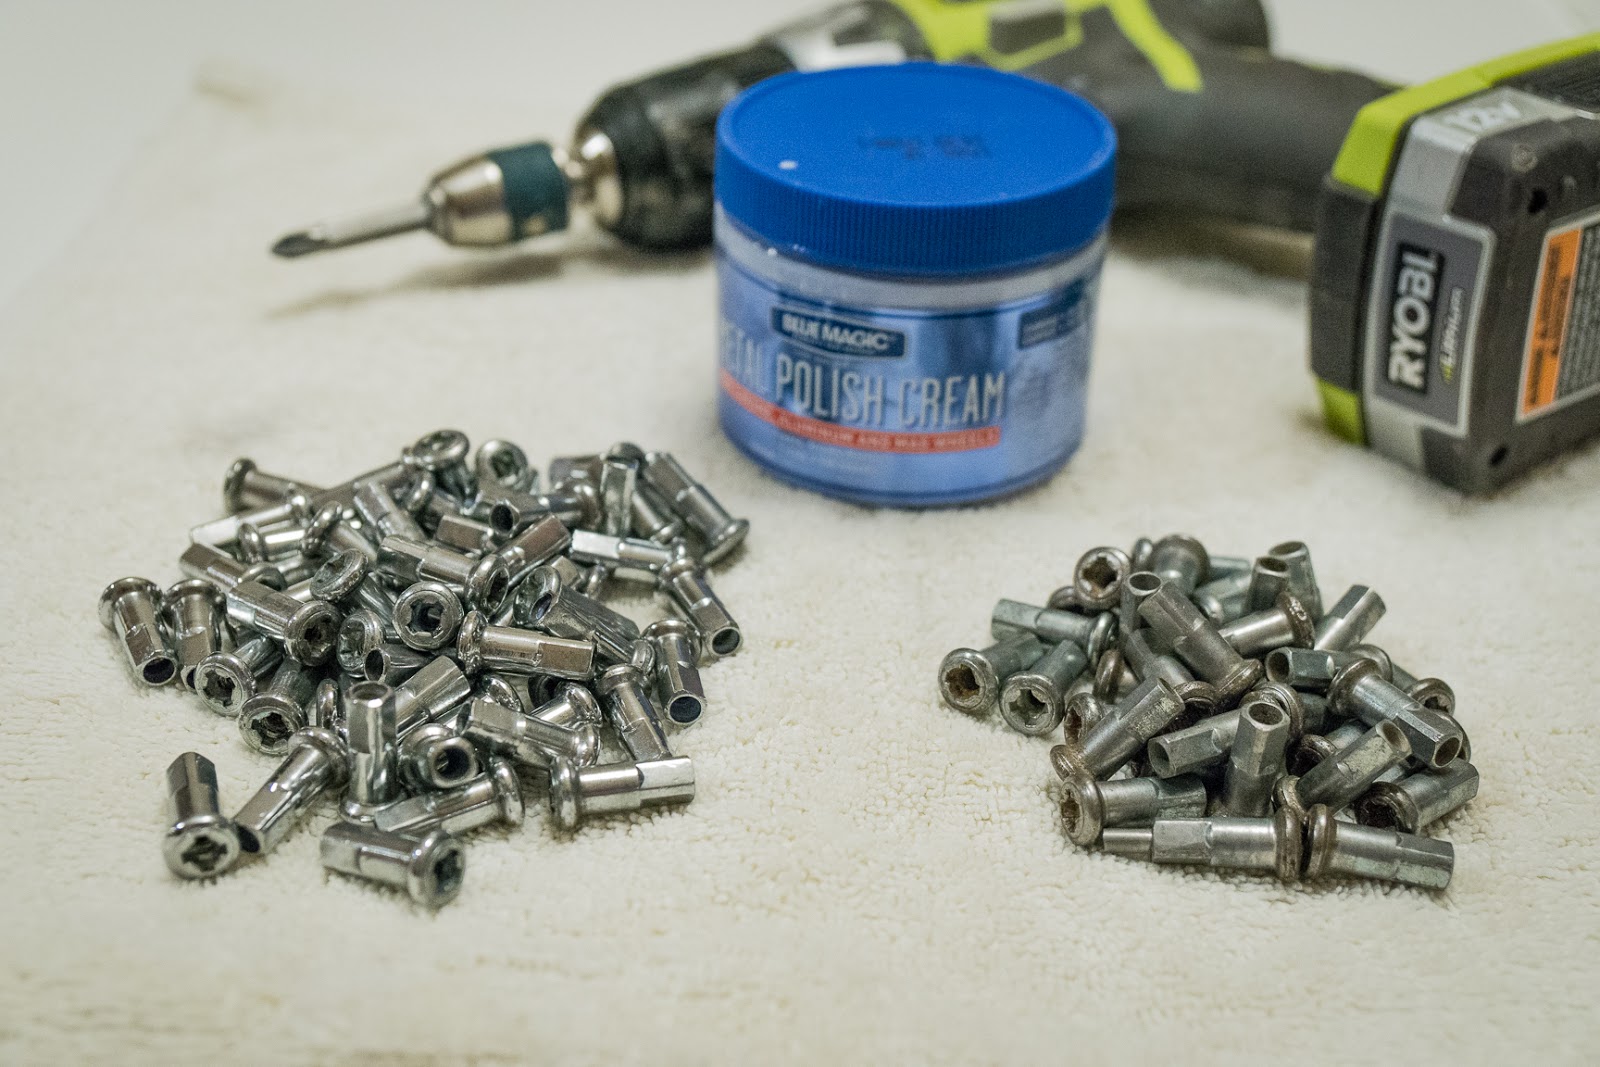
When I disassembled the wheels, I found that about a dozen spokes are unusable. A couple dozen nipples were too rusted on the heads for me to want to use again. I figure I'll end up with enough spokes and nipples for one bike. After much research , the second bike will be getting a new set of front KX250 and rear KDX spokes from Buchanan. After cleaning the existing spokes in the parts washer, they still looked really dull. A drill, some metal polish, and a teenager fixed that.

Image

Polished nipples are nice...

Image

Next week will include splitting the cases and getting the cranks to RB Design for rebuild. Also, I'll finish with ordering parts and continue with the parts cleaning.

Re: KDX Restoration X 2

Posted: 08:00 pm Feb 17 2018
by 91 KDX 250
Nice project!

Can you do me a fav and take pictures of the cylinder job millennium does?
Want to see if they still have porosity issues.

Re: KDX Restoration X 2

Posted: 08:18 pm Feb 17 2018
by ericr
91 KDX 250 wrote:Nice project!

Can you do me a fav and take pictures of the cylinder job millennium does?
Want to see if they still have porosity issues.
Will do! I should be getting them back next week sometime. I think their website has a mention about porosity. I seem to remember that they say it's caused by inclusions during the casting of the cylinder and that small amounts of porosity should not be of concern.

KDX Restoration X 2

Posted: 08:54 pm Feb 17 2018
by MaverickAus
ericr wrote: I used to use Photobucket to host but they stopped free hosting. Any suggestions on what to use now for this forum?

Thanks for reading my ramblings.
Congrats on the KDX's. If you still want to use photobucket you can install https://chrome.google.com/webstore/deta ... dkpmcpkaon assuming you use google chrome browser. It fixes the photobucket forum issue.

KDX Restoration X 2

Posted: 09:18 pm Feb 17 2018
by ericr
MaverickAus wrote:
ericr wrote: I used to use Photobucket to host but they stopped free hosting. Any suggestions on what to use now for this forum?

Thanks for reading my ramblings.
Congrats on the KDX's. If you still want to use photobucket you can install https://chrome.google.com/webstore/deta ... dkpmcpkaon assuming you use google chrome browser. It fixes the photobucket forum issue.
Yes, I use Chrome and installed that fix awhile ago. It's nice to see Photobucket images again. It also works for Firefox but not Edge or Explorer. That's why I'm using Google's Blogger.com now to host photos. It's easy and doesn't seem to have any restrictions about 3rd party hosting like some of the other free sites.

KDX Restoration X 2

Posted: 08:24 pm Feb 22 2018
by ericr
I got my parts back from the powdercoater and I just had to share. I like the bronze. What do you think? Those are the original spokes and nipples that we polished and installed with a 65% Moly paste on the threads to prevent galling. At $31/hub, that was my bling expenditure for the project. It's a single coat of Prismatic PMB-4124 Chrome Bronze powder.

Image

Here's something that has me puzzled. When I spilt the cases on the 200, this fell out. It's 0.380" long. As far as I can see, there is only one roller bearing that supports the transmission input shaft that has needles this size. None are missing from the cage. Any idea where this may have come from?

Image

Re: KDX Restoration X 2

Posted: 11:32 pm Feb 22 2018
by KDXGarage
Cool wheel.

Great pics, too.

Is your KIPS actuation pin present and accounted for?

Re: KDX Restoration X 2

Posted: 01:27 pm Feb 23 2018
by ericr
Jason wrote:Cool wheel.

Great pics, too.

Is your KIPS actuation pin present and accounted for?
That was it! 2x9.8. Thanks.