If you are feeling clutch drag in gear with the engine off and pushing it as well as stalling when coming to a stop, then you need to make an adjustment or you have made an error during the installation.
Your thread you posted up on first impression of the auto cutch was a rave review. What happened? In re-reading it, I see you took liberties with the proceedure and did this,
"I also lost some time trying to torque down the same nut with a regular torque wrench but couldn't do it (the clutch basket kept turning). The solution: install the pressure plates first, put pressure with your hand and use the an impact gun"
This could be trouble. I did a similar thing and warped a plate that slipped down behind the hub before I got the nut tightened. But first things first; lets go through everything from start to finish.
Do you have the instructions with all the photos? I created an installation guide based on my KDX for Garry to ship to anyone ordering the EFM mod. If Garry didn't send it to you and you have a very fast network connection and an e-mail box big enough to receive a 16+meg sized file, I can e-mail it to you. Otherwise I can postal mail it to you.
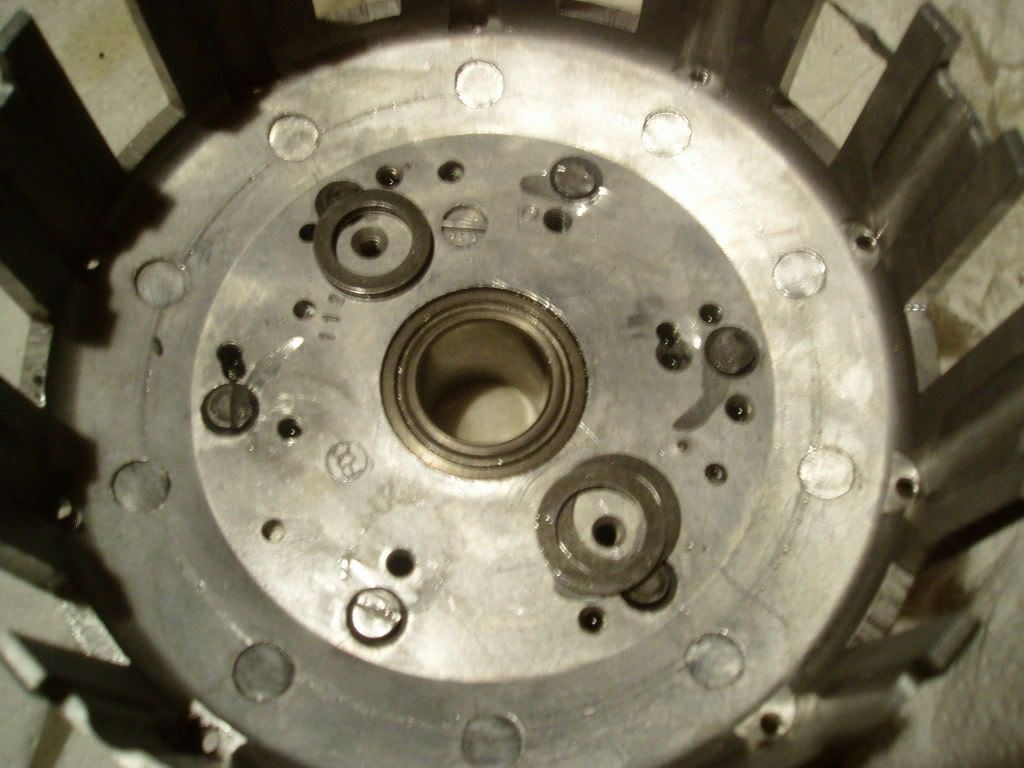
In my gallery are photos of the clutch install. Take a look at them. They are in a sub album titled, "Cutch Photos". In this photo is the clutch basket Garry is talking about with the screws in the bottom plate on the basket.

Remove the screws and under them are washers. Remove those as well. But before you do, let's be sure you have everything assembled right and adjusted correctly first. Here are several things that may have gone wrong in your installation or could be adjusted. (Don't ask how I know. O.k., I'll assume you asked anyway. I screwed up installing my clutch and had a very simular problem)
Start by placing the bike on a stand and draining the oil and removing the clutch cover and the pressure plate; exposing the clutch plates. Remove all the clutch plates. Be sure none are left. Now, notice the order of the plates. They must alternate between friction material plates and solid steel plates. Yes, I inadvertantly installed two steel plates back-to-back and had a simular problem you speak of. Also, I had the very last plate jamb up under the center hub because I installed the plates before tightening the big nut down and it slipped under the basket during the installation. The hub must be torqued down before the plates are installed. But before torquing down this nut, be sure you have the basket and hub installed right.
The first thing to go onto the shaft is a thrust washer, then the sleeve,then the basket, then another thrust washer, then the hub, then the spring washer, then the nut.


With the center nut torqued to spec, the hub will spin freely of the basket.

Inspect the plates and measure for warp as indicated in your manual. If a plate is warped it will cause clutch creep. If you don't have a manual, get one. Here is the proceedure for checking clutch plate warp anyway. Place each friction or steel plate on a flat surface and measure the gap between the clutch plate and the surface the plate is resting on in several locations around the plate. If any plate is warped over the service limit, replace it with a new one. The standard warp is .2mm or less and the service limit is .3mm. Install the plates in the correct order and sequence; alternating between the two types of plates and starting with a friction plate.


Do not install the last plate as the instruction book says in the alternate slots in the basket. Use the same slots for all the plates. This is important because the pressure plate is notched to fit into this slot where the last clutch plate used to sit.

Install the pressure plate and only snug the screws down that hold it in. Again, just like the clutch plates, be sure the pressure plate is fitting between the fingers that the plates are fitting into. Test to be sure the inner hub still rotates independant of the basket; this time moving the steel plates with the hub rotation by placing the motor in gear and rotating the rear tire.
Press in on the center of the clutch basket. It should move at least 1/32" and up to 1/16"

If it doesn't move that much, then you will need to remove those thin washers Garry spoke of. That would lower the inner hub deeper into the basket and create more travel for the pressure plate. The thin washers are under the screws in this photo:

If the pressure plate moves too much, more than 1/16" then you will need to install shim washers Garry provided on the shaft before the hub goes on, raising the hub to reduce the travel. The shim washers are installed on top of the final thrust washer shown in the photo. See how that would raise the hub and consiquently the plates? That would make the pressure plate closer to the clutch plate and less rpm's needed to make the clutch hook up.
With the pressure plate moving the correct travel now, you can adjust the rpm point the clutch operates at by installing the spring washers Garry provided. The spring washers are located under the six allen screws on the face of the pressure plate and installed in pairs across from each other if you do need to add any.

If not installed in pairs across from each other, the uneven pressure would cause the clutch to bind and result in the symptoms you have. Review the page Garry provided with the drawings of the washers. They stack with the curved surface out and seperated by a flat washer like this:
)|(
When adding additional spring washers, take the allen bolt out and place under the big silver washer another spring washer, in pairs across from each other like this:
))|(
See how a second spring washer is layed on top of the first? Remember that's under the large silver washer that the allen screw is against.
Be sure your washers are all installed right by removing each of the allen bolts holding them in, one at a time and reinstalling it before removing the next one. If the spring washers are not installed as in the diagram Garry sent, the clutch will not work right. I added 1 set (pair) of extra washers under allen bolts opposite of each other in order to raise the engine speed needed to get the bike to start rolling. Finish tightening all the allen bolts holding the pressure plate to the basket down. Put the cltuch cover back on and make sure the spacer and gaskets along with the guide pins are all in place. Fill with oil and give it a try.