1989 KDX 200 Basket Case Project
-
KDXrider1989
- Member
- Posts: 643
- Joined: 09:05 pm Sep 07 2010
- Country:
- Location: Houston, TX
Re: 1989 KDX 200 Basket Case Project
This might seem like an odd question to ask, but could you measure the inside diameter of the exhaust pipe at the end of the muffler (where the FMF sticker is)? I want to see if the FMF silencer on my KDX is from a KX500 or KX250 or not
-
Thrahl
- Member
- Posts: 222
- Joined: 08:51 am May 30 2012
- Country:
Re: 1989 KDX 200 Basket Case Project
If you are talking about the very tip (like what you see if you look at the bike from behind), then it is exactly 1 1/8" ID.KDXrider1989 wrote:This might seem like an odd question to ask, but could you measure the inside diameter of the exhaust pipe at the end of the muffler (where the FMF sticker is)? I want to see if the FMF silencer on my KDX is from a KX500 or KX250 or not
Small update. I was about to get started putting the engine back together yesterday but realized I had no way of removing the old crank bearings from the crank.
I guess I will be buying a bearing separator from Harbor Freight as I can't see any other way that would not risk damaging the crank.
But I did get some other stuff done instead.
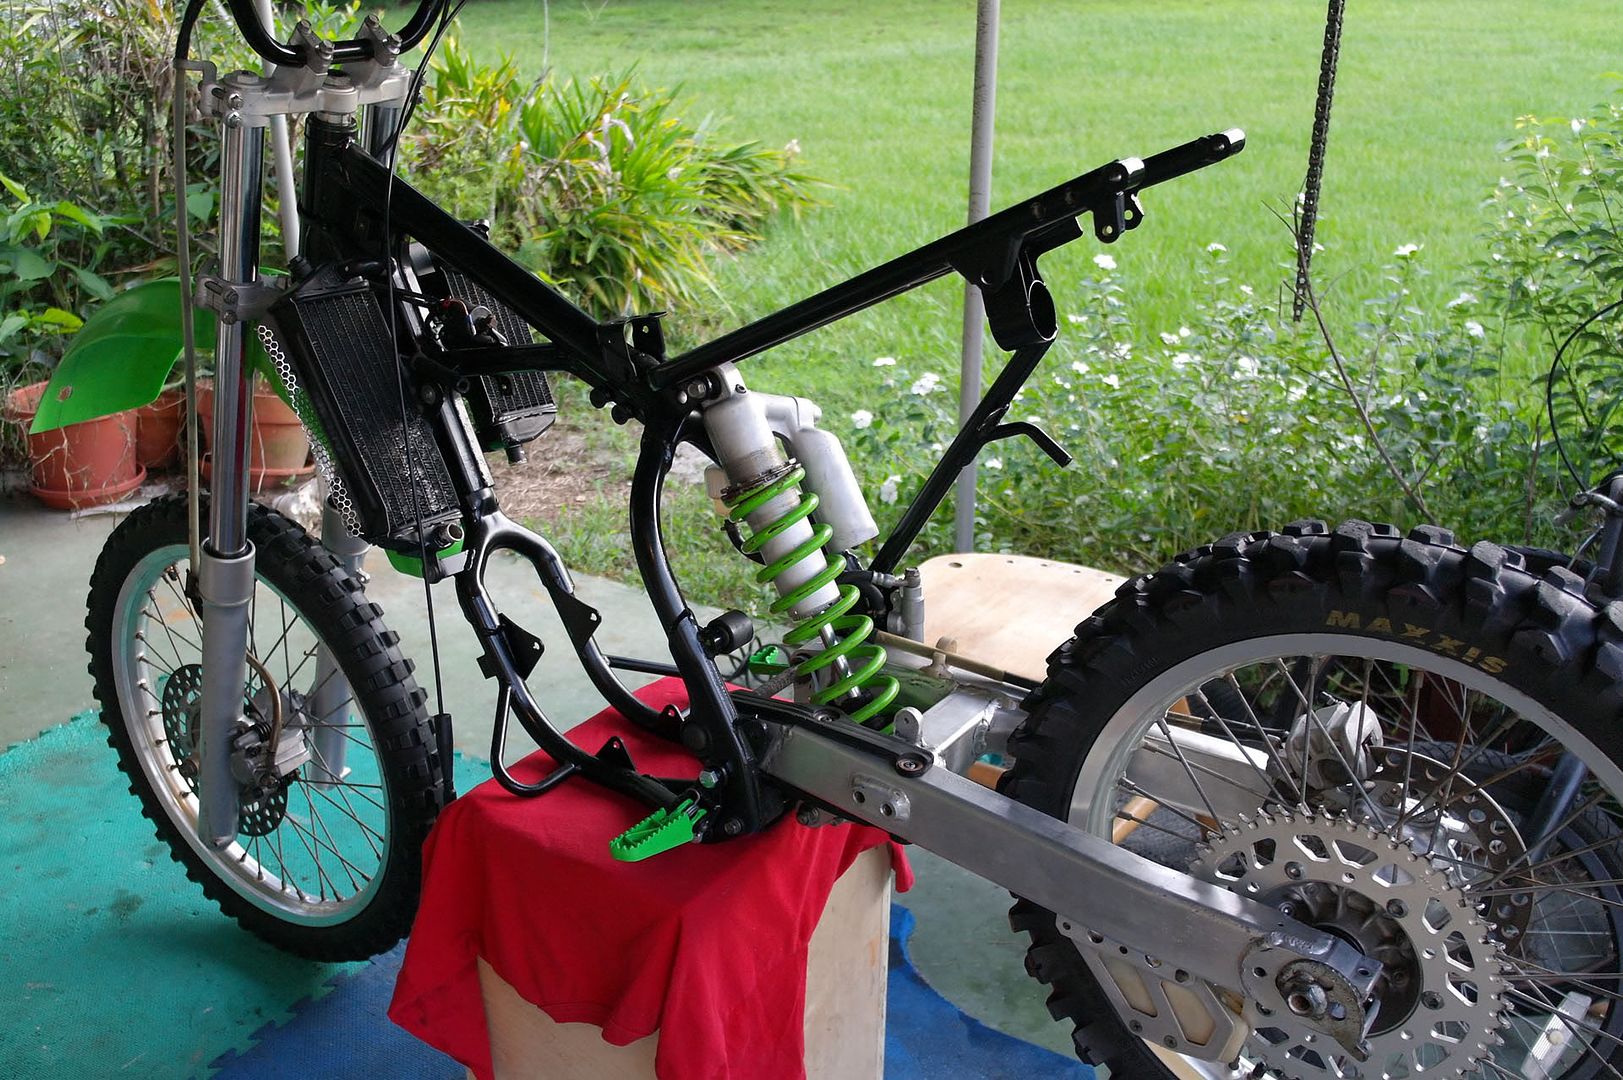
The pegs, rear brake lever, and shifter were all rusty and would look terrible on the freshly painted frame so I figured I might as well paint them.
I went with the dupli-color engine enamel in "grabber green". It is actually pretty dang close to the Kawi green.
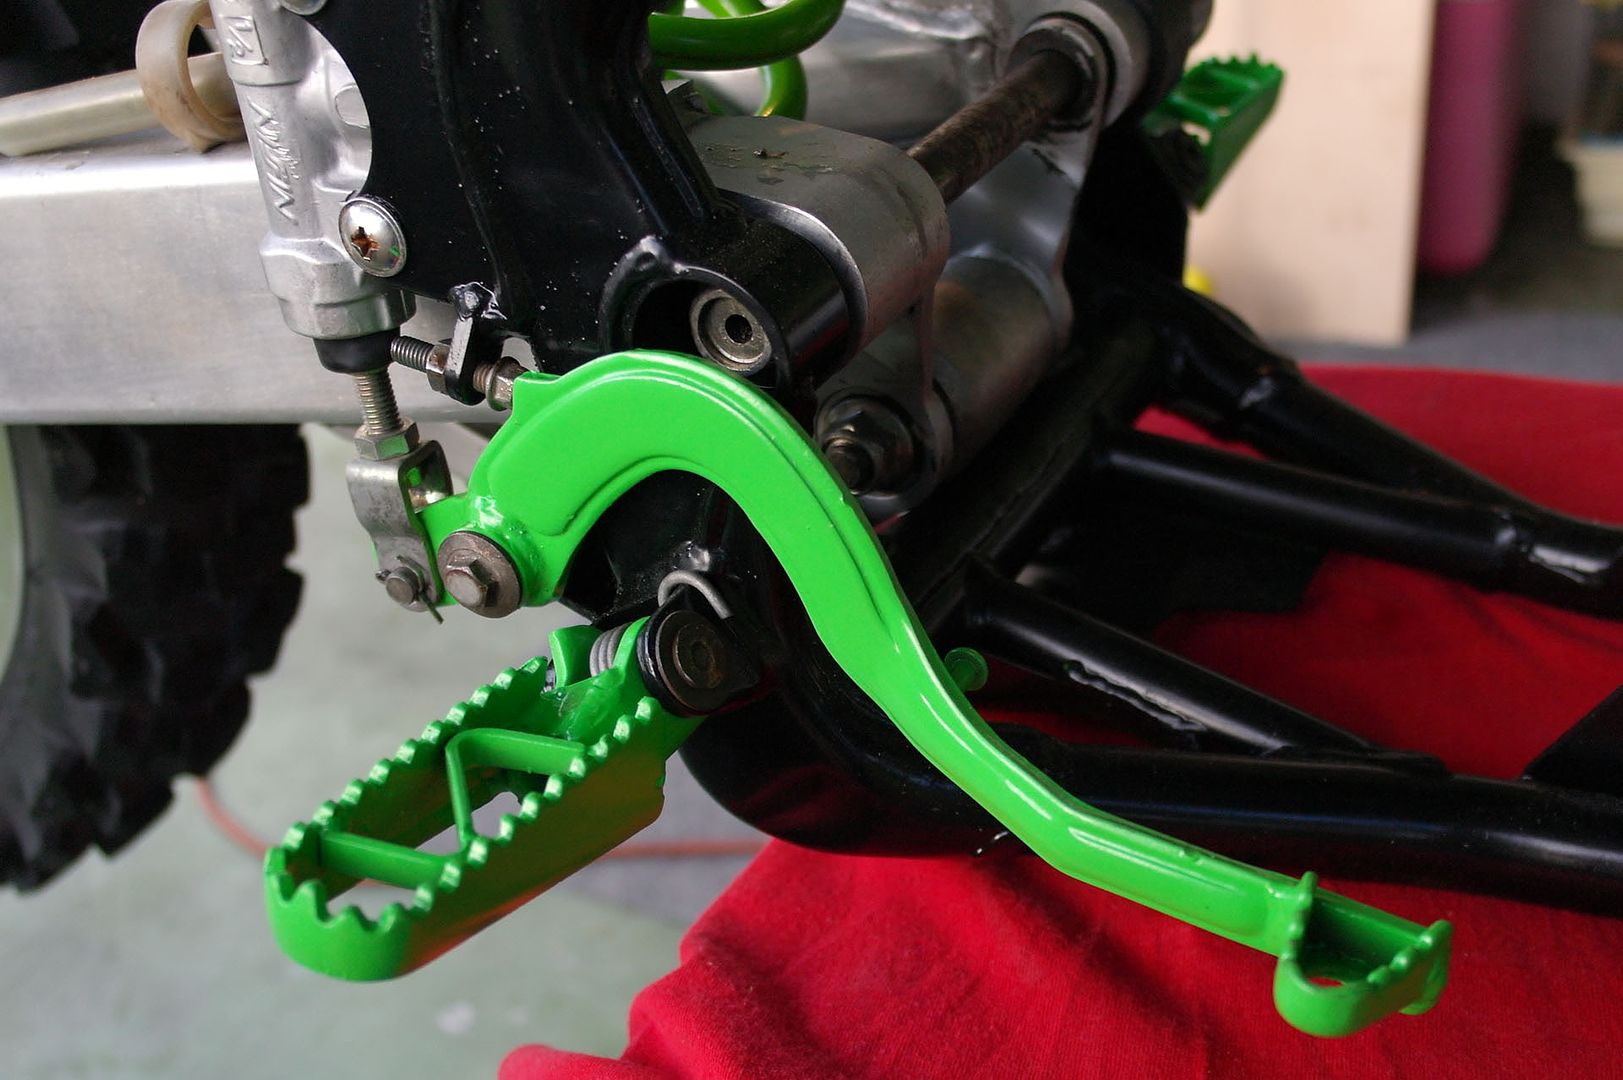
The quality looks great, I am much more happy with it than my frame and I think it will end up lasting longer. We will see.
I also made some radiator guards since I was missing one factory one and the other was messed up.
Made them from just some mesh grate stuff I had lying around.

They are really thin but I set them off the rad by about an inch so even if a decent rock hits it the rad should be fine. It's more for branches down here in Florida anyways.
Got my new front master cylinder in. It came from an '05 Yamaha YFZ450 ATV but I chose it because it is super clean, has a large built-in reservoir, good lever length, and the hose exits from the front.
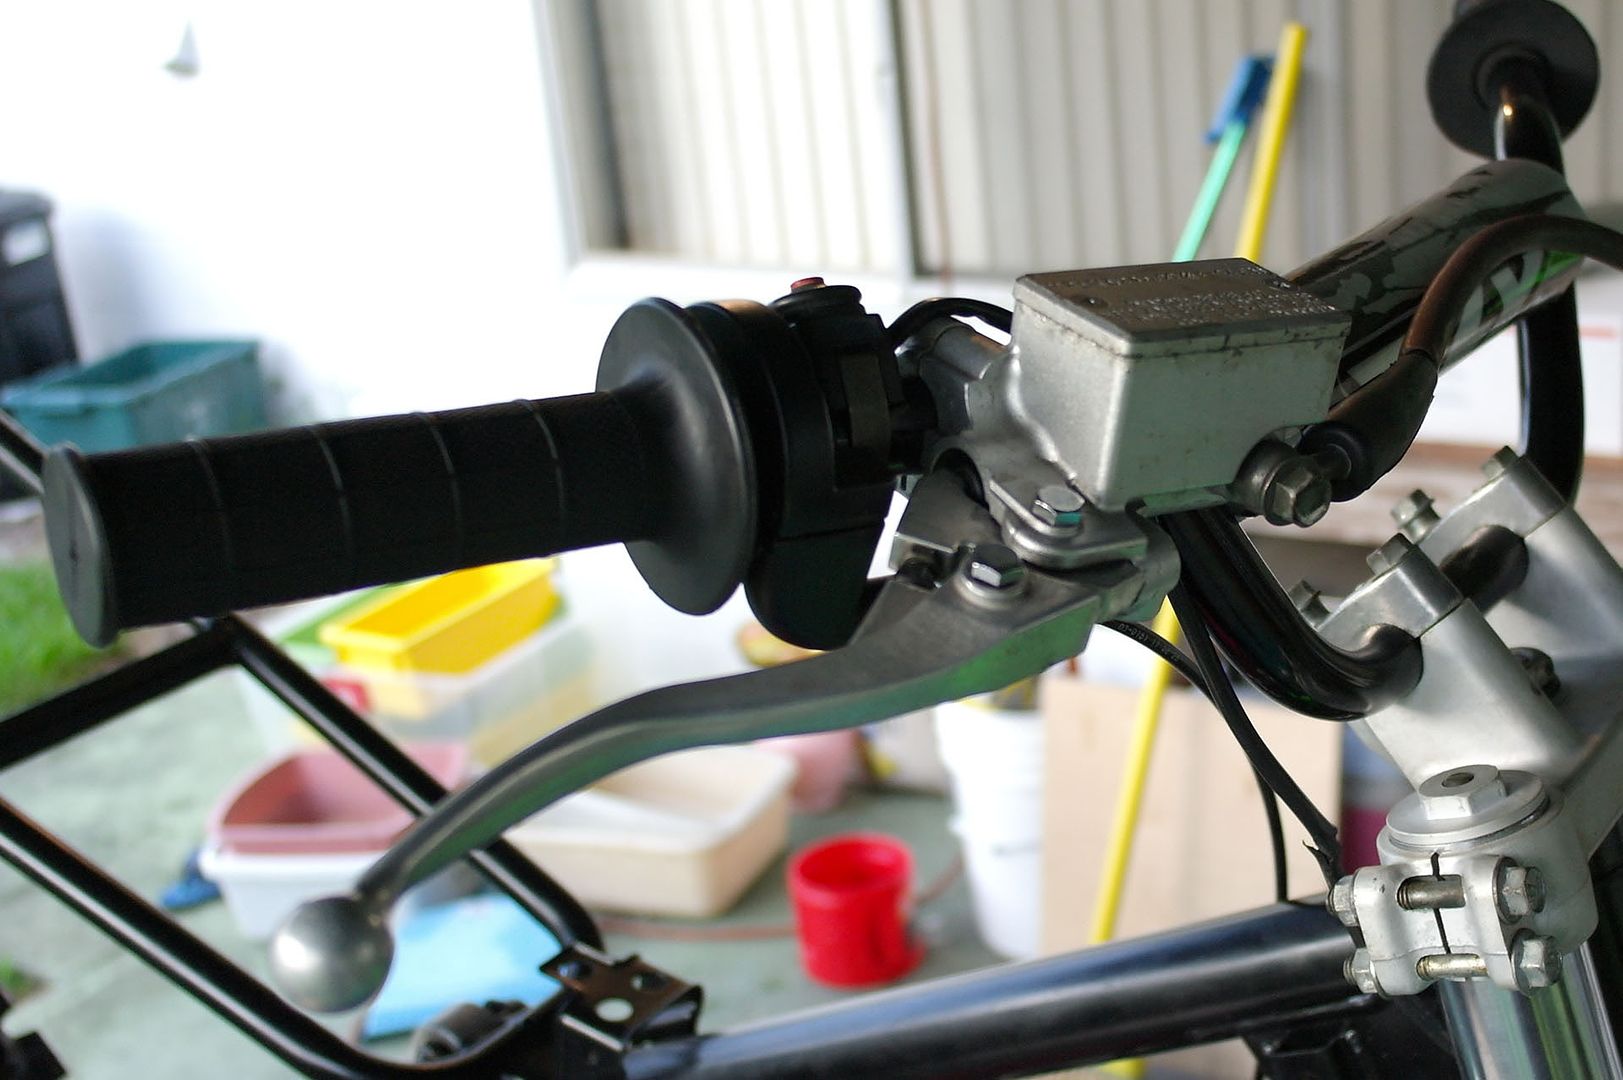
Got it bled and it is pulling pretty good. There might still be a little air in there because if it is sitting for a couple hours, the first couple pulls are a little mushy.
After a few pumps though it stiffens up and feels great. About halfway to the bar when I pull as hard as I can.
On a somewhat related note, I have read about people complaining about their KDX front brakes and how weak they are. All I can say is that it must be the master cylinder because with the two that I have put on this bike with everything else stock, it has more than adequate stopping power. I picked this one up for $25 on eBay so if you don't like your brakes then I would go for a different master cylinder before anything else.
Anyways, here is everything else. Patiently waiting to be reinstalled.
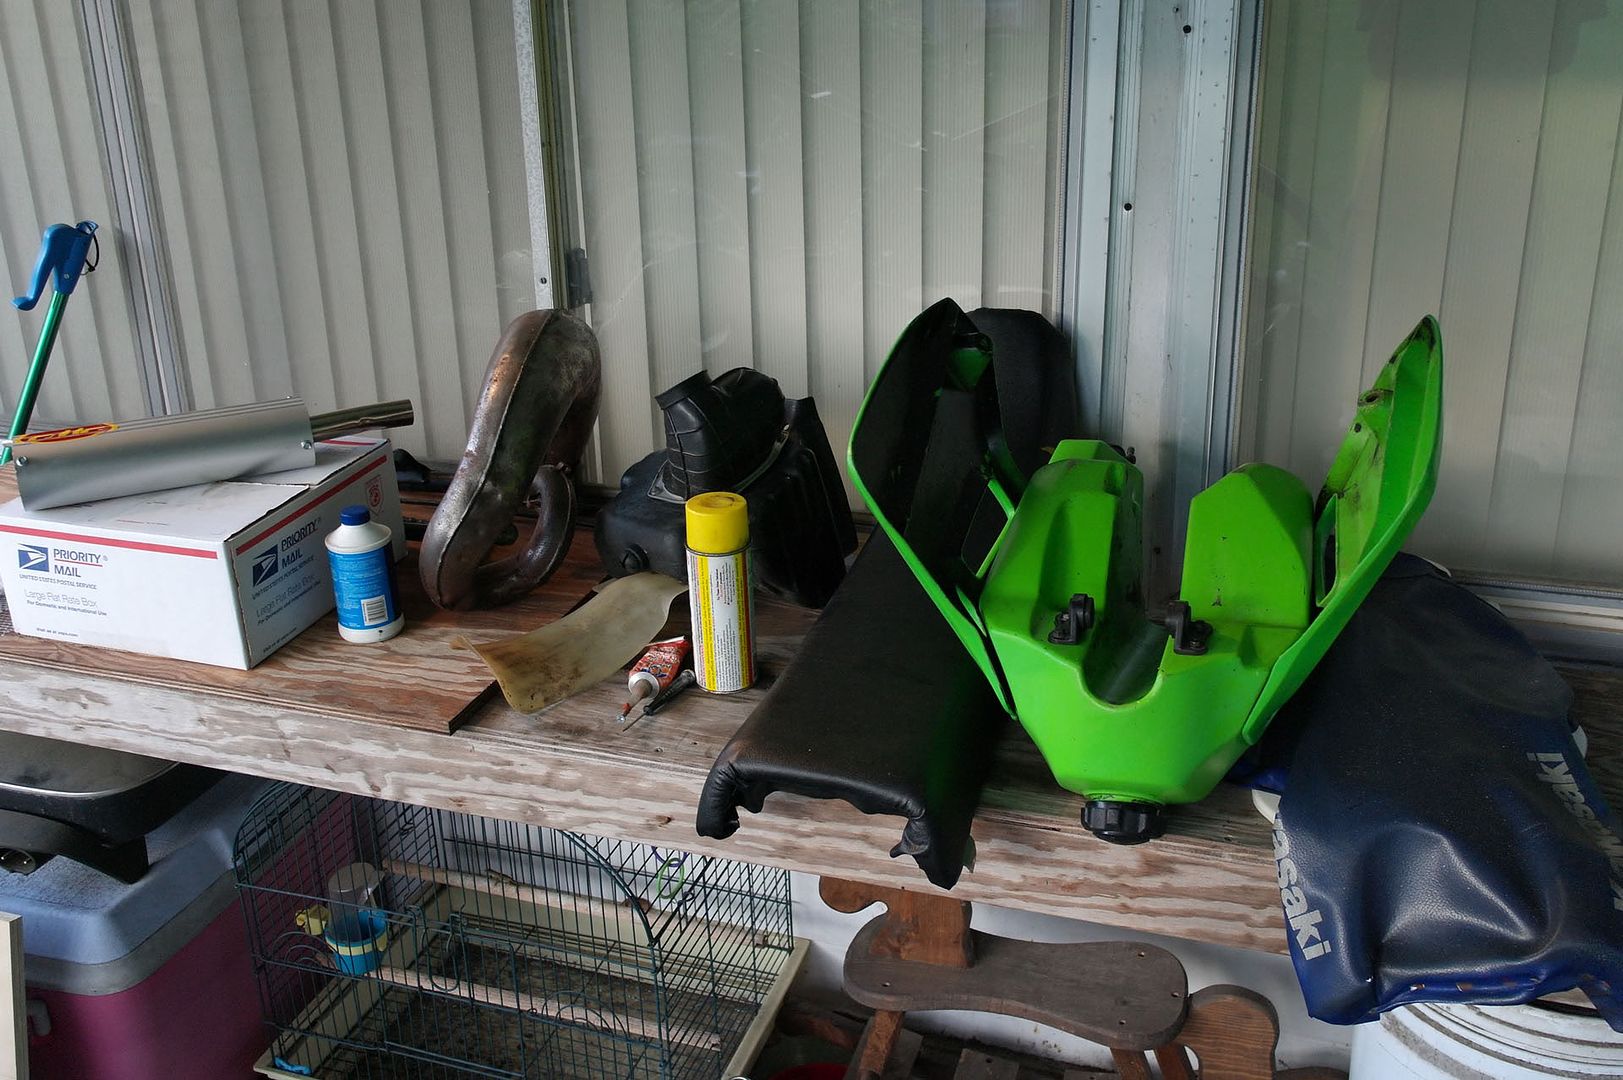
Everything is pretty much ready to go. Need to put the new cover on the seat when it comes in and a few small things but basically just the engine at this point.
I will be picking up the bearing separator this weekend hopefully.
-
Dekon
- Supporting Member II

- Posts: 674
- Joined: 07:54 am Jun 26 2012
- Country:
- Location: Rhode Island
1989 KDX 200 Basket Case Project
Looking good! I like the black frame with the green accessories. The radiator guards look nice also.
-
scheckaet

- KDXRider.net

- Posts: 3740
- Joined: 12:09 am Nov 10 2005
- Country:
- Location: edmond oklahoma
1989 KDX 200 Basket Case Project
the front brake does suck but 99% of the time it's because they were not bled properly even from factory. Mine sucked from the longest time (bought the bike brand new) but I bled them (took me quite a while) properly and they were really good, no more mushy, 1 finger stop.
That grabber green is what i used myself, seems to last pretty well, 1 thing i don't like about this paint, it doesn't like brake cleaner, paint will melt .
.
That grabber green is what i used myself, seems to last pretty well, 1 thing i don't like about this paint, it doesn't like brake cleaner, paint will melt
02 KX 200 hybrid: RB head and carb 
Sold ☹ DRZ 400 SM
bike build: http://www.kdxrider.net/forums/viewtopi ... ike+stable
bike profile http://www.kdxrider.net/forums/viewtopi ... 0709#30709
newb info: http://www.kdxrider.net/forums/viewtopi ... 57#p117919
jetting guide: http://www.kdxrider.net/forums/viewtopi ... 105&t=1156
Sold ☹ DRZ 400 SM
bike build: http://www.kdxrider.net/forums/viewtopi ... ike+stable
bike profile http://www.kdxrider.net/forums/viewtopi ... 0709#30709
newb info: http://www.kdxrider.net/forums/viewtopi ... 57#p117919
jetting guide: http://www.kdxrider.net/forums/viewtopi ... 105&t=1156
-
Thrahl
- Member
- Posts: 222
- Joined: 08:51 am May 30 2012
- Country:
1989 KDX 200 Basket Case Project
I guess I just assumed everyone had already tried bleeding firstscheckaet wrote:the front brake does suck but 99% of the time it's because they were not bled properly even from factory. Mine sucked from the longest time (bought the bike brand new) but I bled them (took me quite a while) properly and they were really good, no more mushy, 1 finger stop.
That grabber green is what i used myself, seems to last pretty well, 1 thing i don't like about this paint, it doesn't like brake cleaner, paint will melt
With any spray paint, even this "enamel" tough stuff, I just assume anything stronger than water is going to melt it. I'm sure it is just my substandard painting skills but every time I have used spray paint it doesn't last very long before chipping, scratching, melting, etc.
I am trying to convince a friend of mine to buy a powder coat system. We can get everything including a bunch of one color of powder for a little over $100.
If we do that then basically everything on the bike that can fit into a standard oven is getting powdercoated. Black rims, green hubs anyone
-
scheckaet
- KDXRider.net
- Posts: 3740
- Joined: 12:09 am Nov 10 2005
- Country:
- Location: edmond oklahoma
Re: 1989 KDX 200 Basket Case Project
thought about that cheap stuff from HF, some have had good result with it. I didn't cuz well i don't have a good air compressor and a good way to sandblast.
02 KX 200 hybrid: RB head and carb
Sold ☹ DRZ 400 SM
bike build: http://www.kdxrider.net/forums/viewtopi ... ike+stable
bike profile http://www.kdxrider.net/forums/viewtopi ... 0709#30709
newb info: http://www.kdxrider.net/forums/viewtopi ... 57#p117919
jetting guide: http://www.kdxrider.net/forums/viewtopi ... 105&t=1156
Sold ☹ DRZ 400 SM
bike build: http://www.kdxrider.net/forums/viewtopi ... ike+stable
bike profile http://www.kdxrider.net/forums/viewtopi ... 0709#30709
newb info: http://www.kdxrider.net/forums/viewtopi ... 57#p117919
jetting guide: http://www.kdxrider.net/forums/viewtopi ... 105&t=1156
-
Thrahl
- Member
- Posts: 222
- Joined: 08:51 am May 30 2012
- Country:
Re: 1989 KDX 200 Basket Case Project
I was looking at this Craftsman one because I have read good things about it and it is extremely cheap.scheckaet wrote:thought about that cheap stuff from HF, some have had good result with it. I didn't cuz well i don't have a good air compressor and a good way to sandblast.
You don't need a compressor either. It only needs like ~10 psi and it makes it internally.
The blasting is the issue for me. I have a HF media blaster with glass beads, sand, soda, etc but it isn't that great.
I do have limited access to a professional bead blasting cabinet but it belongs to a friend of a friend so I can't really rely on that.
There are probably local companies around that will sand/bead blast and do a proper job for not much money but I haven't looked into it much yet.
You also have to have an oven. A regular home oven will work fine, you just can never cook in it again and it isn't very large.
I haven't worked out all of the kinks yet haha
-
Thrahl
- Member
- Posts: 222
- Joined: 08:51 am May 30 2012
- Country:
1989 KDX 200 Basket Case Project
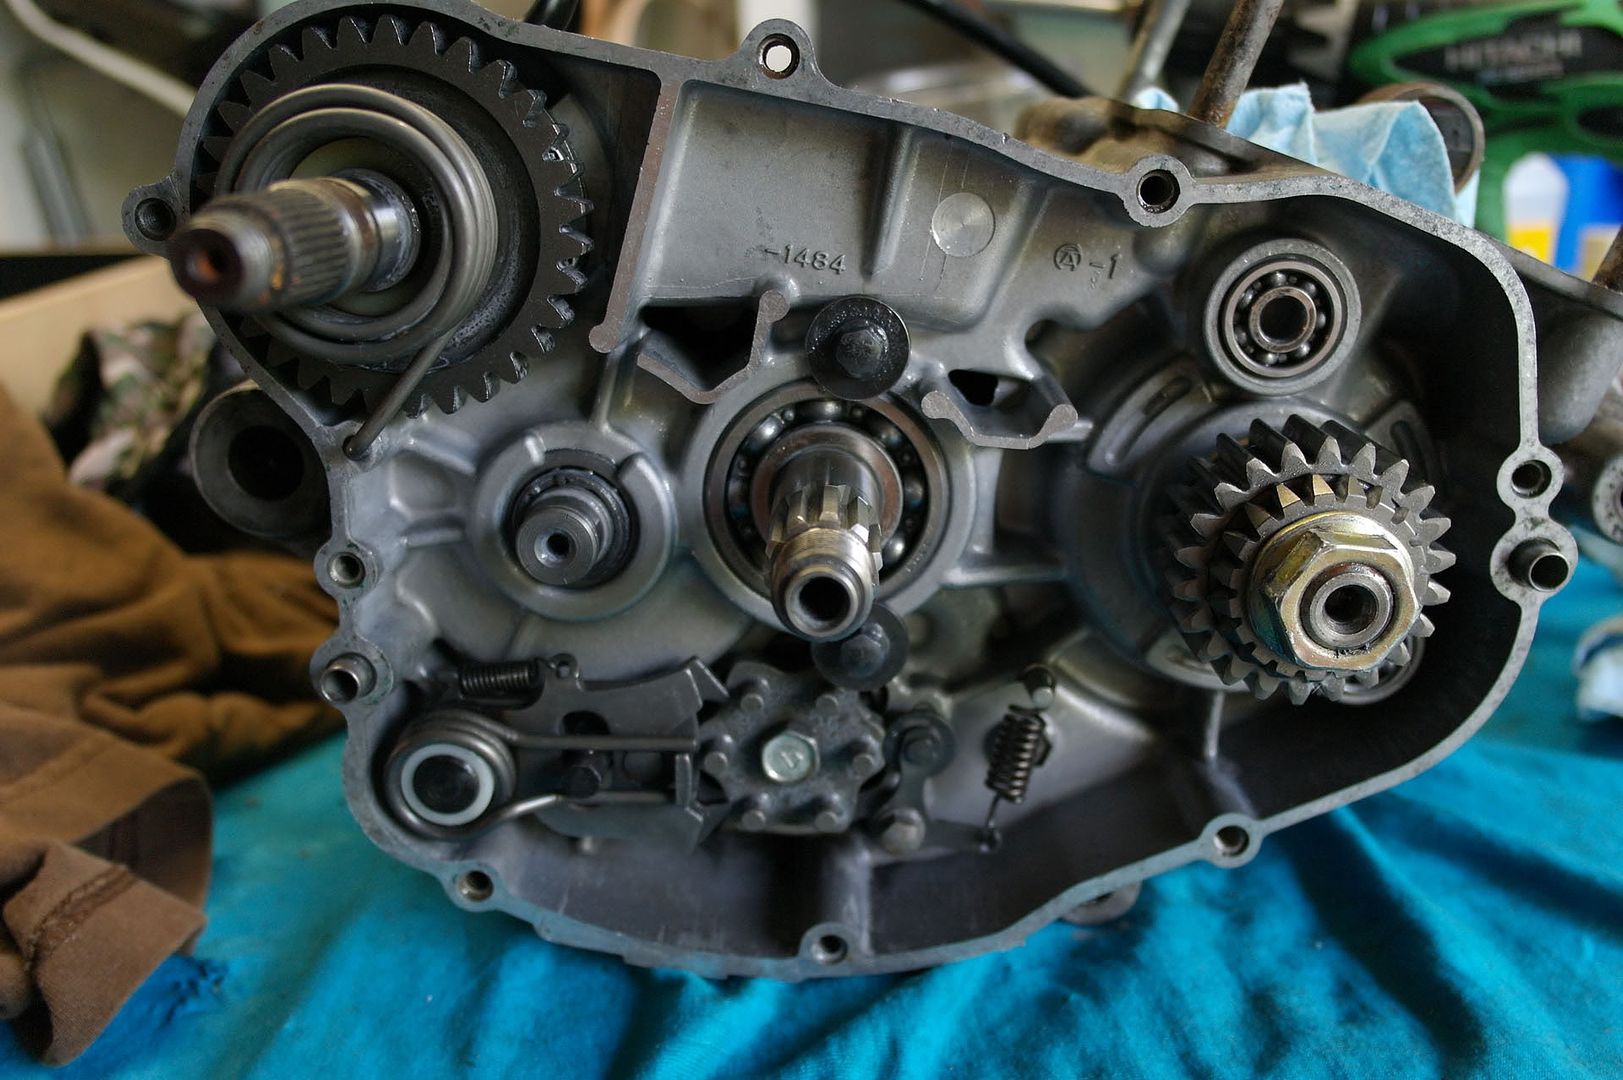
Well I got some time yesterday and started to put the bottom end together.
I went and bought a bearing separator from HF to pull the bearings from the crank.
Eventually got them off after fighting with it for hours.
Installed the new bearings in the case halves, froze the crank and heated the right side bearing.
Dropped together with a nice clunk. Finally something went as expected.
I then attempted to install the left side with heat and freeze while the crank was still cold.
Not so lucky this time. Actually wasn't even close. It maybe went 1/4 of the way down and light taps with the hammer did nothing.
Ended up pulling it back off with the case splitter, cleaned the sealant off and called it a day.
Today I went and bought some dry ice. I figured I would get that crank VERY cold this time and maybe I would get better results.
Still nothing. About as far as yesterday. Maybe it wasn't cold enough I don't know.
So I don't know if anyone else has tried to do the freeze and heat on the left side case but it was useless for me.
I don't want to spend $60 on a tool I will (I hope to God) only have to use once.
So I guess I'll make a little jig to protect the spacing and use a press. Hopefully I can do that tomorrow.
Note to self: Never open up a bottom end again unless absolutely necessary. What a nightmare.
As for the good news, I got my new gripper seat cover installed. Looks great.
Also test fit my 99-02 KX 125/250 rear fender. Just had to cut some fins off the top and it seems like it is going to go on very well.
I'll give updates as to what exactly will be involved when it comes time to install it. But I think it will make a great looking MX style fender for very cheap (picked mine up great condition for $25).
-
Thrahl
- Member
- Posts: 222
- Joined: 08:51 am May 30 2012
- Country:
1989 KDX 200 Basket Case Project
Alright well maybe good news, maybe not.
I got the cases together
I used the heat and freeze but this time stuck the entire right side w/ crank in the freezer for about 1.5 hours, then held dry ice on the crank and heated the bearing a little.
Dropped right on with a nice clunk.
The issue is that both the input and output shafts have a little play. They can move in and out of the case independent of each other about 1mm or so. This doesn't seem right.
Last night I was looking at a washer I had pulled from something but didn't know where it went. I looked and looked in the manual and couldn't find where it was supposed to go.
So I tested the tranny with and without it installed with the left case half off and it seemed to only function properly with the washer out so I left it out. I thought maybe it went behind the clutch.
I'm wondering if that washer was supposed to be inside the crankcase now. Here's a pic.

It wouldn't be a huge deal if I have to resplit and install that washer again since I know how to do it now, it would just be annoying.
I got the cases together
I used the heat and freeze but this time stuck the entire right side w/ crank in the freezer for about 1.5 hours, then held dry ice on the crank and heated the bearing a little.
Dropped right on with a nice clunk.
The issue is that both the input and output shafts have a little play. They can move in and out of the case independent of each other about 1mm or so. This doesn't seem right.
Last night I was looking at a washer I had pulled from something but didn't know where it went. I looked and looked in the manual and couldn't find where it was supposed to go.
So I tested the tranny with and without it installed with the left case half off and it seemed to only function properly with the washer out so I left it out. I thought maybe it went behind the clutch.
I'm wondering if that washer was supposed to be inside the crankcase now.
It wouldn't be a huge deal if I have to resplit and install that washer again since I know how to do it now, it would just be annoying.
-
KDXrider1989
- Member
- Posts: 643
- Joined: 09:05 pm Sep 07 2010
- Country:
- Location: Houston, TX
Re: 1989 KDX 200 Basket Case Project
that sucks, I hate it when I forget small stuff like that that end up potentially causing big problems. That looks like the thrust washer for the clutch basket though, so you might be good
-
scheckaet
- KDXRider.net
- Posts: 3740
- Joined: 12:09 am Nov 10 2005
- Country:
- Location: edmond oklahoma
1989 KDX 200 Basket Case Project
+1 on the clutch washer
02 KX 200 hybrid: RB head and carb
Sold ☹ DRZ 400 SM
bike build: http://www.kdxrider.net/forums/viewtopi ... ike+stable
bike profile http://www.kdxrider.net/forums/viewtopi ... 0709#30709
newb info: http://www.kdxrider.net/forums/viewtopi ... 57#p117919
jetting guide: http://www.kdxrider.net/forums/viewtopi ... 105&t=1156
Sold ☹ DRZ 400 SM
bike build: http://www.kdxrider.net/forums/viewtopi ... ike+stable
bike profile http://www.kdxrider.net/forums/viewtopi ... 0709#30709
newb info: http://www.kdxrider.net/forums/viewtopi ... 57#p117919
jetting guide: http://www.kdxrider.net/forums/viewtopi ... 105&t=1156
-
Thrahl
- Member
- Posts: 222
- Joined: 08:51 am May 30 2012
- Country:
Re: 1989 KDX 200 Basket Case Project
I assumed it was the thrust washer when I was assembling everything.KDXrider1989 wrote:that sucks, I hate it when I forget small stuff like that that end up potentially causing big problems. That looks like the thrust washer for the clutch basket though, so you might be good
I also seem to remember there being a small amount of in and out play in the clutch before I took everything apart too.
Can anyone who has recently worked on their clutch tell me if they have a small amount of direct in and out play in the transmission shaft?
Or if anyone could just run out to their bike and feel their output shaft for play.
I really want to get this thing together as I could even get it started up tomorrow but don't want to do anything until I know I don't need to split the cases again.
-
Julien D

- KDXRider.net

- Posts: 5858
- Joined: 07:53 pm Nov 07 2008
- Country: USA
- Contact:
1989 KDX 200 Basket Case Project
That may be the thrust washer that has to be in place between the basket and hub. What other large washers have you got left?
-
Thrahl
- Member
- Posts: 222
- Joined: 08:51 am May 30 2012
- Country:
1989 KDX 200 Basket Case Project
Nothing that isn't bagged and labeled with it's respective parts.Julien D wrote:That may be the thrust washer that has to be in place between the basket and hub. What other large washers have you got left?
The thrust washer isn't in the bag with the clutch though so that must be it. It must have been stuck on the shaft and I forgot to bag it.
After a little research it seems like it is normal for their to be a little play in the output shaft. I guess it's the same for the input?
Unless someone thinks there definitely should not be in and out movement in the two shafts I am going to go ahead and assemble the engine tomorrow.
-
Julien D
- KDXRider.net
- Posts: 5858
- Joined: 07:53 pm Nov 07 2008
- Country: USA
- Contact:
Re: 1989 KDX 200 Basket Case Project
Sounds reasonable. I honestly can't remember if there was any play in those areas, but it seems to me there would surely be some movement. I can't think off-hand of anywhere inside the transmission that there was a washer like that. If you have no other thrust washer, it must be the one for the clutch.
Bike is looking sharp, btw. I like the color scheme so far, and those custom radiator guards look sweet!
J.
Bike is looking sharp, btw. I like the color scheme so far, and those custom radiator guards look sweet!
J.
-
KDXrider1989
- Member
- Posts: 643
- Joined: 09:05 pm Sep 07 2010
- Country:
- Location: Houston, TX
Re: 1989 KDX 200 Basket Case Project
I think I remember there being very minimal play on my transmission and clutch. I think it's fine, because metal expands a little when hot
-
Thrahl
- Member
- Posts: 222
- Joined: 08:51 am May 30 2012
- Country:
1989 KDX 200 Basket Case Project
So close I can taste it now  Got the bottom end squared away and piston in.
In the bottom end I had the same issue as SS109 where the crank wasn't center. I used my case splitter to push the crank through and got it pretty dang close, within .05" or so. Looks perfect to the naked eye.
Checked ring gap, was good out of box, don't know if that is usually like that. Wrist pin clips were a bitch to get in but at least I know they aren't going to accidentally come out.
Got the cylinder on, made sure the rings were sat properly with the centering pin things.
Reed box in (thanks again for that SS109) and sprocket installed. When I put the sprocket on it took up the small amount of movement in the output shaft so that's good.
KIPS installed and moving perfectly. There was one bushing that was tighter than the others so I stuck it on the left valve so it will hopefully last a good while before breaking teeth again.
Everything torqued to spec and looking great. Also threw on the clutch, stator, main shaft gears, etc. but haven't torqued them down yet since they will take some force and I will probably need a helping hand.
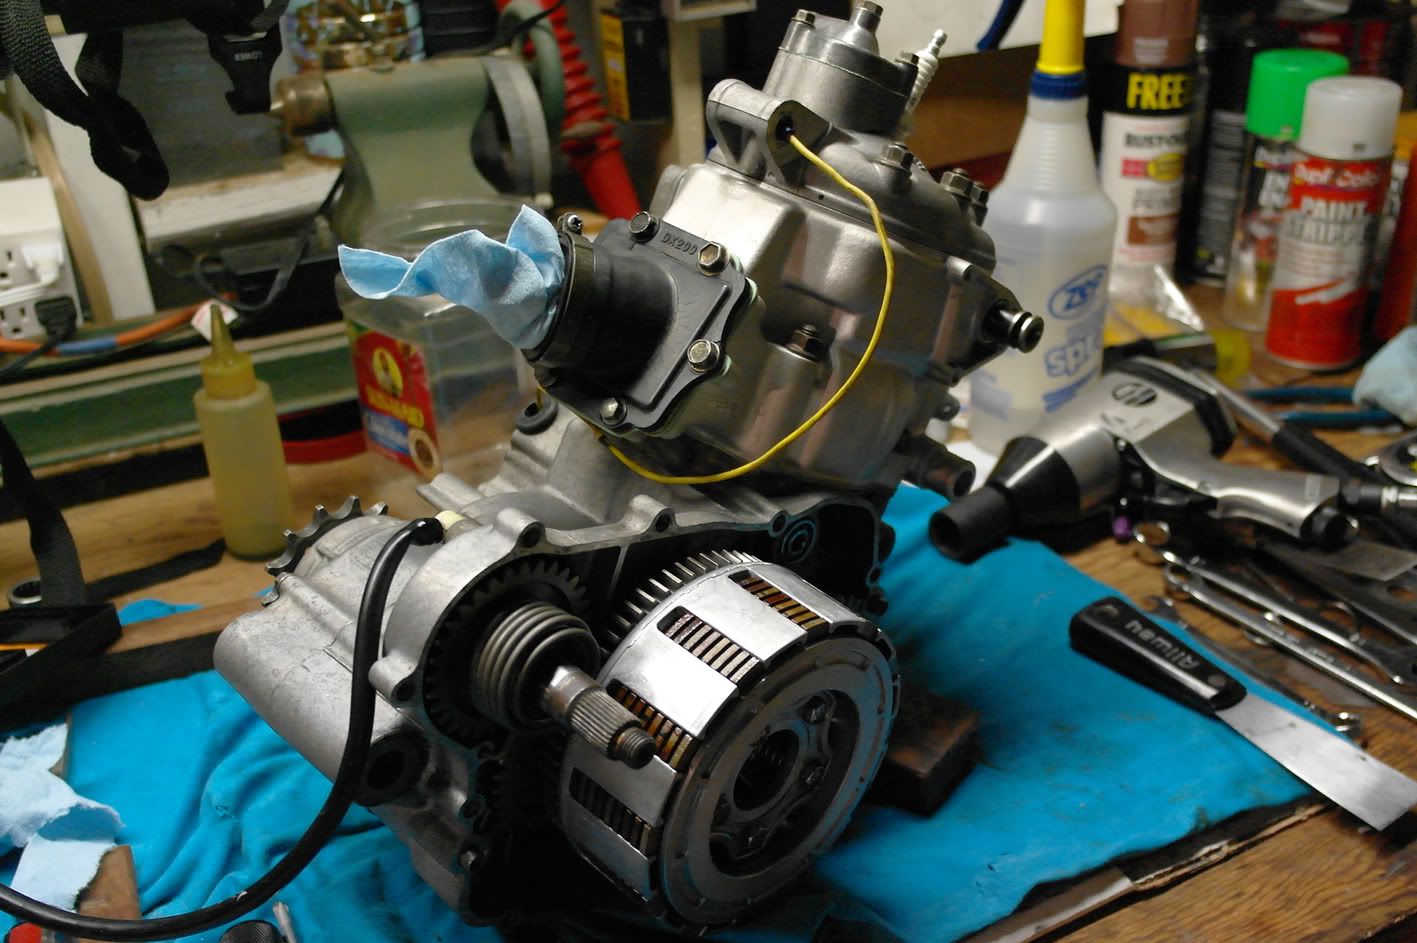
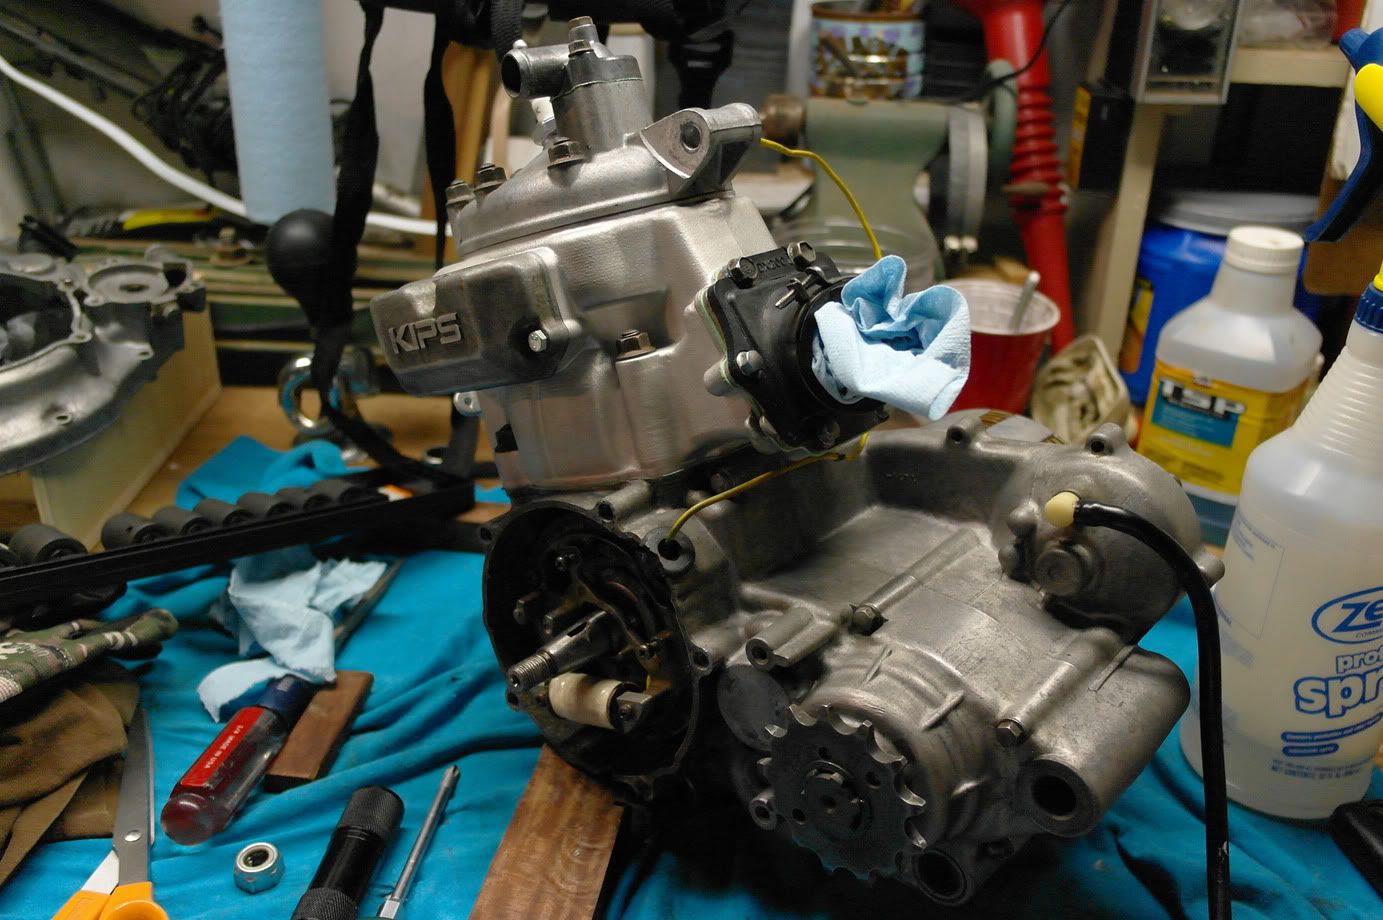
You get a good shot of my expansive and beautifully clean engine building area.
Also, before I got everything super solid I wanted to do a leak test. I just sprayed soapy water around all my gaskets, seals, etc. and put 10-20 PSI from my compressor through a little fitting I made.
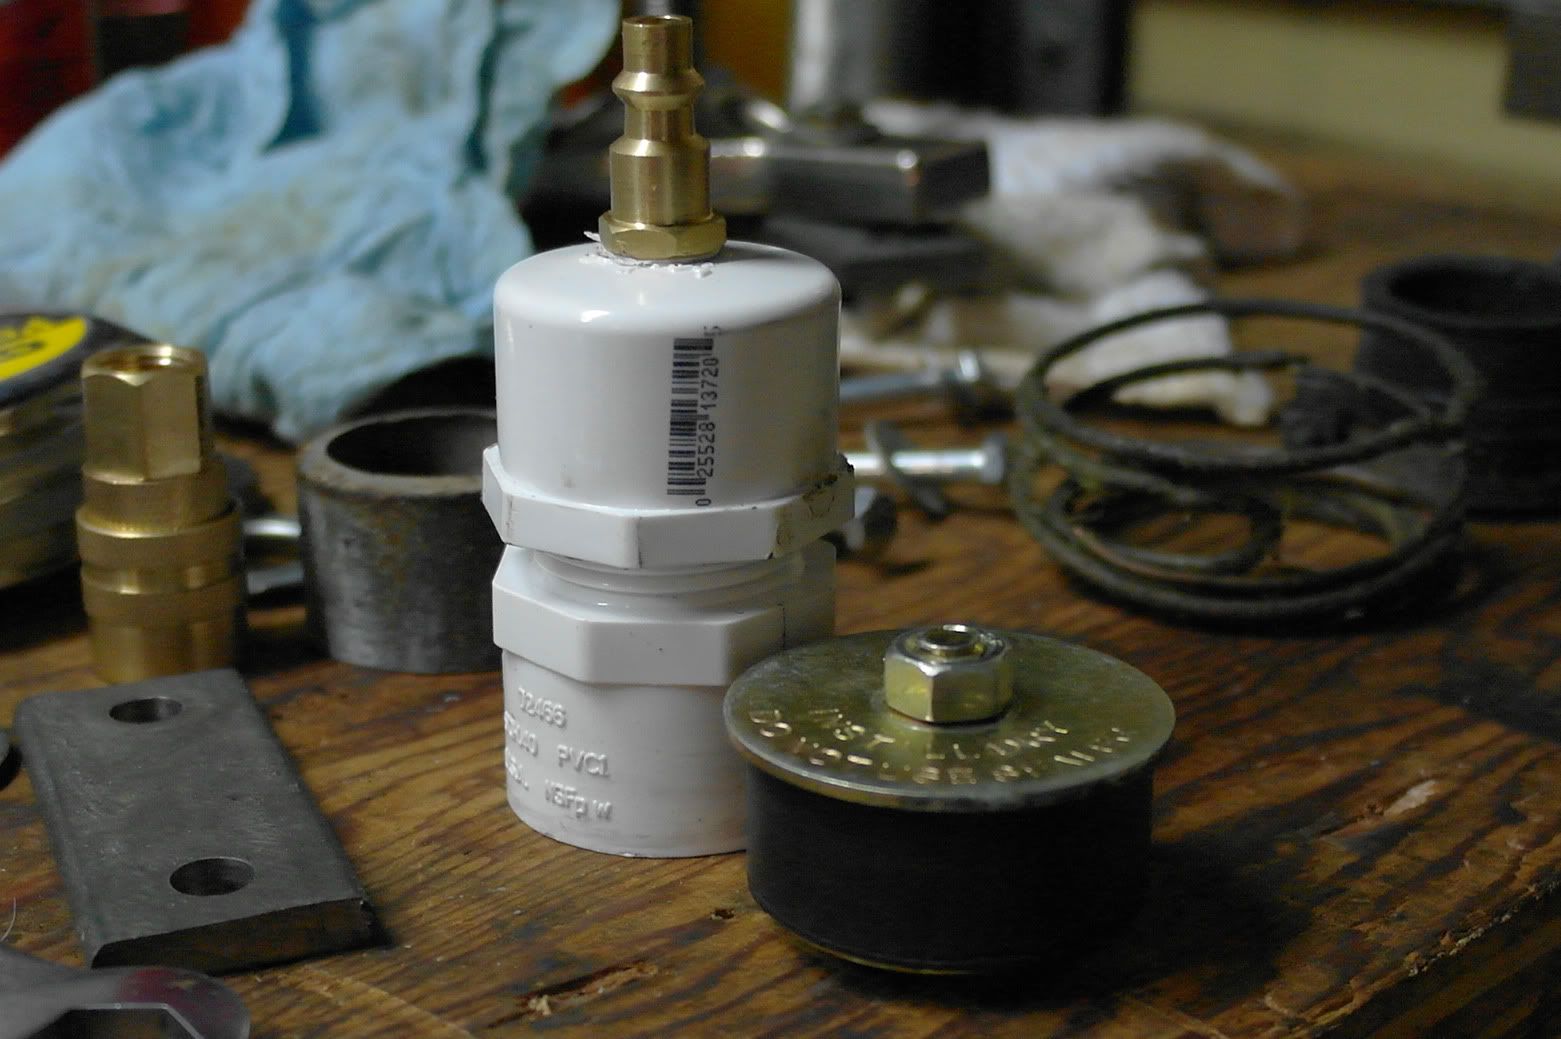
I got the idea from here, but his is a full leakdown tester with a gauge. Mine does the same thing, you just have to manually spray everything to check for leaks.
Rubber exhaust plug - $4
PVC tubing - $1.50
Air fitting - free (lying around in my garage)
Knowing the bike isn't going to run lean from a leak and seize - saves me $300 on replate and piston.
The only leak I found was a little bit around my reed cage. I used a little case sealant on everything and it went right away.
So anyways now it's pretty much just a matter of installing stuff and firing this thing up.
I should be able to work on it more Saturday and hopefully have it running. Still small things to do outside the engine like rubber exhaust mounts, finish fitting the rear fender, etc. Getting close though!
In the bottom end I had the same issue as SS109 where the crank wasn't center. I used my case splitter to push the crank through and got it pretty dang close, within .05" or so. Looks perfect to the naked eye.
Checked ring gap, was good out of box, don't know if that is usually like that. Wrist pin clips were a bitch to get in but at least I know they aren't going to accidentally come out.
Got the cylinder on, made sure the rings were sat properly with the centering pin things.
Reed box in (thanks again for that SS109) and sprocket installed. When I put the sprocket on it took up the small amount of movement in the output shaft so that's good.
KIPS installed and moving perfectly. There was one bushing that was tighter than the others so I stuck it on the left valve so it will hopefully last a good while before breaking teeth again.
Everything torqued to spec and looking great. Also threw on the clutch, stator, main shaft gears, etc. but haven't torqued them down yet since they will take some force and I will probably need a helping hand.
You get a good shot of my expansive and beautifully clean engine building area.
Also, before I got everything super solid I wanted to do a leak test. I just sprayed soapy water around all my gaskets, seals, etc. and put 10-20 PSI from my compressor through a little fitting I made.
I got the idea from here, but his is a full leakdown tester with a gauge. Mine does the same thing, you just have to manually spray everything to check for leaks.
Rubber exhaust plug - $4
PVC tubing - $1.50
Air fitting - free (lying around in my garage)
Knowing the bike isn't going to run lean from a leak and seize - saves me $300 on replate and piston.
The only leak I found was a little bit around my reed cage. I used a little case sealant on everything and it went right away.
So anyways now it's pretty much just a matter of installing stuff and firing this thing up.
I should be able to work on it more Saturday and hopefully have it running. Still small things to do outside the engine like rubber exhaust mounts, finish fitting the rear fender, etc. Getting close though!
-
SS109

- KDXRider.net
- Posts: 5795
- Joined: 05:11 am Aug 23 2009
- Country: USA
- Location: Tucson, AZ, USA
- Contact:
1989 KDX 200 Basket Case Project
No problem on the parts. Glad they are helping someone out. Now, hurry up and get that thing running! 
Youtube Channel: WildAzzRacing
AZ State Parks & Trails OHV Ambassador - Trail Riders of Southern AZ
Current KDX: '98 KDX220
Old KDX: '90 KDX200 -White/Blue
'11 GasGas EC250R
AZ State Parks & Trails OHV Ambassador - Trail Riders of Southern AZ
Current KDX: '98 KDX220
Old KDX: '90 KDX200 -White/Blue
'11 GasGas EC250R
-
Thrahl
- Member
- Posts: 222
- Joined: 08:51 am May 30 2012
- Country:
1989 KDX 200 Basket Case Project
Well guys I got everything together. I took great care assembling the engine, making sure everything was done properly. Ring gap was good, rings sat on piston good, rings aligned on their pins in the cylinder, piston felt good in the cylinder, everything assembled with a little bit of 2 stroke oil. Crank bearings had no play, they were brand new of course, there was no play in the rod up and down, all bearings felt nice. No air leaks anywhere, everything checked out good.
Basically everything went together smooth, but now I think it's toast.. Once I got got the idle adjust set right it started without too much trouble. Let it idle until it was at operating temp, then let it cool down. Started right back up, took a spin in my yard keeping low rpms for a few minutes then let it cool. Fired it back up and took it for another spin with a little higher rpms, then let cool. There were a few small leaks but I got them fixed. It was dark so I parked it for the night. Came back Saturday and it started up easily, let it warm up and took it up and down the street, this time bringing the rpms up there a ways. It pulls strong and everything felt good.
The problem was that it was revving up much too soon. Max rpms are reached at only over half throttle. At first I thought it was just super fast and I wasn't used to it but once it was broke in and I was twisting the throttle a good amount, I realized it was hitting max too soon. I took the KIPS shaft cover off and the valves are opening before even 1/2 throttle.
Then I started listening closer and realized the engine just didn't sound good. It sounds like the piston is basically knocking around. I took the pipe off to look in the cylinder and sure enough the piston is scored and I can see that the there are seizure marks in the cylinder on the intake side. There is still a lot of compression and it pulls hard but obviously is wrecked just as bad as it was when I got it.
Here is a video of it running.
[youtube][/youtube]
If that embed doesn't work for some reason here is a direct link.
The first piece of tape on the throttle housing is 0 throttle and the 2nd piece is half. Full throttle is far below that and you can see that I never even get close to it.
It makes me sick to even think about all of the time and money I have spent on this bike only to have this happen before I have even taken it on its first ride.
I will probably take the engine back apart to at least see what happened, but I don't think I will be rebuilding this bike or putting any more time into it any time soon.
Here is a picture of the finished bike.
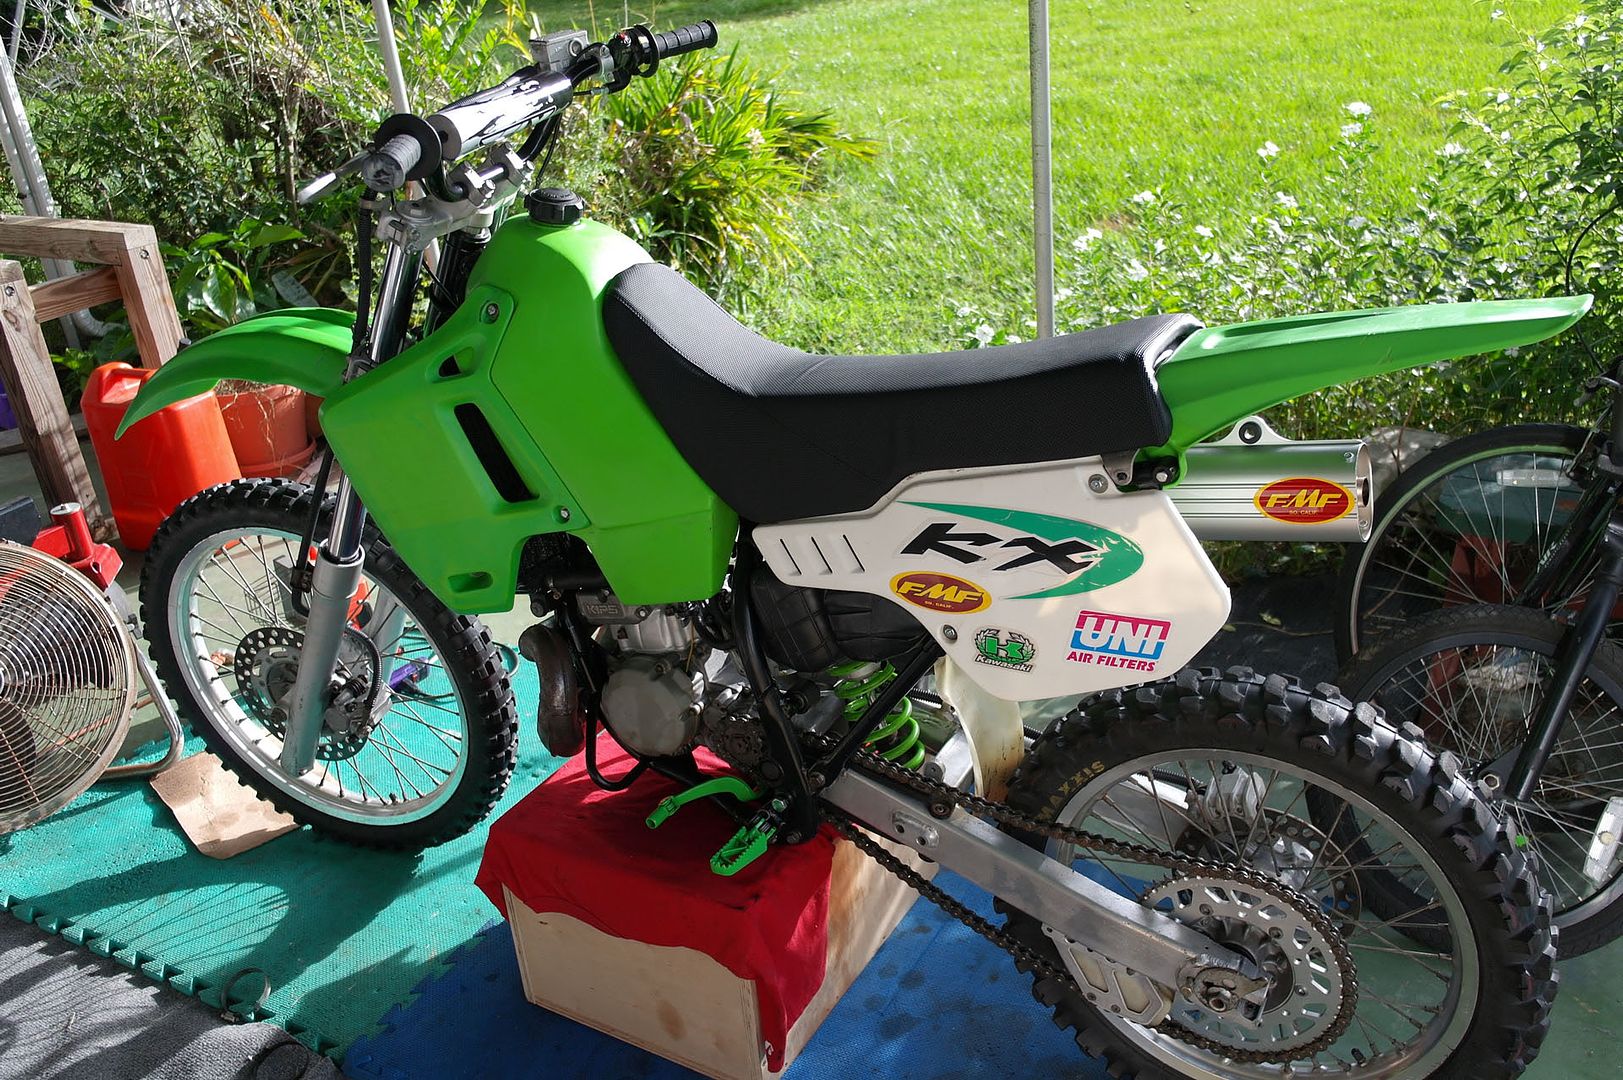
I really like how it turned out cosmetically. Just wish I could say the same about the engine.
What are your thoughts about running the bike in this condition? The piston and cylinder need to be replaced/replated anyways but I don't want to do more damage than there already is.
Anyways thank you guys for your help on this rebuild. I really appreciate everything you have done in helping me through this.
I apologize that you have helped me so much only for it to come to this.
Basically everything went together smooth, but now I think it's toast.. Once I got got the idle adjust set right it started without too much trouble. Let it idle until it was at operating temp, then let it cool down. Started right back up, took a spin in my yard keeping low rpms for a few minutes then let it cool. Fired it back up and took it for another spin with a little higher rpms, then let cool. There were a few small leaks but I got them fixed. It was dark so I parked it for the night. Came back Saturday and it started up easily, let it warm up and took it up and down the street, this time bringing the rpms up there a ways. It pulls strong and everything felt good.
The problem was that it was revving up much too soon. Max rpms are reached at only over half throttle. At first I thought it was just super fast and I wasn't used to it but once it was broke in and I was twisting the throttle a good amount, I realized it was hitting max too soon. I took the KIPS shaft cover off and the valves are opening before even 1/2 throttle.
Then I started listening closer and realized the engine just didn't sound good. It sounds like the piston is basically knocking around. I took the pipe off to look in the cylinder and sure enough the piston is scored and I can see that the there are seizure marks in the cylinder on the intake side. There is still a lot of compression and it pulls hard but obviously is wrecked just as bad as it was when I got it.
Here is a video of it running.
[youtube][/youtube]
If that embed doesn't work for some reason here is a direct link.
The first piece of tape on the throttle housing is 0 throttle and the 2nd piece is half. Full throttle is far below that and you can see that I never even get close to it.
It makes me sick to even think about all of the time and money I have spent on this bike only to have this happen before I have even taken it on its first ride.
I will probably take the engine back apart to at least see what happened, but I don't think I will be rebuilding this bike or putting any more time into it any time soon.
Here is a picture of the finished bike.
I really like how it turned out cosmetically. Just wish I could say the same about the engine.
What are your thoughts about running the bike in this condition? The piston and cylinder need to be replaced/replated anyways but I don't want to do more damage than there already is.
Anyways thank you guys for your help on this rebuild. I really appreciate everything you have done in helping me through this.
I apologize that you have helped me so much only for it to come to this.
-
rbates9

- Supporting Member II
- Posts: 3164
- Joined: 06:07 pm Apr 27 2010
- Country:
- Location: UPSTATE New York
1989 KDX 200 Basket Case Project
Well that just plain sucks.... Take some pics of the cylinder and piston and some one might be able to help figure out what happened.