Well, Kawasaki didn't build the load to fit the stator hence bulbs blowing.
Anyways, sorry I'm not following what your talking about. I don't see what is wrong with the schematic. Nevermind, I'm sure I found what you were talking about after I reread what the idiot asking the question said.
what are the red, yellow and blk wires for where the headlight used to conect?
KDX Lighting Stator Rewind How-To
Posted: 08:39 pm Apr 23 2013
by Faithfulfather
How many feet of 17 gauge wire should I buy? I am thinking of getting some off of eBay.
Re: KDX Lighting Stator Rewind How-To
Posted: 09:07 pm Apr 23 2013
by Roadhazardguy
Its 18ga they used, 17 would work too but it would change your output a little. I think it was said that a 1/4lb roll would do but I'm not sure. I was just going to get this one so I can do several coils and have extra in case I mess up or somthing, plus the green enamel is rated for higher temperatures. And well..
it just looks cool on our kawasakis. http://www.ebay.com/itm/261087232615?ss ... 1438.l2649
Re: KDX Lighting Stator Rewind How-To
Posted: 09:12 pm Apr 23 2013
by Faithfulfather
Roadhazardguy wrote:Its 18ga they used, 17 would work too but it would change your output a little. I think it was said that a 1/4lb roll would do but I'm not sure. I was just going to get this one so I can do several coils and have extra in case I mess up or somthing, plus the green enamel is rated for higher temperatures. And well..
it just looks cool on our kawasakis. http://www.ebay.com/itm/261087232615?ss ... 1438.l2649
Thank you for the quick response. I think I'll get the same one. I let y'all know how it turns out.
Re: KDX Lighting Stator Rewind How-To
Posted: 09:27 pm Apr 23 2013
by Roadhazardguy
Yeah no problem man, sounds good. Let us know how it goes and take some pictures, we all like pictures!
KDX Lighting Stator Rewind How-To
Posted: 09:20 pm Apr 24 2013
by RailwayRog
dmimoto wrote:
RailwayRog wrote:I'm in the process of rewinding my stator, the only difference is I'll be installing a regulator/rectifier (i have a battery that needs charging for my dual sport accessories).
So my question here is; instead of placing the ground wire from the stator back to the frame of the bike i believe I'll have to run that wire back to the reg/ref?
I guess this is what you call "floating ground"?
Anyone here done this mod?
How did your system work out ?
I'm doing the same thing on my 2003 200. I'm using Trail Tech's Reg/Rec and a 2200 mAh Ni-Cad battery to power a socket for charging my GPS and phone on multi day rides here in Co.
I have the 18 ga wire ordered and plan to rewind the coil while I have it apart to add the floating ground.
Sorry about getting back so late.
I wound up not rewinding the stator just floated the ground, installed a reg/rect and battery.
Works great, though I'm using it for lights only.
KDX Lighting Stator Rewind How-To
Posted: 08:30 pm Aug 24 2013
by tlevta
If I wanted to do the ignition source coil, could I rewind it the same way as the lighting coil?
Re: KDX Lighting Stator Rewind How-To
Posted: 10:15 pm Aug 24 2013
by Roadhazardguy
Yes you can rewind it the same way but with 34GA wire instead of 18GA. You'll probably want to build some sort of jig to speed up the process a little because it will take a lot more wraps. Or weld a small rod to a piece of strap that you've bent to go around one end of the coil and with a bolt holding it secure then put that in a variable speed drill and go at it. Clear as mud? I'll draw a picture or something if you don't understand what I'm trying to say.
Re: KDX Lighting Stator Rewind How-To
Posted: 11:40 pm Aug 24 2013
by chkdx
Just curious tlevta, why do you want to do the ignition coil? Are you trying to increase its output, or just fixing a damaged one?
KDX Lighting Stator Rewind How-To
Posted: 12:21 am Aug 25 2013
by tlevta
My 91 KDX 250 has an ignition issue. I've checked the stator with a meter and haven't found any open lines yet. The CDI is another story, and that might be what I've got to replace.
Anyway, both stator windings are looking pretty old, and I'm paranoid they'll fail while I'm 30 miles away from the truck.
Re: KDX Lighting Stator Rewind How-To
Posted: 12:23 am Aug 25 2013
by tlevta
Roadhazardguy wrote:Yes you can rewind it the same way but with 34GA wire instead of 18GA. You'll probably want to build some sort of jig to speed up the process a little because it will take a lot more wraps. Or weld a small rod to a piece of strap that you've bent to go around one end of the coil and with a bolt holding it secure then put that in a variable speed drill and go at it. Clear as mud? I'll draw a picture or something if you don't understand what I'm trying to say.
I like the idea, but yeah it would be cool if you could illustrate that for us, please.
Re: KDX Lighting Stator Rewind How-To
Posted: 10:10 pm Aug 25 2013
by Roadhazardguy
OK here's my quick 5yo drawing skills in action. it should make a little more sense.
KDX Lighting Stator Rewind How-To
Posted: 02:07 pm Aug 27 2013
by tlevta
I understand, now. I'll rig up something like that when I get around to it.
Re: KDX Lighting Stator Rewind How-To
Posted: 05:46 pm Aug 27 2013
by bufftester
Stator windings aren't prone to just fail, they aren't moving and are fairly well protected. I personally have never seen or even heard of one going bad on a bike (did lose one on my jetski but that was due to a poor decision, a huge wave, and frantic bailing to prevent a Titanic scenario ). As long as it ohms good I'd be more suspect of the coil/wires or CDI unit. Most rewind just the lighting coil for the increased output, not really necessary on the ignition side since the coil is doing the high voltage step up.
Posted: 01:07 pm Aug 28 2013
by davidstipek
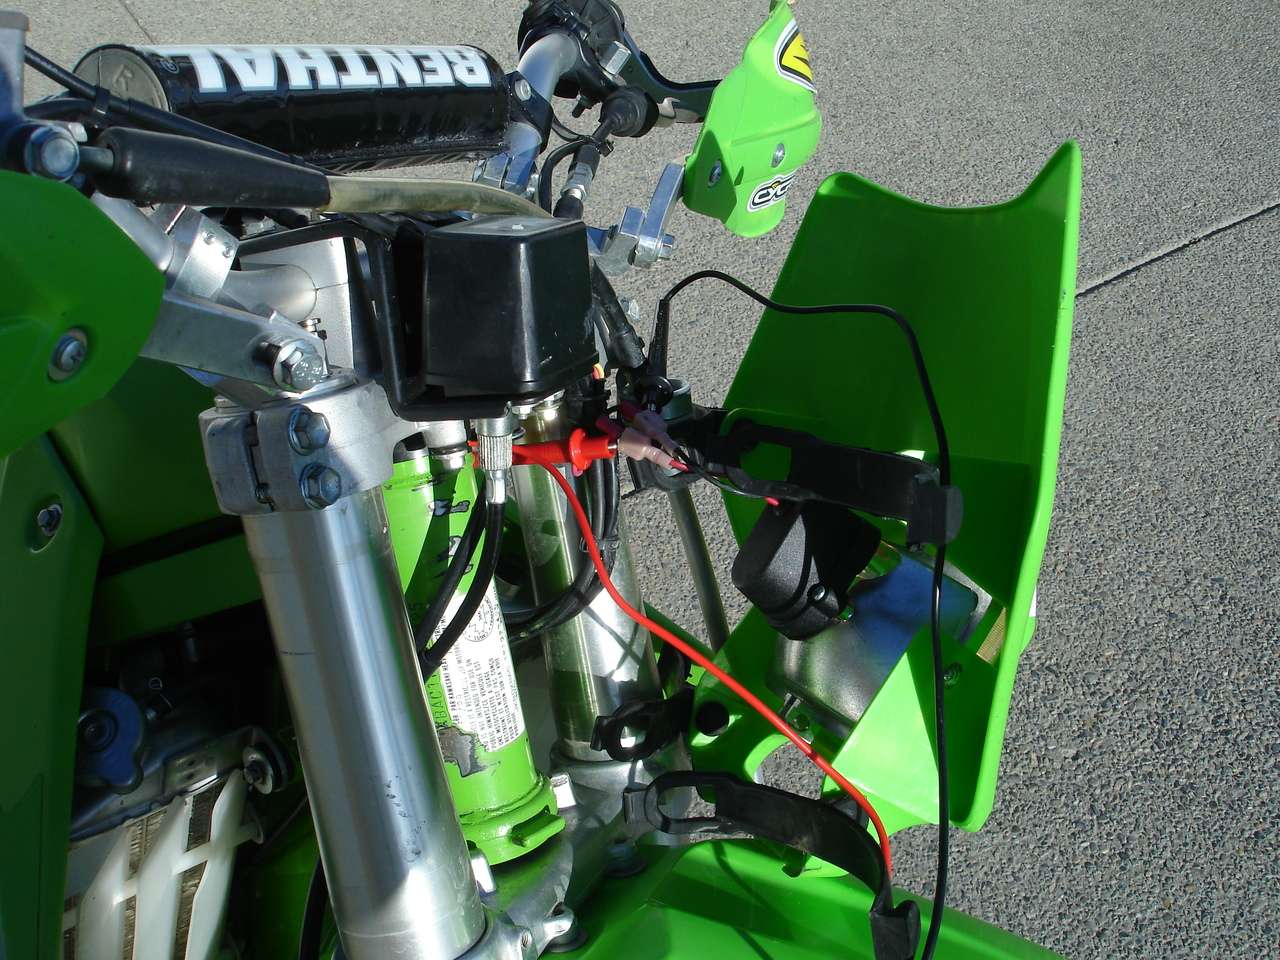
Slick_Nick wrote:Black wire hooked to the COM port, red wire hooked to the 10A max input, and you can see the multimeter setting was on AC amps. Hooked the red wire into the red side of the headlight harness, and the black into the black side as per the pics.
hooked to AC amps? is lighting ACV or DCV?
KDX Lighting Stator Rewind How-To
Posted: 01:34 pm Aug 28 2013
by davidstipek
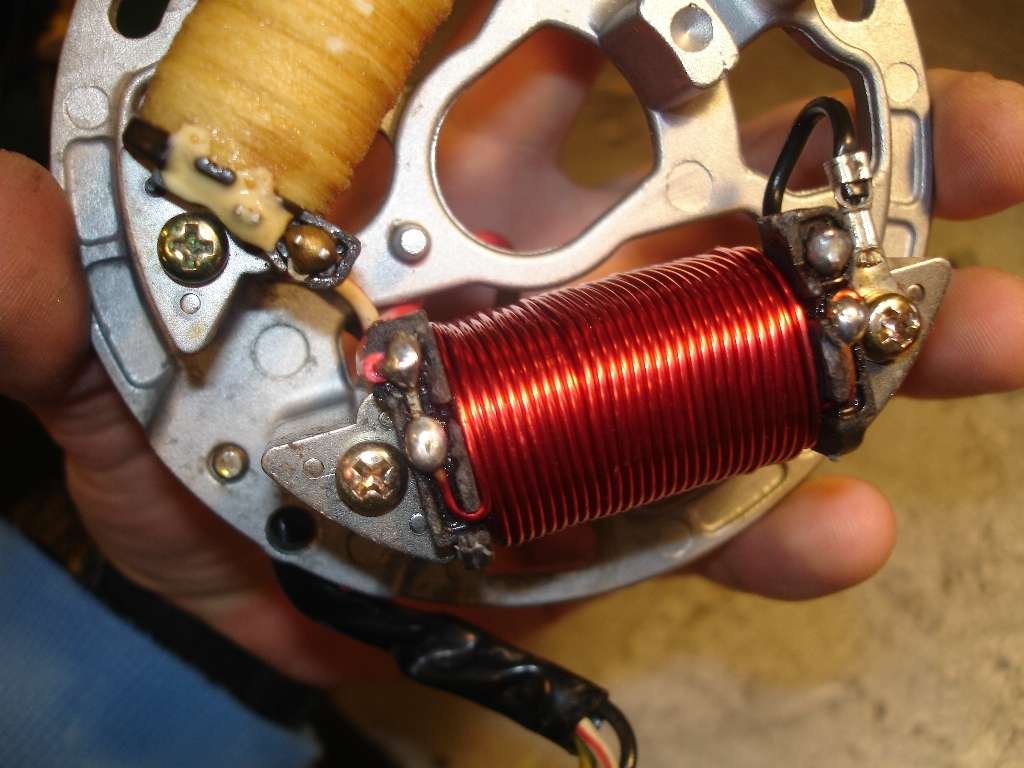
Slick_Nick wrote:Quick How-To on rewinding your stock lighting stator. The setup I ended up with tested out at 98W, the stock stator at 60W. Now, I don't dual-sport my bike, but I wanted a brighter headlight for those nights when you're caught out just after sunset. 100W is more than enough for a standard headlight / tail light. This procedure was done on an A/H series KDX, but the basic procedure should apply for any bike with a single coil AC generator. Onto the rewind.
You will need:
- A flywheel puller
- A flywheel holder
- Socket set
- Soldering iron
- Side cutters / wire strippers
- 17GA coated magnet wire, 1 small spool should do
Remove the flywheel cover, use a flywheel holder to remove the 17mm nut on the flywheel. use your puller to remove the flywheel. Remember, on the KDX those are LEFT HAND THREADS for the puller.
Unplug the stator wire. The connection is found up on the right side of the bike just by the shock reservoir.
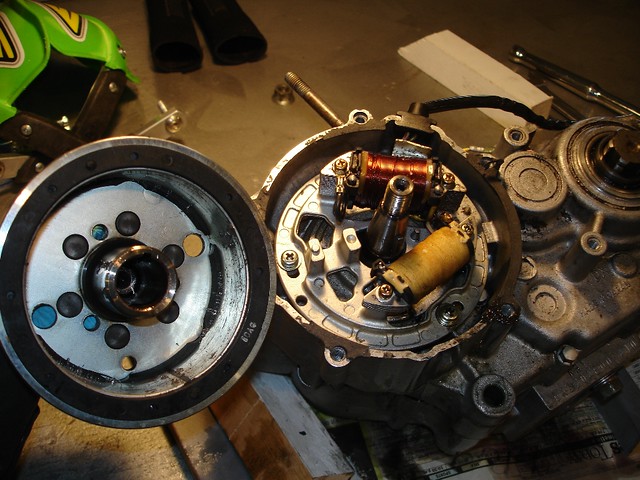
Remove the three phillips screws with an impact hammer if they're stuck, and remove the stator. Pay close attention to the timing reference marks, so you can put the stator back in correctly.
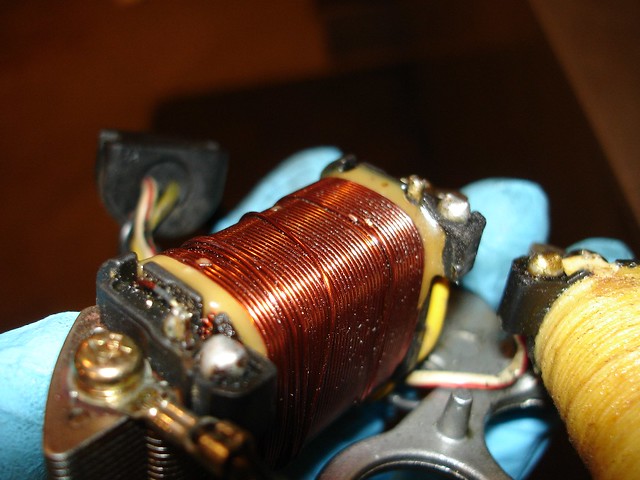
There are two coils on the stator plate, the ignition coil, and the lighting coil. The lighting coil (the one we're concerned with) is the larger, uncoated coil. Go ahead and remove the coil from the stator plate, by removing the two phillips screws. You will need to clip the power wire, do so as close to the coil as you can. This will leave lots to solder back on later. You should now have the coil all by itself.
Now, de-solder the ends of the coil wires, the black ground wire can remain. You want to clean all the old solder off. Remove the old coil of wire. There will be a LOT of it, like 200 yards worth, not kidding.
Pay special attention to how the wire is wrapped around! What direction, and where it starts and where it ends.
Using your coated wire, simply rewind the stator just like it was stock, leaving extra at each end for soldering. Read:
For the best possible result, keep the wire as tight as possible. I had a friend hold the spool taught while I wrapped the stator. This is a time consuming process, be patient and it will pay off. The more wraps of wire you can fit the better, and the tighter they're packed the better.
Be really careful not to scratch the coating off the wire. If there's a short in the stator, you've just dropped your output to nothing. The idea is to fit as much wire as possible on the coil, obviously without hitting the flywheel. The stock wire was wound about to that point, you can use my pics for reference, but that is about all that would fit under the flywheel.
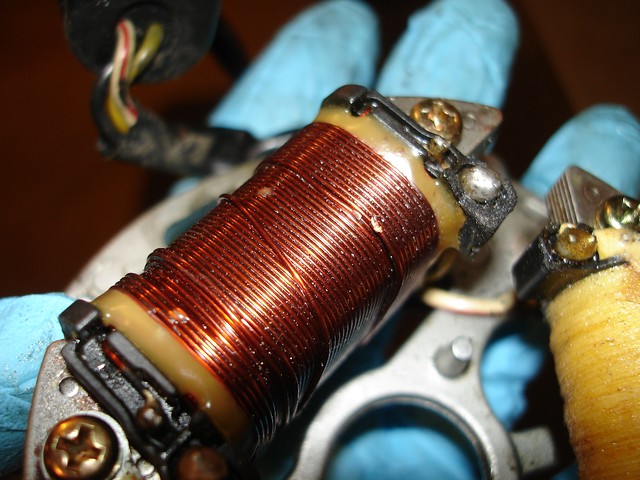
Done wrapping now? Good. Time to solder those ends on. I cut just enough to reach the soldering terminals. This is definitly a measure twice, cut once kinda deal.
Scrape the coating off the last 1/4" or so, and solder the wire to the posts. This was easily done because you paid attention to how it all came off, right?
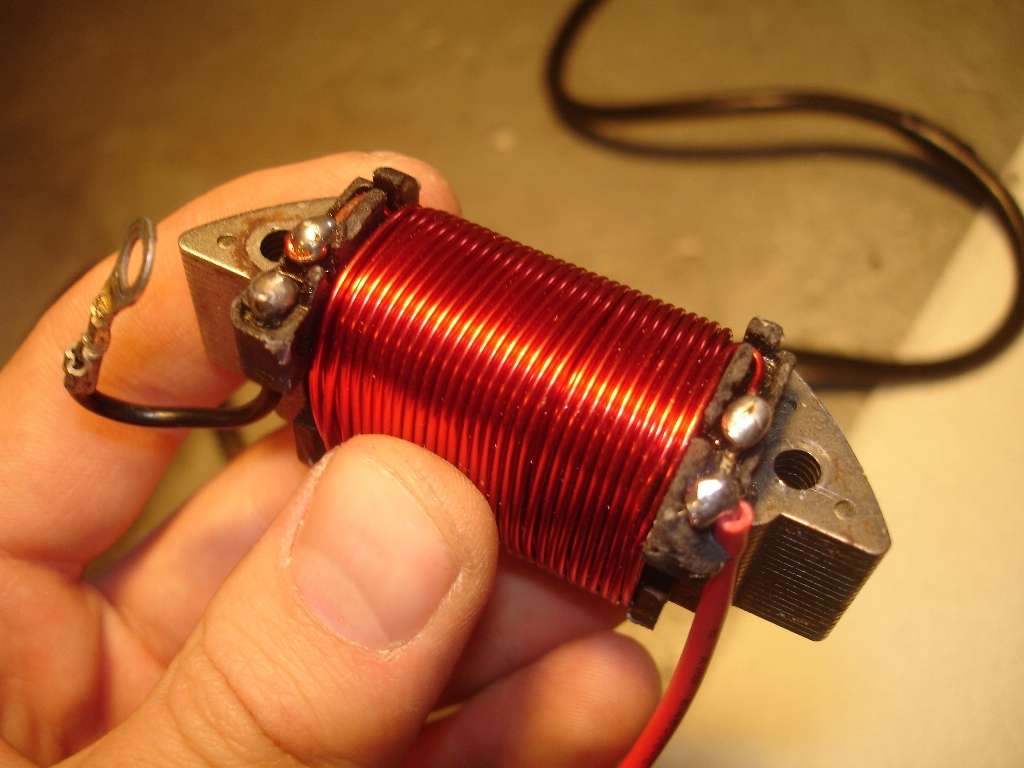
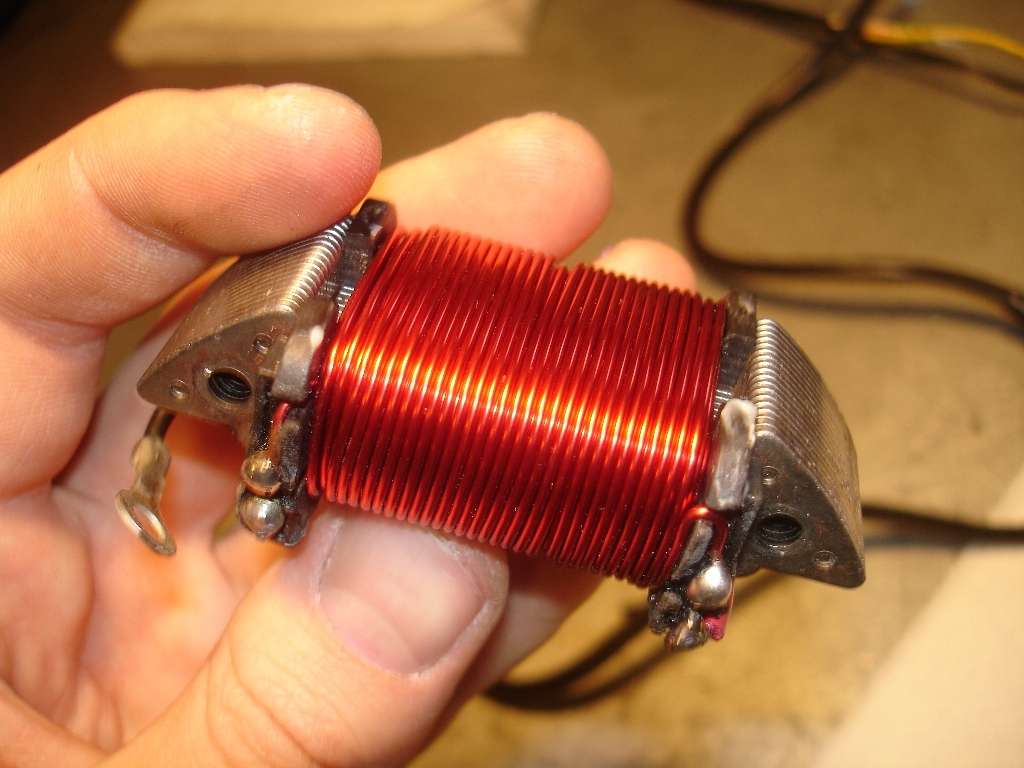
Solder on a new output wire where the old one was attached, leaving about 3" to work with. Your finished stator should look like this:
Cut the output wire to length, solder it back to the output wire you cut in the harness, and heat shrink wrap it to seal it in.
Bolt the coil back to the stator plate:
I like to check the coil for continuity at this point, right from one end of the coil wire to the end of the harness yellow wire. Would be a shame if there was a short and you waited until it was back together to find it, wouldn't it? Any good multimeter is capable of checking continuity.
Reinstall the stator plate, paying attention to the timing marks. This would be a good time to advance or retard your timing, depending on your riding preference. Refer to your service manual for details on that.
[/IMG]
Reinstall the flywheel, make sure it doesnt contact your coil! Bolt the flywheel cover back on, and fire it up!
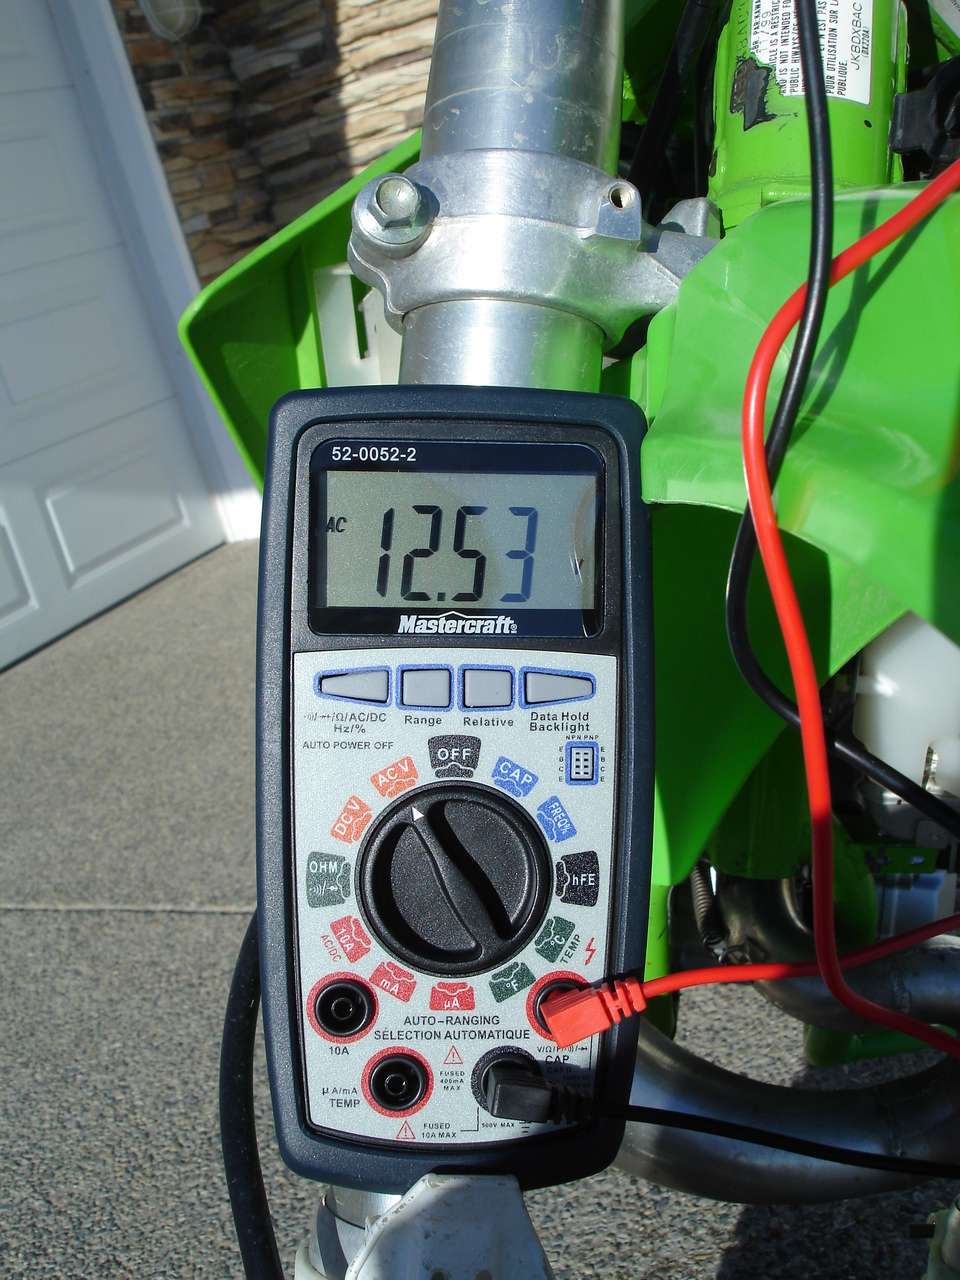
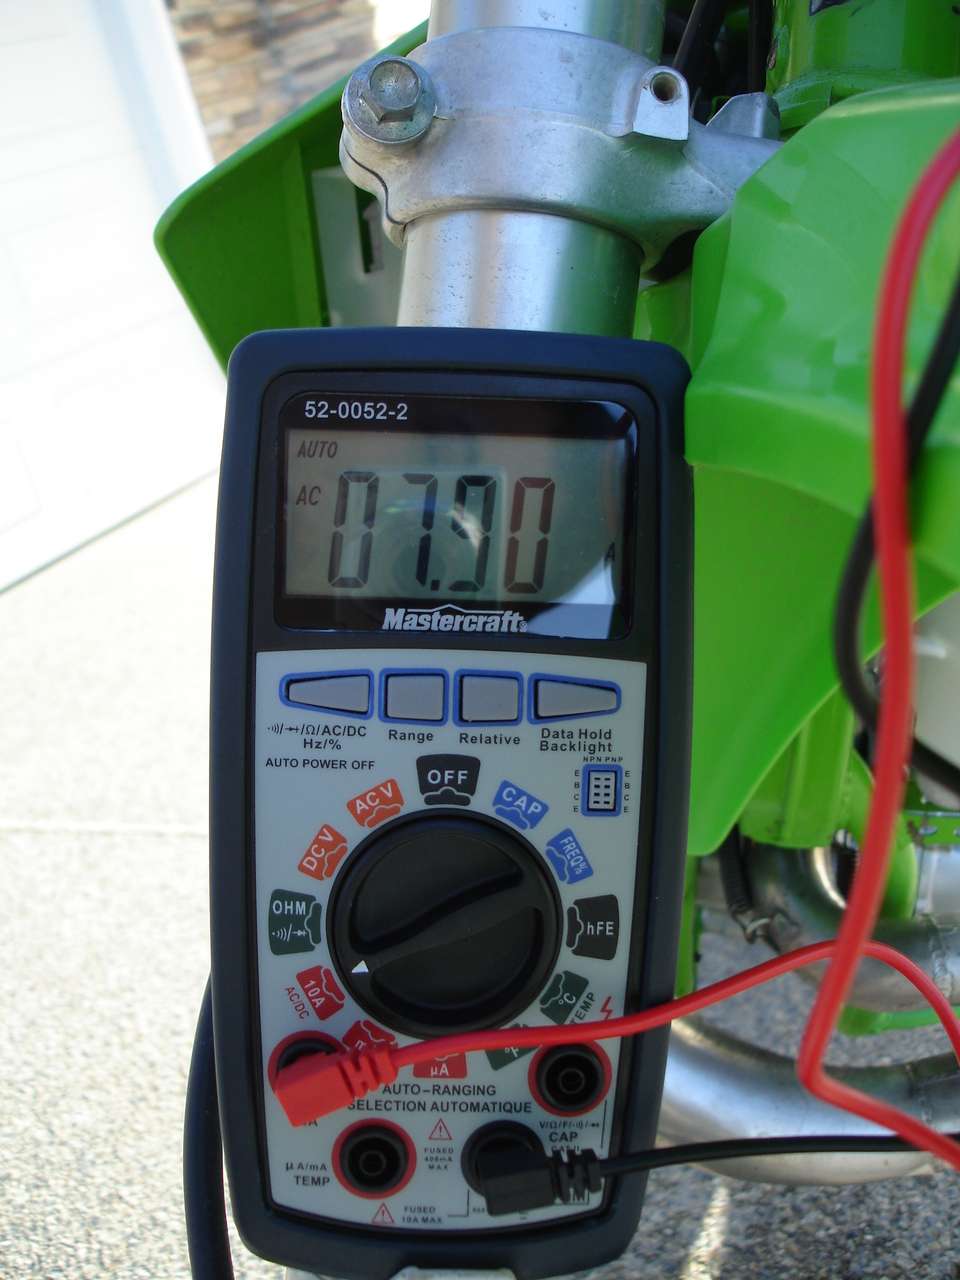
I tested my bike right at the headlight socket, with the stock headlight and tail light on, no other electrical equipment installed.
12.53v AC @ 7.90a AC gives 98.987 watts. Measurements taken just above idle.
Idle gave 12.34v AC @ 7.81a AC, which works out to 96.375 watts.
VIDEO:
So, just under 100W for about $18 and a bit of spare time. Good luck!
Big Question here...
I have a Suzuki RC110Y (Engine is from my old Electric Start Suzuki Crystal... Installed in Custom frame) I have a spare Stator assembly that the Charging/Light coil is toasted. I want to rewap it as you have done... (Good job on explaining!) But I want to use a 7 wire R/R (3 yellows-stator 2 power 2 grounds) this would mean wrapping 3 coils on my coil frame (alt. directions ) all 3 coils woild have a common connection, the other 3 ends go to R/R. Can I Layer them ( as original was done?) or do I need to do side/by/side wraps?
12VAC only goes to R/R; Everything on bike is 12DCV. Issue is that this bike is used for city traffic, cannot go around in 2nd gear @ 4000 rpm+ to charge... I need more wattage (or Amps) @ lower more sustainable RPM, I also think the regulator in the 7 wire R/R should be capable.
Now is what I have written possible? Oh... and also is common connection on coils grounded? or is it floated?
This I really need to know!
David
Re: KDX Lighting Stator Rewind How-To
Posted: 01:37 pm Aug 28 2013
by Roadhazardguy
Lighting is AC unless you add a regulator/ rectifier then it becomes DC after that.
Re: KDX Lighting Stator Rewind How-To
Posted: 01:43 pm Aug 28 2013
by davidstipek
Roadhazardguy wrote:Lighting is AC unless you add a regulator/ rectifier then it becomes DC after that.
Yes, if coil is grounded... If not it is concidered a floating coil/ground and output then is it not DCV?
Re: KDX Lighting Stator Rewind How-To
Posted: 01:51 pm Aug 28 2013
by Roadhazardguy
What you are referring to is a three phase stator. 7 poles, 1 exciter coil and 6 lighting coils. The 6 coils are in pairs of 2 and I think they are staggered. Your three yellow wires will go into a three phase specific reg /rec. Look up a three phase stator for more info.
Floated ground or not it is still AC until it has been rectified.
Re: KDX Lighting Stator Rewind How-To
Posted: 07:12 am Aug 29 2013
by davidstipek
Roadhazardguy wrote:What you are referring to is a three phase stator. 7 poles, 1 exciter coil and 6 lighting coils. The 6 coils are in pairs of 2 and I think they are staggered. Your three yellow wires will go into a three phase specific reg /rec. Look up a three phase stator for more info.
Floated ground or not it is still AC until it has been rectified.
I wish I could post a picture Suzuki 650 shows 3 coils and 7 wire R/R. I can wrap my original coil frame looks simular to the one who posted "How to do..."
Okay, breaking question down... If I wrap 3 coils on frame. Tying one end of each as common and then grounding it. Making each coil 40' in length. using the 7 wire R/R from suzuki 650, what type voltage/amps could I expect? will it be high enough to charge Battery in city traffic? or should I make coils 50'? 60'? I have room to do any of the 3.
If I change to 18ga I can still do 3x40-45' lengths....?
I need to get @ lowest rpm... say 1000. to get 12.5 + DCV. People say magnets are weak this is my issue, 4 different covers same, tried 2 new...same. Shop confirmed magnetic wheel/Cover is A+
I know this is shooting in the dark, but not being able to post picture of stator (I have been waiting for 3 hrs, for Image Shack to send confirming Email)
David


 [/IMG]