1982 KDX250 Engine Rebuid
-
brawlingkhan
- Member
- Posts: 16
- Joined: 11:13 am Nov 16 2015
- Country:
- Location: Atlanta, GA
1982 KDX250 Engine Rebuid
Hello everyone, I recently picked up an air cooled 82 KDX250 and I have decided to completely rebuild it this winter and I need advice. The bike had a good spark when I picked it up, but it did not run. I also checked compression and it was decent at 130 PSI and after I cleaned the carbon out of the exhaust port and cylinder it tested at 155 PSI. After ultrasonically cleaning the carb and setting the float height I got it to run well for a week or so. While out riding one day the bike developed a lean condition, which lead to a runaway engine. Luckily I got the engine killed before any major damaged occurred. I think the crank seal on the flywheel side is a dry air seal, so I figured that was causing the runaway engine because I do not think it would've been anything else and no other variables changed.
Assuming the crank seals were bad, I completely disassembled the engine except for splitting the cases because I do not have a crank case splitter. When I got the top end off I poured the crank area full of premix and checked for leaks, but I do not see any. The crank does have a little play in it from side to side and I have already ordered bearings and seals. A new piston, rings and gaskets have also been ordered.
I am a little weary about splitting the cases and replacing the bearings and seals, however, I would like to learn this process instead of paying a shop to complete the work. I need guidance from someone who has completed this process. I know it is possible to freeze the bearings and heat the cases to get the bearings to complete this. Anyone know of a write up with a step-by-step guide?
-
KDX Geoff
- Supporting Member I

- Posts: 156
- Joined: 11:29 pm May 26 2013
- Country:
1982 KDX250 Engine Rebuid
l recently and with some trepidation, did my first set of crank bearings and seals.
Its a straight forward job and having just done a second set (on a different motor ) l've got it sorted with the basic tools l need and getting bearings off and on the crank and back in the cases.
I'm short for time right now but I'll take some pics and walk you through what l did on my engines before the weekend.
Cheers
Geoff
Its a straight forward job and having just done a second set (on a different motor
I'm short for time right now but I'll take some pics and walk you through what l did on my engines before the weekend.
Cheers
Geoff
-
brawlingkhan
- Member
- Posts: 16
- Joined: 11:13 am Nov 16 2015
- Country:
- Location: Atlanta, GA
1982 KDX250 Engine Rebuid
Thanks for your response. I look forward to your post and the additional information.
-
TheRadBaron
- Supporting Member II

- Posts: 267
- Joined: 10:21 pm Nov 07 2012
- Country:
Re: 1982 KDX250 Engine Rebuid
I'd highly recommend buying the correct tools before you start. I did it with subpar tools for years and caused myself a lot of headache and money on broken parts. Tusk makes a very nice (and affordable) crankcase splitting tool and another very nice crankshaft puller tool that's used to put the cases back together. I'll never do another engine without them and I wish I would have bought them years ago.
It's a bit of an investment but money very well spent.
A small engine stand will also make the job much easier. I made mine out of 2x4s with a plywood top. I cut holes in the plywood so that the various shafts and protrusions fit through the holes and allow the engine to sit flat on the outer cover gasket surfaces. Then the stand just sits on your workbench and the engine sits nice and stable on it while you assemble everything. Another highly recommended tool.
Good luck.
-
brawlingkhan
- Member
- Posts: 16
- Joined: 11:13 am Nov 16 2015
- Country:
- Location: Atlanta, GA
1982 KDX250 Engine Rebuid
Thanks RadBaron, I have had my eye on the Tusk splitter and puller. It seems like it's pretty essential to the process and I plan on ordering it tonight. I hadn't thought of making an engine stand though, that would also make this a lot easier. Do you happen to have any pictures of your design?
-
kawi_rider
- Member
- Posts: 5
- Joined: 07:17 pm Jan 05 2016
- Country:
Posting?
does anyone know how to post im new here
-
TheRadBaron
- Supporting Member II

- Posts: 267
- Joined: 10:21 pm Nov 07 2012
- Country:
Re: 1982 KDX250 Engine Rebuid
Uh, I think you figured it out.
-
kawi_rider
- Member
- Posts: 5
- Joined: 07:17 pm Jan 05 2016
- Country:
Posting?
yea if i had 1200 something posts i would be wondering how to post alsoTedh98 wrote:Yeah, I am still trying to figure that out as well.kawi_rider wrote:does anyone know how to post im new here
-
kawi_rider
- Member
- Posts: 5
- Joined: 07:17 pm Jan 05 2016
- Country:
Re: 1982 KDX250 Engine Rebuid
but how do i make a topic like to post off of?
- Tedh98
- Supporting Member II

- Posts: 1576
- Joined: 01:08 pm Mar 20 2009
- Country:
- Location: Atlanta, Georgia
- Contact:
Re: 1982 KDX250 Engine Rebuid
Go to the subforum you want to post in and hit the "new topc" button. Kind of in the top left corner.kawi_rider wrote:but how do i make a topic like to post off of?
-
KDX Geoff
- Supporting Member I

- Posts: 156
- Joined: 11:29 pm May 26 2013
- Country:
1982 KDX250 Engine Rebuid
This is how l do it and the tools l use. I'm not have any trouble doing it like this and it works for me.brawlingkhan wrote:Thanks for your response. I look forward to your post and the additional information.
I've taken pics with engine bits around the shed. This isn't one of the motors l did bearings and seals in.
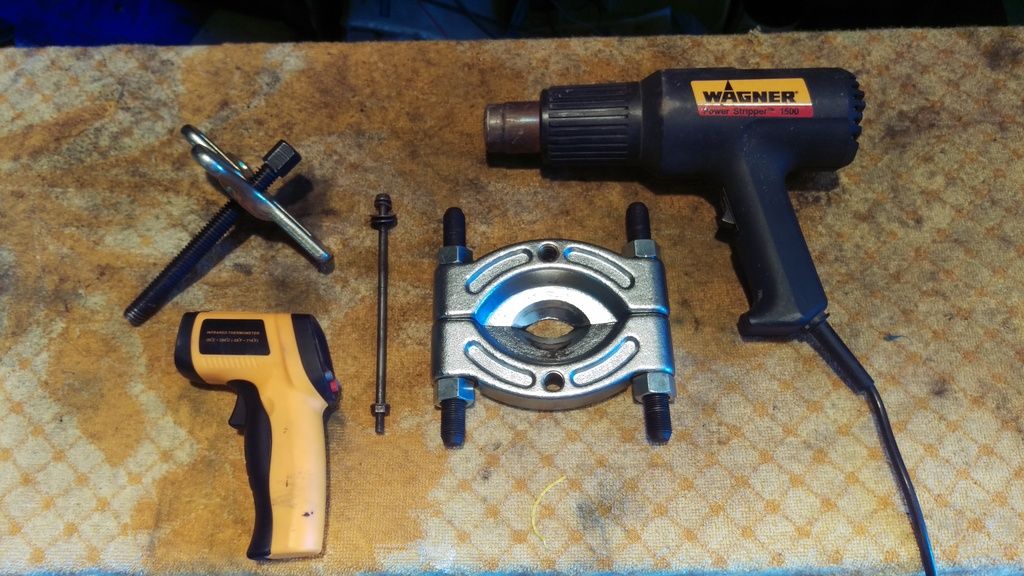
Harmonic balancer (car) puller, 2 fuel tank mounting bolts, infrared temp sensor, bearing clamp,
Separating the cases is straight forward. Both times the bearings gave come out on the crank.
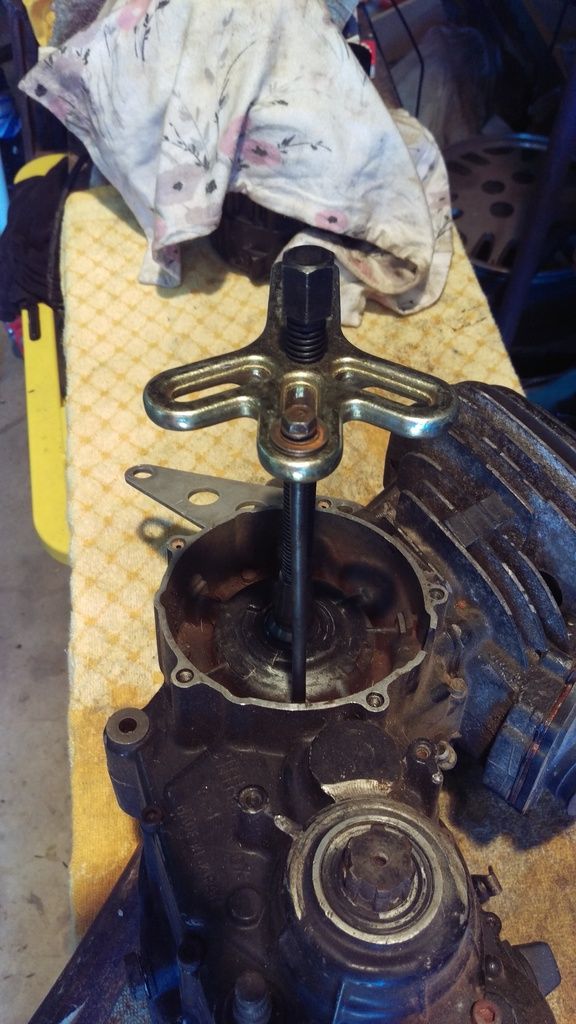
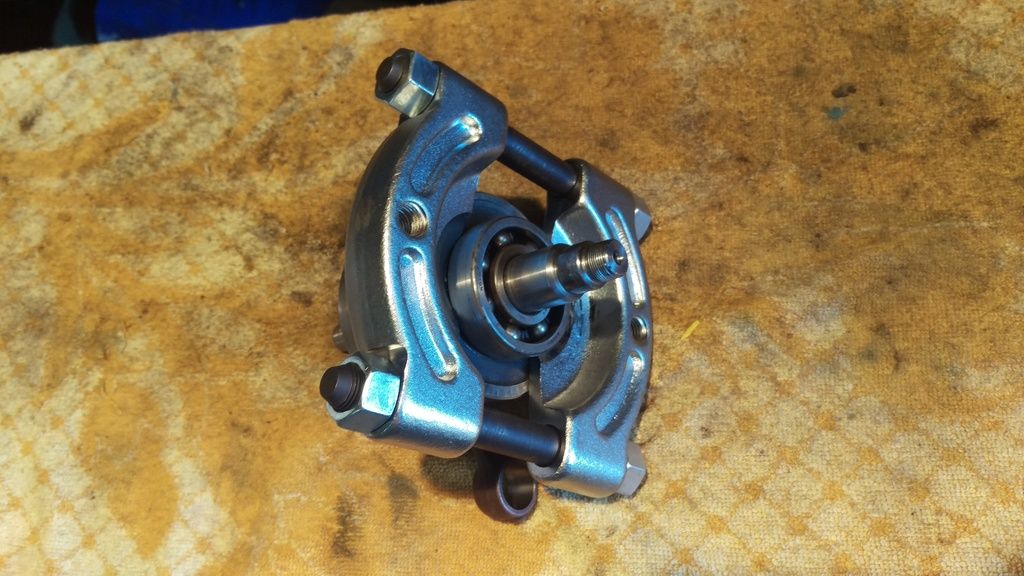
Two choices here. In a press or a gentle tap tap a tap with the hammer on the tool (not the crank end) to close the gap and push the bearing along the crank as the gap closes, it doesn't take much pressure to get the bearings off the crank
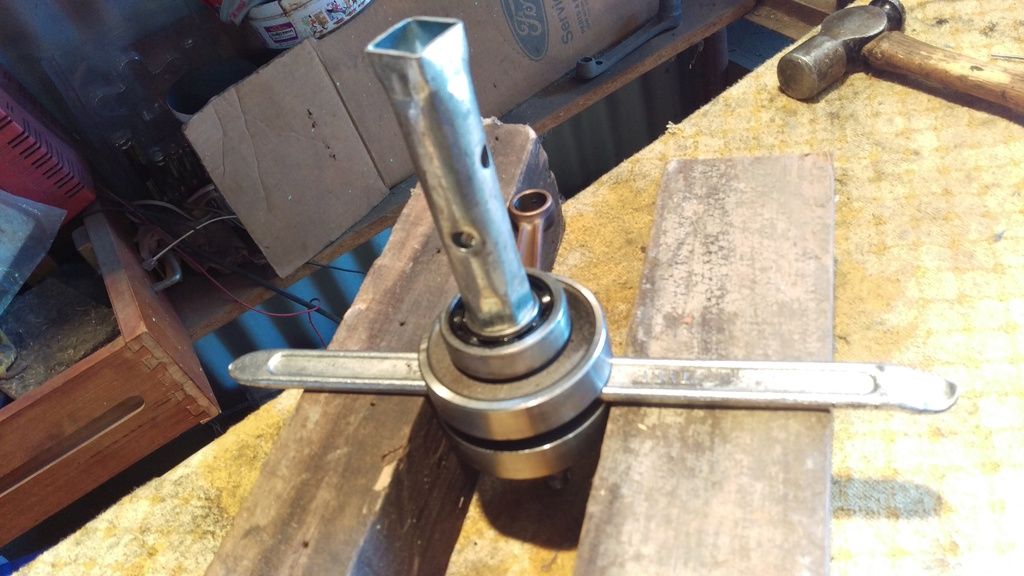
I tried fitting the bearings in the cases first but l wasn't sure they were home on the crank so I heat the bearings up a bit and tap them home on the crank first. The tapping is not going through the crank because of the tyre lever is directly under the centre where the pressure is and while they don't fall on, it take very little to tap them home.
I heat up the cases to around 80 C with the heat gun and have this large socket here to protect the seal from the extremely hot air from the heat gun.
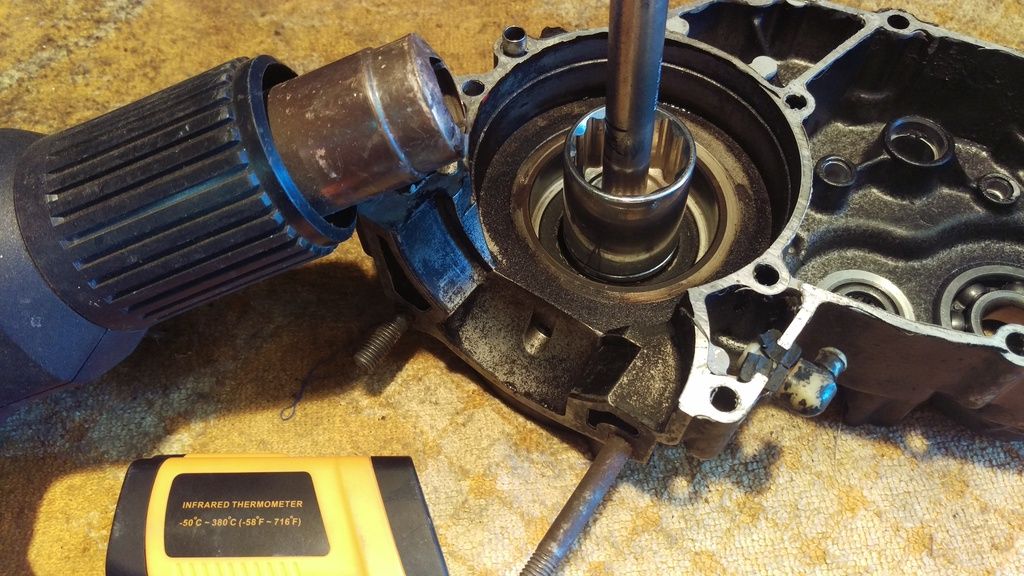
I put the crank with the new bearings in the freezer overnight. With the case at around 80 C the frozen bearing hardly needs a tap to go in and you'll hear when the bearing seats by the noise it makes when it seats in the case. I've found it only take seconds for the bearing to absorb some heat from the case and expand tight into the case.
I wrap an ice thing around the other bearing to keep it cold while l heat up the other case to fit it.
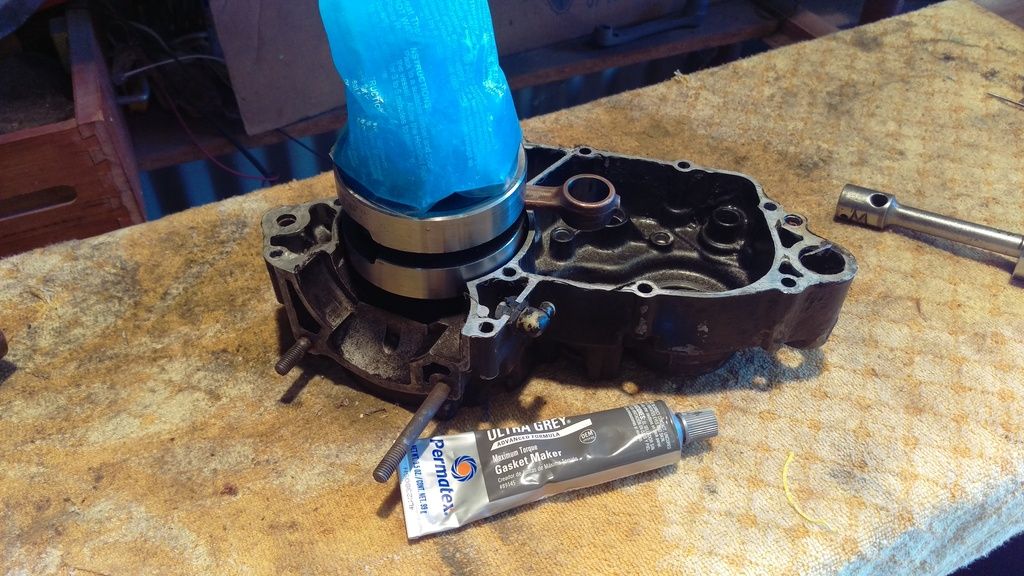
Please note the word 'tap' here. I dont have to hit anything to do this. With the heat and cold the tapping with the hammer lets me know things are home when they've been fitted. I also flat sand my cases and use the tiniest of wipes of sealer on them as there's no gasket.
-
brawlingkhan
- Member
- Posts: 16
- Joined: 11:13 am Nov 16 2015
- Country:
- Location: Atlanta, GA
1982 KDX250 Engine Rebuid
Thank you for the response, this is very helpful. Last night I used the Tusk splitter to separate the cases and when they pulled apart, shift forks dropped from out of the transmission, which I was not expecting. How do you pull the crank out from the cases? I have the tusk puller, but I have not had a chance to look at it because it arrived late in the day yesterday.
-
KDX Geoff
- Supporting Member I

- Posts: 156
- Joined: 11:29 pm May 26 2013
- Country:
1982 KDX250 Engine Rebuid
A bit of heat on the outside of the case (where the primary drive gear is) and tap tap on the end of the crank with something to protect the thread unless you have a press to do it.
I also wrap glad wrap (clear food wrap, like from the kitchen) the gearbox into the case to protect it and stop bits falling out. When I'm heating the case to put the crank back in the gearbox case, I put a piece of cardboard between the gladwrap and the heat so it doesn't melt.
I also wrap glad wrap (clear food wrap, like from the kitchen) the gearbox into the case to protect it and stop bits falling out. When I'm heating the case to put the crank back in the gearbox case, I put a piece of cardboard between the gladwrap and the heat so it doesn't melt.
-
brawlingkhan
- Member
- Posts: 16
- Joined: 11:13 am Nov 16 2015
- Country:
- Location: Atlanta, GA
Re: 1982 KDX250 Engine Rebuid
I got the crank seals and bearings in the cases and was able to heat the race of the bearing and slide the crank in. Now I am assembling the transmission and am having some difficulties... The service manual says to install the transmission in neutral and I cannot find neutral after putting the shift forks and rods in the case. The transmission appears to shift correctly, but I am unsure if I should put the cases back together with the transmission not in neutral, which is incorrect per the manual. Do you have any experience assembling the transmission and how to tell if the shift forks are in correctly? I pretty much assembled it according to how the manual is pictured, but it is not very detailed.
-
KDX Geoff
- Supporting Member I

- Posts: 156
- Joined: 11:29 pm May 26 2013
- Country:
1982 KDX250 Engine Rebuid
I've not worried about what gear the box is in when splitting cases as I've not had gearbox issues so I've left them in the case and wrapped them in place.
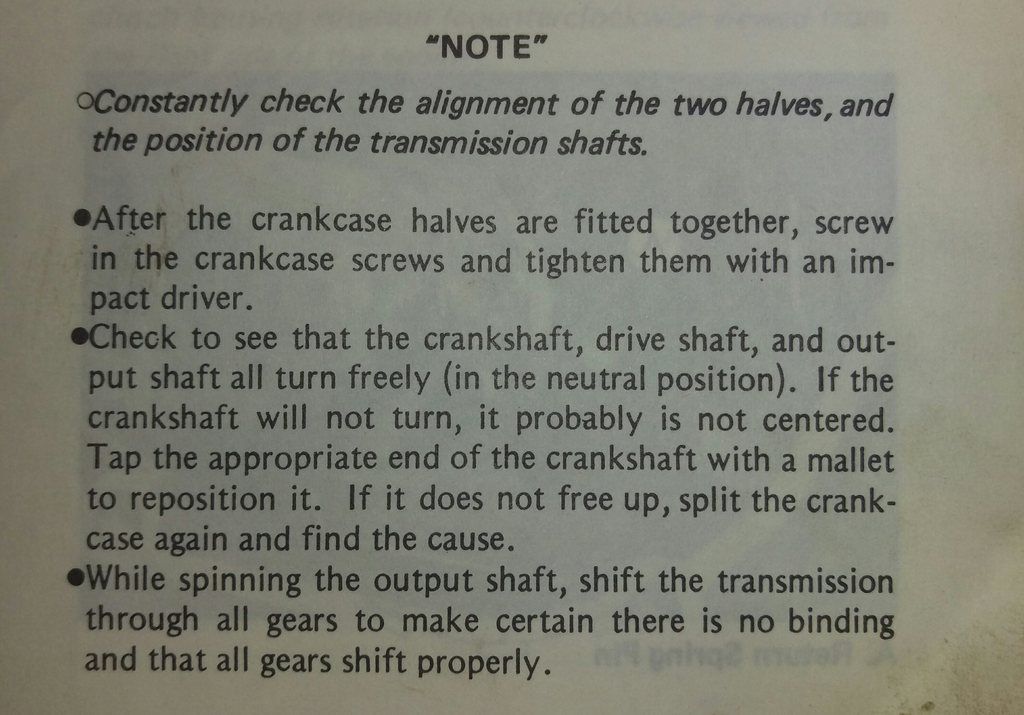
I read my manual and l dont think its critical to be in neutral. My perception is they want the box in neutral so you can check the crank rotates freely when you first put the case together.
Partzilla diagrams might help to see you've got all the bits in the box.
http://www.partzilla.com/parts/search/K ... parts.html
http://www.partzilla.com/parts/search/K ... parts.html
I read my manual and l dont think its critical to be in neutral. My perception is they want the box in neutral so you can check the crank rotates freely when you first put the case together.

Partzilla diagrams might help to see you've got all the bits in the box.
http://www.partzilla.com/parts/search/K ... parts.html
http://www.partzilla.com/parts/search/K ... parts.html
- Tedh98
- Supporting Member II

- Posts: 1576
- Joined: 01:08 pm Mar 20 2009
- Country:
- Location: Atlanta, Georgia
- Contact:
1982 KDX250 Engine Rebuid
I've been doing the same thing, except I've been using dry ice. Cooling down the crank just gives that extra little bit of clearance for it to go together every time.
-
brawlingkhan
- Member
- Posts: 16
- Joined: 11:13 am Nov 16 2015
- Country:
- Location: Atlanta, GA
1982 KDX250 Engine Rebuid
Wow, I wish I had not removed the transmission now. The cases are now back together and the transmission and crank spun freely in neutral and shifted through all gears before I put the shift pawl assembly in. When I put the shift paw in there was one ratchet paw spring that was free and compressed to hold the ratchet paw in place. The other ratchet paw spring is stuck in the compressed position and will not move freely to hold the ratchet paw. After everything was assembled back in its proper place the transmission would shift up through all six gears, however, I could not shift back down through the gears with the assembly together. I disassembled the ratchet paw and it would should down through the gears. This leads me to believe that the spring needs to be replaced and be functional so the transmission will shift properly. Do you have any idea if both springs should move freely or should one be compressed? Next task is rewinding the lighting coil and doing the timing, which I also have not completed on an engine like this previously.
Thanks for all the help with this project. I am looking forward to riding this machine.
Thanks for all the help with this project. I am looking forward to riding this machine.
-
KDX Geoff
- Supporting Member I

- Posts: 156
- Joined: 11:29 pm May 26 2013
- Country:
1982 KDX250 Engine Rebuid
I've had the situation where the shifter parts were not home properly with the side cover off and l had trouble selecting gears, started to think l had an internal problem when it was just not sitting properly and rotating the drum. Sometimes they need a bit more oil to work properly, its not dry ?
How about a pic, they're worth a thousand words I've got a 250 engine on the bench, it would take a minute to take the side cover off and have a look...
With the crank out you can close and open the cases easily and check the box is working correctly and when you're happy with it then you put the crank in.
How about a pic, they're worth a thousand words
With the crank out you can close and open the cases easily and check the box is working correctly and when you're happy with it then you put the crank in.
-
brawlingkhan
- Member
- Posts: 16
- Joined: 11:13 am Nov 16 2015
- Country:
- Location: Atlanta, GA
Re: 1982 KDX250 Engine Rebuid
http://s1318.photobucket.com/user/brawl ... /slideshow
If you click on the link it should take you to pictures of the bike. In the 3rd picture there is a fiche of the shift mechanism and I think the issue with the bike shifting lies with the shift pawl spring, which is number 18-19 in the picture. If you look at image number 4, the pawl spring is stuck in the compressed position and I am not sure if this is correct. I would not assume so, because it does have a spring. I also put a few pictures of the work so far, including the new bearings and seals installed.
If you click on the link it should take you to pictures of the bike. In the 3rd picture there is a fiche of the shift mechanism and I think the issue with the bike shifting lies with the shift pawl spring, which is number 18-19 in the picture. If you look at image number 4, the pawl spring is stuck in the compressed position and I am not sure if this is correct. I would not assume so, because it does have a spring. I also put a few pictures of the work so far, including the new bearings and seals installed.

