Hi everyone, this is my first post on the forum. Last year I bought a '93 KDX 200. I took went out with the bike once and it ran great.
After that run I noticed that the bike had losts its power, so I decided to do a top end rebuild. I disassembled the top end and found that the right side vavle was broken and the left one was not even there. The center valve was de only one working properly.
I went online and found a pair of aluminium aftermarket valves for my bike, I live in Argentina so original valves are hard to find. They are very well built and fit perfectly on the bike. The problem is that they don't have any markings at all, no punch marks for timing and no groove for right side valve. I could figure out which valve goes where, but I don't know how to time them with out the punch marks. Could any one tell me on which toothe of the gear the punch mark goes using the lowest point of the opening as a reference? or tell me some other way of timing the valves without using the punch marks.
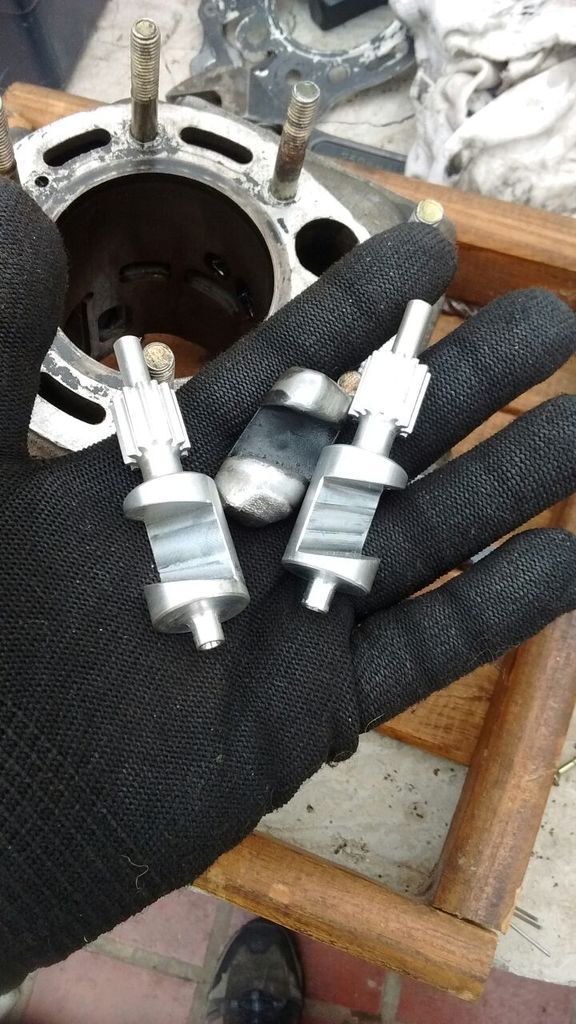
Here is a picture of the old valve that the bike had and the new aluminium ones I found.
KDX 200 KIPS question
-
- Member
- Posts: 2
- Joined: 02:07 pm Jun 16 2016
- Country: Argentina
- bufftester
- Platinum Member
- Posts: 3461
- Joined: 06:03 pm Oct 31 2012
- Country: USA
- Location: University Place, WA
Re: KDX 200 KIPS question
This link KIPS Valve has a good breakdown of the reassembly. The way you're holding them in the picture above is correct as far as left and right valves.
Using the mark on the actuator rod lay the left valve on a flat surface and rotate it so the cutout portion is facing to the right. Then mark the gear at the point in line with the mark on the rod. This is the valve open position (you install the valves in the open position initially)
idler gear is set with the flat part on the bottom, then align the right valve so that the cut out part is facing the left and mark the gear accordingly. Once installed you can verify they are correct by sliding the actuator rod all the way in (CLOSED) and look through the exhaust ports in the cylinder and verify they are closed.
Last edited by bufftester on 11:55 pm Nov 27 2017, edited 1 time in total.
-
- Member
- Posts: 2
- Joined: 02:07 pm Jun 16 2016
- Country: Argentina
Re: KDX 200 KIPS question
Thanks for clearing this up for me. It is exactly what I needed. Sorry for the late reply
-
- Member
- Posts: 5
- Joined: 06:08 am Nov 24 2017
- Country: USA
KDX 200 KIPS question
Bufftester, do you have the KIPS reassembly/timing pictures available somewhere else? The Photobucket won't let me view them, not available. I'm finishing up a 1991KX125/1990KX200 hybrid and my new steel Kips valves will be here today or real soon.
- bufftester
- Platinum Member
- Posts: 3461
- Joined: 06:03 pm Oct 31 2012
- Country: USA
- Location: University Place, WA
Re: KDX 200 KIPS question
The first link in my post above has a great visual on it
This link KIPS Valve has a good breakdown of the reassembly.
-
- Member
- Posts: 14
- Joined: 05:46 pm Aug 17 2017
- Country: Portugal
Re: KDX 200 KIPS question
Just finished installing my KIPS valves, thank you guys for the link as it was truly helpful - the manual does not even mention the hard part of installing and setting up the main valve, wtf?? Here are some more pictures of the valves when OPEN (rod fully out to the stop) as they are always not enough :)bufftester wrote:The first link in my post above has a great visual on it
This link KIPS Valve has a good breakdown of the reassembly.
Sent from my Mobile using Tapatalk